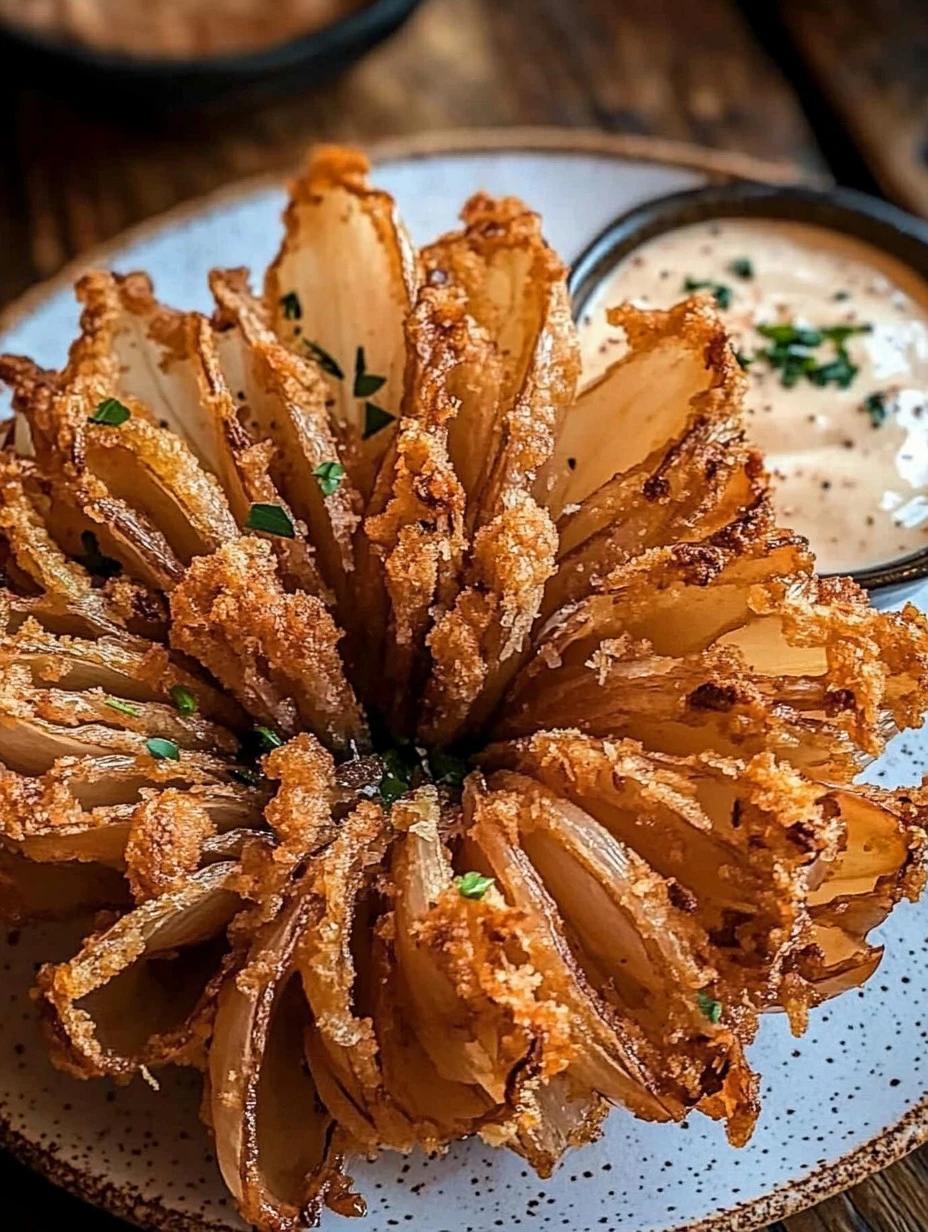
Every time I make this Airfryer Blooming Onion, my heart fills with nostalgia. I can still recall the first time I tried one at a local fair, the way the crispy outer layer cracked open to reveal the tender onion inside. The smell wafting through the air was irresistible, and the excitement of sharing it with friends was something I wanted to recreate in my own kitchen. Now, every time I whip up this delightful dish, it reminds me of those joyful moments, bringing warmth and smiles to my family. I promise, once you try making this at home, you’ll find the same comfort I do!
How to make Airfryer Blooming Onion
Ingredients: To make your Airfryer Blooming Onion truly shine, you’ll need the following ingredients:
-
1 large onion: The star of the show! Choose a big, sweet onion, like Vidalia or Walla Walla, for a wonderful flavor.
-
1 cup all-purpose flour: This helps form that crispy coating we all love.
-
1 teaspoon paprika: Adds a lovely smoky flavor and a pop of color.
-
1 teaspoon garlic powder: Because everything is better with garlic!
-
1 teaspoon onion powder: To enhance that onion flavor—it’s like a flavor booster.
-
1/2 teaspoon cayenne pepper: Just a little kick to spice things up, but you can adjust it to your taste.
-
1 cup buttermilk: This is what makes the onion tender and juicy—trust me!
-
1 cup breadcrumbs: For the crunchiest exterior.
-
Cooking spray or oil for greasing: Helps everything crisp up nicely in the air fryer.
Personal note: I love adding fresh herbs like rosemary—it makes the onion smell and taste amazing! You can even mix in some grated Parmesan cheese to the breadcrumbs for added flavor.
Cooking Steps:
-
Preheat the Air Fryer: First, we need to get that air fryer warmed up! Preheat it to 350°F (175°C). Trust me, this is key for that crispy finish!
-
Prepare the Onion: Carefully cut the bottom off the onion and remove the outer skin. Place it cut side down on a cutting board. Now, this is the fun part! Using a sharp knife, make 12 vertical cuts into the onion about 1 inch apart, but be cautious not to cut all the way through the root.
-
Make the Dredging Mixture: In a bowl, mix together the flour, paprika, garlic powder, onion powder, and cayenne pepper. This is where the magic of flavor begins!
-
Dip in Buttermilk: Take the prepared onion and dip it first into the buttermilk, making sure it’s well coated. This helps the flour mixture stick beautifully.
-
Coat with the Flour Mixture: Next, sprinkle the flour mixture all over the onion, ensuring every bit is coated. Get in there and have fun!
-
Into the Buttermilk Again: For extra crispiness, dip that coated onion back into the buttermilk.
-
Breadcrumb Coating: Now it’s time to coat the onion in the breadcrumbs. Make sure it’s well covered—don’t be shy!
-
Grease the Air Fryer Basket: Lightly spray the air fryer basket with cooking spray or use some oil to grease it. This will help keep the onion from sticking and ensure a perfect golden-brown finish.
-
Place the Onion Inside: Carefully place the prepared onion into the air fryer basket, cut side up, and give it a light spray of cooking oil on top.
-
Air Fry the Onion: Cook in the air fryer for about 15-20 minutes, or until it’s golden brown and crispy. Check it halfway through and give it a little shake for even cooking.
-
Serving Time: When the onion is done, take it out and let it cool for a minute. Serve it up with your favorite dipping sauce, and watch everyone’s eyes light up!
Why I Love Making This Dish: I adore making this Airfryer Blooming Onion because it’s not just about the delicious taste; it evokes the feeling of joy and togetherness. I can clearly see my family gathering around the table, eagerly reaching for the crispy petals, dipping them in creamy ranch sauce, and sharing laughs—those moments are priceless. It brings the family closer, and nothing beats the joy of seeing everyone enjoy a dish that I’ve made with love.
What You’ll Need: The primary tool you’ll need is an air fryer, of course! If you don’t have one, I highly recommend getting one. It’s such a game-changer in the kitchen. Having a good cutting board and a sharp knife also helps make the preparation easier.
Step-by-Step Guide:
- First, preheat the oven to 350°F. Trust me, this is key for that crispy skin!
- Cut the bottom off the onion and remove the outer skin.
- Make vertical cuts to create the blooming effect.
- Mix and coat with the flour, then the buttermilk, and finally the breadcrumbs.
- Follow the frying instructions closely and enjoy the aroma wafting through your kitchen!
Tips for Perfect Results: To achieve the crispiest onion, consider these tips I’ve picked up over the years:
- Make sure to use a generous amount of cooking spray for that perfect crunch.
- If you like it extra spicy, add a bit more cayenne pepper to the flour mixture.
- Experiment with different types of breadcrumbs—seasoned or panko breadcrumbs can add lovely variations in texture and flavor.
Serving Suggestions and Sides: When it comes to serving your Airfryer Blooming Onion, I love pairing it with a homemade dipping sauce. Ranch dressing is always a hit in my house, but you can also try a spicy mayo or even a bleu cheese dip if you’re feeling adventurous. As for sides, think about serving this onion with a fresh garden salad, crispy french fries, or even some grilled vegetables to balance out the meal.
Leftovers: Oh, if you happen to have leftovers (which is rare in my household), storing them is super easy! Just place them in an airtight container in the fridge. When you’re ready to enjoy them again, pop them back into the air fryer at 350°F for about 5 minutes to reheat and restore that crispy goodness!
FAQ Section:
-
Can I use a different type of onion? You can, but using a sweet onion really elevates the taste. I’ve also tried this with red onions, and it turned out delicious, too!
-
What can I dip the onion in? The sky’s the limit! Ranch dressing is my go-to, but you can also try honey mustard, barbecue sauce, or even a tangy yogurt dip.
-
Can I make this ahead of time? I recommend preparing the onion and storing it in the fridge (without cooking) if you want to get a head start. Just coat it, cover it, and then pop it in the air fryer when you’re ready!
This dish has become a favorite in my house, and I’m so excited for you to try it. I know you’ll love it as much as I do! The crispy, tender onion paired with your favorite sauce is such a treat, you might even want to make it for every family gathering! Let me know how it turns out, and if your family asks for seconds, just like mine does every time, you’ll know you’ve hit a home run!
Airfryer Blooming Onion
Ingredients
Main Ingredients
- 1 large onion Choose a big, sweet onion like Vidalia or Walla Walla.
- 1 cup all-purpose flour Forms the crispy coating.
- 1 teaspoon paprika Adds smoky flavor.
- 1 teaspoon garlic powder Enhances flavor.
- 1 teaspoon onion powder Boosts onion flavor.
- 1/2 teaspoon cayenne pepper Adjust to taste for spiciness.
- 1 cup buttermilk Makes the onion tender.
- 1 cup breadcrumbs For crunch.
- cooking spray or oil for greasing Helps achieve a crispy texture.
Optional Additions
- fresh herbs like rosemary For added aroma and flavor.
- grated Parmesan cheese Mix with breadcrumbs for extra flavor.
Instructions
Preparation
- Preheat the Air Fryer to 350°F (175°C).
- Cut the bottom off the onion and remove the outer skin. Place it cut side down on a cutting board.
- Make 12 vertical cuts into the onion about 1 inch apart, without cutting through the root.
Dredging and Coating
- In a bowl, mix together the flour, paprika, garlic powder, onion powder, and cayenne pepper.
- Dip the onion into the buttermilk, ensuring it's well coated.
- Sprinkle the flour mixture all over the onion, ensuring every bit is coated.
- For extra crispiness, dip the coated onion back into the buttermilk.
- Coat the onion in the breadcrumbs, ensuring it's well covered.
Cooking
- Lightly spray the air fryer basket with cooking spray or use oil to grease it.
- Place the prepared onion into the air fryer basket, cut side up, and spray lightly with cooking oil.
- Cook in the air fryer for about 15-20 minutes, or until golden brown and crispy, shaking halfway through for even cooking.
Serving
- Let the onion cool for a minute before serving with your favorite dipping sauce.