Every time I make this Banana Cream Pie, it reminds me of the warmth of family gatherings on lazy summer afternoons. The first time I baked this delightful treat, my grandchildren were visiting, and the way their eyes lit up when they took their first bites is a memory I’ll cherish forever. The sweet aroma of ripe bananas mingled with the creamy vanilla filling and the buttery crust filled my kitchen, creating a warm and inviting atmosphere. I could hear the laughter and chatter as they devoured each slice, and I knew—I had to share this sweet treasure with all of you. As you make this Banana Cream Pie, I hope it brings you the same joy and comfort it brings to my home!
How to make Banana Cream Pie
Ingredients:
- Graham cracker crumbs: These give our pie its fabulous crust! You could even crush up some vanilla wafers if you prefer a different flavor.
- Butter: What’s a crust without butter? It adds richness and helps bind everything together.
- Sugar: A little sweetness goes a long way, especially in our crust!
- Milk: Whole milk is best for that creamy pudding—it makes every bite divine.
- Egg yolks: These add richness and help thicken our pudding to perfection.
- Vanilla extract: Don’t skimp on the vanilla! It brings a lovely depth to the flavors and is essential for that classic banana cream taste.
- Fresh bananas: The star of our pie! Use ripe bananas for maximum sweetness.
- Heavy cream: For a lightened up whipped topping—it elevates the pie wonderfully!
- Powdered sugar: Just a touch to sweeten our whipped cream.
Let’s get started with the cooking steps—it’s easier than you think!
Step 1: Preheat the oven First, preheat your oven to 350°F (175°C). Trust me, this is key for that crispy crust! A warm oven will help our crust bake beautifully.
Step 2: Make the crust In a mixing bowl, combine graham cracker crumbs, melted butter, and sugar. Mix it all together until the crumbs are well coated and resemble wet sand.
Step 3: Press into the pie dish Press this mixture firmly into the bottom and up the sides of a 9-inch pie dish. I like to use the bottom of a measuring cup to get it nice and even. Bake this for about 10 minutes, then let it cool.
Step 4: Prepare the pudding While your crust is cooling, let’s make that delicious pudding! In a saucepan, heat milk over medium heat. In a separate bowl, whisk together egg yolks and sugar until smooth.
Step 5: Mix the hot milk As the milk begins to steam (but not boiling!), gradually pour it into your egg mixture, whisking constantly. This step is crucial—if you add the hot milk too quickly, you might end up with scrambled eggs, and we don’t want that!
Step 6: Thicken the pudding Return this mixture to the saucepan and cook it over medium heat, stirring frequently until it thickens, about 5-7 minutes. You’ll know it’s ready when it coats the back of a spoon.
Step 7: Add flavor Once thickened, remove from heat and stir in vanilla extract. Let this cool slightly.
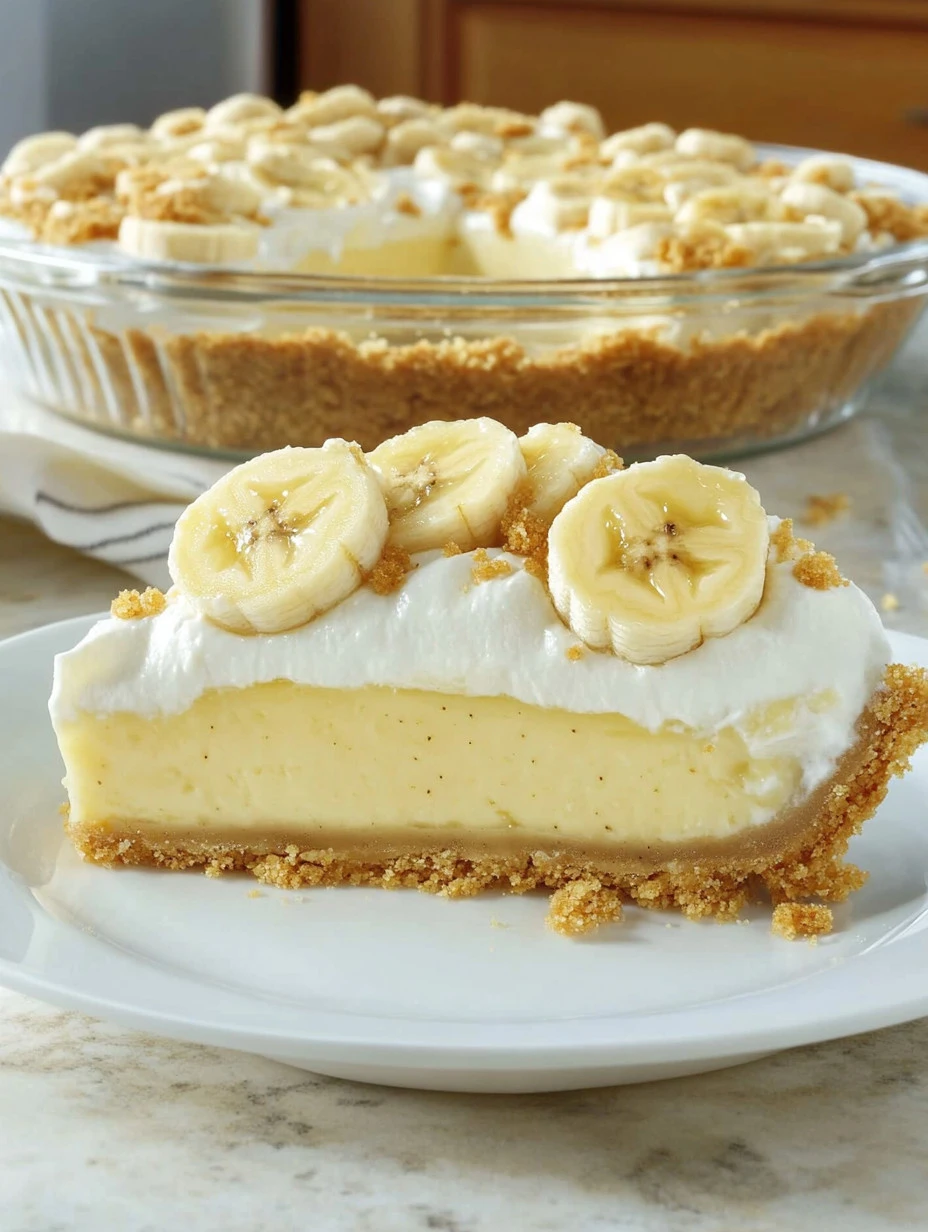
Step 8: Assemble the pie Now comes the fun part! Slice your fresh bananas and layer them evenly over the cooled pie crust. Pour the pudding mixture over the bananas, smoothing it out with a spatula.
Step 9: Whip the cream In a mixing bowl, whip heavy cream with powdered sugar until soft peaks form. Gently spread this whipped cream over the top of the pudding layer.
Step 10: Chill Cover the pie and let it chill in the refrigerator for at least 2 hours. I know, waiting is the hardest part, but it’s worth it!
Step 11: Serve and enjoy When you’re ready to serve, slice yourself a generous piece, and watch everyone’s faces light up with joy.
Why I Love Making This Dish: Banana Cream Pie holds a special place in my heart. Growing up, my mother made it for special occasions, and it was a treat I always looked forward to. The combination of bananas, cream, and a buttery crust creates a delectable harmony that uplifts my spirits. When I bake this pie, it feels like a hug from the past, reminding me of the love and care my family shares.
What You’ll Need: For this recipe, you’ll need some basic kitchen tools: a mixing bowl, a pie dish, a whisk, and a saucepan. I always recommend having a good quality spatula for smoothing out your filling. It makes the process easier and ensures your pie looks beautiful!
Tips for Perfect Results:
- For a crust that’s extra crispy, bake it a bit longer but be careful not to burn it.
- Use ripe bananas—the kind with a few brown spots are perfect for that natural sweetness.
- Don’t skip chilling the pie! It helps set everything beautifully, and the flavors meld together perfectly.
Serving Suggestions and Sides: This pie is a delightful standalone dessert, but it pairs wonderfully with a scoop of vanilla ice cream or a drizzle of chocolate sauce. Fresh berries on the side add a lovely burst of color and contrast beautifully with the creamy pie.
Leftovers: If you find yourself with leftovers (which, let’s be honest, can be rare!), simply cover the pie with cling wrap and place it in the refrigerator. It’ll stay fresh for a couple of days. To enjoy, just slice and serve cold—it’s just as delicious!
FAQ Section: Can I use other types of cookies for the crust? Absolutely! I love experimenting with different cookie flavors. Vanilla wafers or even chocolate cookies can make for a delicious twist.
What if I don’t have fresh bananas? While fresh bananas are key for this recipe, you could use banana purée as an alternative, though the texture won’t be quite the same.
Can I make this pie in advance? You can definitely make the pie a day ahead! Just cover it well with plastic wrap and keep it chilled in the fridge.
Conclusion: I’m so excited for you to try making this Banana Cream Pie. It’s easy, delicious, and packed with love. I know you and your family are going to love this sweet, nostalgic treat as much as I do! The smiles on your loved ones’ faces when they take a bite will make it all worthwhile. Remember to let me know how it turns out; I can’t wait to hear your stories and see your pies! Happy baking!

Banana Cream Pie
Ingredients
For the crust
- 1 cup Graham cracker crumbs You could also use crushed vanilla wafers.
- 1/2 cup Butter, melted Essential for richness.
- 1/4 cup Sugar Adds a hint of sweetness.
For the pudding
- 2 cups Whole milk Best for creamy pudding.
- 3 large Egg yolks Help thicken the pudding.
- 1/2 cup Sugar
- 1 teaspoon Vanilla extract Key for classic flavor.
- 3 ripe Fresh bananas Use bananas with brown spots for sweetness.
For the topping
- 1 cup Heavy cream For whipping.
- 2 tablespoons Powdered sugar To sweeten whipped cream.
Instructions
Preparation
- Preheat your oven to 350°F (175°C).
- In a mixing bowl, combine graham cracker crumbs, melted butter, and sugar. Mix until well coated.
- Press this mixture firmly into a 9-inch pie dish and bake for about 10 minutes. Let it cool.
- In a saucepan, heat milk over medium heat. In a bowl, whisk together egg yolks and sugar until smooth.
- Gradually pour the hot milk into the egg mixture while whisking constantly.
- Return the mixture to the saucepan and cook over medium heat, stirring frequently until thickened, about 5-7 minutes.
- Remove from heat, stir in vanilla extract, and let it cool slightly.
- Slice fresh bananas and layer them over the cooled pie crust. Pour the pudding mixture over the bananas.
- Whip heavy cream with powdered sugar until soft peaks form. Spread this whipped cream over the pudding layer.
Chill and Serve
- Cover the pie and let it chill in the refrigerator for at least 2 hours before serving.
- When ready to serve, slice and enjoy the joy it brings to your family.