
Every time I make this Better Than Sex Cake, it brings back sweet memories of family gatherings and those delightful evenings spent around the dinner table, laughing and sharing stories. The scent of chocolate wafting through my kitchen transports me back to simpler times when my children were young and our home was filled with the sounds of their laughter. I remember making this cake for my best friend’s birthday one year—it was met with such rave reviews that I knew I had found a real gem of a recipe. If you’ve never tried this cake, trust me when I say it’s an experience in itself! The combination of rich chocolate, creamy layers, and a hint of caramel will leave you feeling warm inside and may even spark a few memories of your own. I can’t wait for you to try it, and I hope it makes you feel just as good as it does for me!
How to make Better Than Sex Cake
Ingredients:
- 1 box chocolate cake mix: This is the heart of your cake. It brings that delightful chocolate flavor that everyone loves.
- Water (as required on the box): Necessary for mixing with the cake mix to create that soft, moist cake.
- Oil (as required on the box): This adds moisture that keeps the cake tender and delicious.
- Eggs (as required on the box): Eggs help bind ingredients and add richness to your cake.
- 1 can (14 oz) sweetened condensed milk: This is where the magic happens—working its way into those holes we poke in the cake, creating sheer bliss.
- 1 jar (12 oz) caramel topping: Who can resist the gooey sweetness of caramel? It adds a wonderful layer of flavor that pairs perfectly with chocolate.
- 1 (8 oz) container whipped topping, thawed: Think of this as the fluffy cloud on top of your cake. It lightens everything up.
- 1 cup toffee bits: These give a nice crunch and candy-like texture, making each bite delightful.
- 1/2 cup mini chocolate chips: Because we can never have too much chocolate!
How to make it is as thrilling as it is easy.
Step-by-Step Guide:
- Preheat your oven: Start by preheating your oven according to the instructions on the cake mix package. This is key for a perfectly baked cake.
- Grease and flour your baking dish: Greasing and flouring a 9×13 inch baking dish ensures your cake slides out easily when it’s done.
- Prepare the chocolate cake: Follow the package directions to make your cake batter. It’s as simple as mixing the ingredients together!
- Pour the batter into the prepared baking dish: Make sure to spread it evenly for uniform baking.
- Bake the cake: Place your dish in the oven and bake as directed. The smell will begin to fill your kitchen, which is my favorite part!
- Poke holes: Once your cake is baked and still warm, take a wooden spoon or a skewer and poke holes all over the top. The more holes, the better it soaks up that deliciousness!
- Pour sweetened condensed milk: Gently pour the sweetened condensed milk over the cake, making sure to fill those holes. You’ll see it gradually soak in, and this is where the magic starts.
- Drizzle caramel topping: Now, add the caramel topping evenly over the top. Trust me, this step is crucial—caramel makes everything better!
- Cool on a wire rack: Allow the cake to cool completely in the pan before adding the topping—this usually takes about 30 minutes.
- Spread the whipped topping: Once it’s cooled, grab your whipped topping and spread it evenly over the top. This adds a lovely lightness that balances the richness of the cake.
- Sprinkle with toppings: Now, sprinkle your toffee bits and mini chocolate chips all over the whipped topping. This adds the perfect crunch and flavor burst!
- Chill: Finally, refrigerate your cake for at least 4 hours or overnight. This allows all those flavors to meld beautifully together.
Tips for Perfect Results:
- I always recommend using high-quality chocolate cake mix. It gives you the best flavor and texture. You want your cake to wow everyone, after all!
- If you want a touch of uniqueness, try adding a splash of vanilla extract to the whipped topping. It adds an extra layer of flavor without being overpowering.
- The longer you let the cake chill, the better it tastes; overnight is ideal, but at least give it a solid 4 hours!
Serving Suggestions and Sides: You can serve this cake on its own, but I love pairing it with a scoop of vanilla ice cream. The cold creaminess complements the rich cake beautifully. Another favorite of mine is fresh berries—raspberries or strawberries cut, sprinkled with a bit of sugar to release their juices, are fantastic! You could also consider a drizzle of chocolate sauce on the plate for that finishing touch.
Leftovers: Now, if you have any leftovers (which is a big if in my household!), simply cover the cake tightly with plastic wrap to keep it fresh. Store it in the fridge. When you’re ready to indulge again, just take a slice straight from the fridge. If you want, you can pop it in the microwave for a few seconds to gently warm it up—but believe me, it’s delicious chilled, too!
FAQ Section: Can I use a different flavor cake mix? Absolutely! While chocolate is the classic choice, a vanilla or red velvet cake mix can also work nicely. It may alter the overall flavor, but it can still be delicious!
Does it matter if I use homemade whipped cream? You can certainly use homemade whipped cream if you’re up for it! It adds a lovely freshness, and you can control the sweetness, which I love. Just make sure to whip it to stiff peaks so it holds up.
Can I make this cake in advance? Yes! This cake is perfect for making a day ahead of time. In fact, letting it sit in the fridge overnight allows the flavors to develop even more!
Better Than Sex Cake has become one of my family’s favorites, and I’m so excited for you to try it! The combination of flavors and textures creates an experience that is truly irresistible. I can’t wait to hear how it turns out for you! You’re going to love how easy it is to make and, most importantly, how delicious it is. And if your family asks for seconds like mine does every time, you’ll know you hit the sweet spot! Let me know how they react, and enjoy every bite!
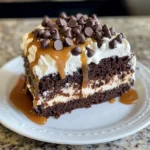
Better Than Sex Cake
Ingredients
For the Cake
- 1 box chocolate cake mix This is the heart of your cake. It brings that delightful chocolate flavor that everyone loves.
- as required on the box Water Necessary for mixing with the cake mix to create that soft, moist cake.
- as required on the box Oil This adds moisture that keeps the cake tender and delicious.
- as required on the box Eggs Eggs help bind ingredients and add richness to your cake.
For the Toppings
- 1 can (14 oz) sweetened condensed milk This is where the magic happens—working its way into those holes we poke in the cake.
- 1 jar (12 oz) caramel topping Adds a wonderful layer of flavor that pairs perfectly with chocolate.
- 1 container (8 oz) whipped topping, thawed Think of this as the fluffy cloud on top of your cake.
- 1 cup toffee bits Give a nice crunch and candy-like texture.
- 1/2 cup mini chocolate chips Because we can never have too much chocolate!
Instructions
Preparation and Baking
- Preheat your oven according to the instructions on the cake mix package.
- Grease and flour a 9x13 inch baking dish.
- Follow the package directions to prepare your chocolate cake batter.
- Pour the batter into the prepared baking dish and spread it evenly.
- Bake the cake as directed and enjoy the smell filling your kitchen.
- Once baked, poke holes all over the top of the warm cake with a wooden spoon or skewer.
- Gently pour the sweetened condensed milk over the cake, filling the holes.
- Drizzle the caramel topping evenly over the cake.
- Allow the cake to cool completely in the pan for about 30 minutes.
Final Touches
- Spread the whipped topping evenly over the cooled cake.
- Sprinkle with toffee bits and mini chocolate chips.
- Chill the cake in the refrigerator for at least 4 hours or overnight.