
Every time I make this Cheese Ball, it reminds me of those cozy gatherings we used to have in our living room, where laughter filled the air and friends would drop by unexpectedly just to share a moment together. The first time I made this delightful treat, my friend Sarah stopped by to catch up, and as the aroma of the cheeses wafted through the kitchen, she couldn’t help but say, “What is that wonderful smell?” Little did I know that this simple recipe would soon become a staple for our get-togethers. The smell alone brings back memories of warmth and comfort, and I know once you try it, you’ll feel the same way. It’s a perfect appetizer—great for parties, family get-togethers, or even just a casual Saturday night at home. So, let’s dive into how to make this delicious Cheese Ball that will have everyone coming back for more!
How to make Cheese Ball
Ingredients: Let’s have a look at what you’ll need to whip up this scrumptious Cheese Ball. Here’s the list:
- 8 oz cream cheese: This is the base of our cheese ball and gives it that rich, creamy texture. Make sure it’s softened so it mixes beautifully.
- 1 cup sharp cheddar cheese: This cheese not only adds a fantastic flavor but also that cheesy goodness we all crave.
- 3-4 green onions: Chopped finely, they add a refreshing crunch and a mild onion flavor that makes everything better.
- 1-2 teaspoons of your favorite spices: You can get creative here! I usually opt for garlic powder and pepper, but don’t be afraid to experiment.
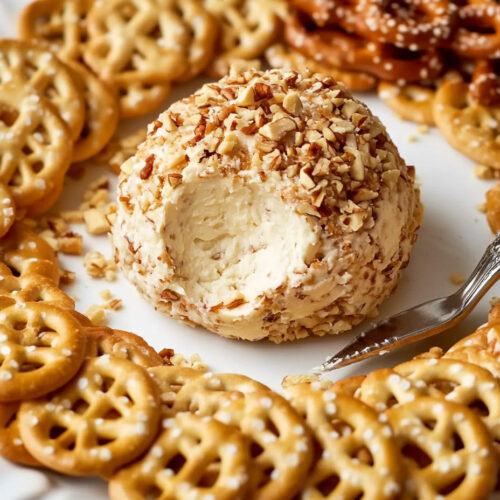
- 1 cup chopped pecans: These will give our cheese ball a lovely coating and a nice crunch.
- Assorted dippers: I love serving this with crackers, pretzel crisps, apple slices, and maybe some vegetable sticks to balance out the cheese!
How to Prepare Your Cheese Ball
Preparation is super easy! Let’s break it down step-by-step so you can enjoy this treat in no time.
-
Mixing the Cheeses: In a large mixing bowl, combine the softened cream cheese and sharp cheddar cheese. I find it’s best to use a fork to mash them together until you’ve got a smooth texture. If you have a hand mixer, that works wonders, too!
-
Flavor It Up: Next, toss in the chopped green onions and your spices. Give it a good mix until everything is combined. At this stage, I always take a little taste—the joy of cooking, right? Adjust the seasoning if you feel it needs a little something extra.
-
Shape It Like a Ball: Once everything is well mixed, I like to get my hands a bit messy. Scoop out the mixture and mold it into a ball shape. It doesn’t have to be perfect! Just round enough so it can be rolled in the pecans easily.
-
Roll in Pecans: Now for the fun part! Spread the chopped pecans on a plate and roll your cheese ball in them until it’s fully coated. This gives it such a nice crunch and adds that lovely nutty flavor.
-
Chill It: Place the cheese ball on a serving platter and cover it with plastic wrap. Pop it in the refrigerator for at least an hour. This allows the flavors to meld together nicely, and it firms up perfectly for serving.
-
Serve and Enjoy: Finally, take it out of the fridge when you’re ready to serve. I like to arrange some assorted dippers around it on the platter. Trust me, when people see it, they won’t be able to resist!
Why I Love Making This Dish What makes this Cheese Ball special for me goes beyond the delicious taste—it’s about sharing moments with friends and family. I can still remember the first time I made it for a holiday gathering and watching my grandchildren dive into it, their faces lighting up with joy. The conversations that flowed, the laughter shared, and the memories created are priceless. It’s truly a recipe that brings people together, making any occasion a little brighter and a lot tastier.
What You’ll Need: Aside from the ingredients mentioned, you will only need a few basic kitchen tools:
- A mixing bowl
- A fork or hand mixer
- Plastic wrap for chilling
- A serving platter
Step-by-Step Guide:
- Preheat your heart and kitchen as you gather your ingredients.
- In your mixing bowl, combine the cream cheese and cheddar.
- Add the green onions and spices to the cheese mixture.
- Shape it into a ball with your hands, bringing all those yummy ingredients together.
- Roll your cheese ball in the pecans and cover it well.
- Chill in the fridge to develop the amazing flavors.
- Set it out with your favorite dippers and watch it disappear!
Tips for Perfect Results: Here are a few tricks I’ve learned over the years that’ll help you whip up the perfect cheese ball:
- Let the cream cheese sit at room temperature for at least 30 minutes before mixing. This makes it easier to blend.
- For a little zing, try adding some grated cheese like Parmesan or a splash of Worcestershire sauce to the mix.
- If you’re not a fan of pecans, you can substitute them with chopped walnuts or even crispy bacon bits for a fun twist!
Serving Suggestions and Sides: When it comes to serving, I always love to put out a variety of dippers. Besides crackers and pretzel crisps, consider apple slices for a refreshing crunch or some colorful veggie sticks like carrots and bell peppers. You could even add a nice dip variety—like hummus or a sour cream dip—to give more choices. This way, everyone can create their own little flavor combinations.
Leftovers: Ah, leftovers! If you’re lucky enough to have some cheese ball left, you can store it tightly covered in the fridge for about 3 days. I have found that it tastes just as good the next day, but it never lasts long in my house. If you want to enjoy it later, just let it sit out for about 15-20 minutes to reach room temperature before serving. This ensures it’s creamy and ready to spread again.
FAQ Section: Can I use low-fat cream cheese? Sure! I’ve made it with low-fat cream cheese before, and while it’s not quite as rich, it works just fine.
What if I don’t have pecans? You can substitute them with virtually any nuts you like. Walnuts or even almonds would give nice crunch and flavor.
How long does it need to chill? I recommend chilling it for at least one hour. The longer it sits, the better it tastes as the flavors meld together.
This Cheese Ball has become a beloved recipe in my home, and I’m genuinely excited for you to try it. It’s simple enough to make on a weekday but festive enough to shine at any gathering. You’re going to love how easy and fun it is to prepare. Just imagine serving it at your next family gathering or potluck and watching your loved ones rave about it. So go ahead, give it a try—I can’t wait to hear how it turns out for you!
This dish has become a favorite in my house, and I’m so excited for you to try it. I know you’ll love it as much as I do! Let me know how it turns out, and if your family asks for seconds, just like mine does every time.
Cheese Ball
Ingredients
Cheese Base
- 8 oz cream cheese Softened for easy mixing.
- 1 cup sharp cheddar cheese Adds fantastic flavor.
Flavor Additions
- 3-4 pieces green onions Chopped finely.
- 1-2 teaspoons favorite spices Garlic powder and pepper are suggested; feel free to experiment.
Coating
- 1 cup chopped pecans For rolling the cheese ball.
Dippers
- assorted dippers (crackers, pretzel crisps, apple slices, vegetable sticks) For serving.
Instructions
Preparation
- Combine the softened cream cheese and sharp cheddar cheese in a large mixing bowl.
- Add the chopped green onions and your favorite spices; mix until well combined.
- Scoop the mixture and mold it into a ball shape.
- Roll the cheese ball in the chopped pecans until fully coated.
- Chill the cheese ball in the refrigerator for at least one hour.
- Serve with assorted dippers.