
Every time I make these Cheesy Stuffed Peppers, it takes me back to my childhood home, where the aroma of my mother’s cooking filled the air. Sunday dinners were a family affair—everyone gathered around the table, sharing stories and laughter. It was during those times that I truly learned the importance of home-cooked meals and the love that goes into preparing them. When I fill my kitchen with the delightful scent of these stuffed peppers, I know I’m creating more than just a meal; I’m making memories. You see, cooking is not just about the food. It’s about connecting with people you love and sharing that warmth with them. I can't wait for you to try this recipe! I promise it will fill your home with comfort and happiness.
How to make Cheesy Stuffed Peppers
Ingredients:
- 4 bell peppers: I love using a mix of colors—red, yellow, and green—for a vibrant presentation!
- 1 cup cooked rice: This helps to bulk up the filling and makes it hearty.
- 1 cup shredded cheese (cheddar, mozzarella, or your choice): You can’t skimp on cheese! It’s the star of this dish.
- 1 can black beans, drained and rinsed: These add a lovely texture and flavor.
- 1 cup diced tomatoes: Fresh or canned, either works well and adds juiciness to the mixture.
- 1 teaspoon cumin: This spice brings a warm, earthy note that pairs beautifully with the peppers.
- Salt and pepper to taste: Always important to season well to bring out all the flavors.
- Olive oil spray: A little spray to keep things from sticking and to add a nice touch of crispness.
Cooking Steps:
-
Preheat your air fryer to 360°F (182°C): I can’t stress this enough—starting at the right temperature is key for that perfect cook!
-
Prepare the bell peppers: Cut the tops off the bell peppers and remove the seeds. I like to save the tops to chop up and add to the filling for extra flavor.
-
Make the filling: In a large bowl, combine the cooked rice, shredded cheese, black beans, diced tomatoes, cumin, salt, and pepper. Mix everything well—you want those flavors to meld together!
-
Stuff the peppers: Now comes the fun part! Pack each bell pepper with the mixture, pressing down gently to pack it in. You want them full but not so stuffed that they overflow.
-
Spray the peppers: Lightly spray the outside of each stuffed pepper with olive oil. This will help them get a lovely, golden-brown color in the air fryer.
-
Place in air fryer: Carefully lay the stuffed peppers in your air fryer basket. Make sure they aren’t crammed too tightly; they need a little room for air circulation.
-
Air fry the peppers: Cook for about 15-20 minutes, or until the peppers are tender and the cheese is bubbly and melted. I like to check them around the 15-minute mark to see if they’re good to go.
-
Serve and enjoy!: Once they’re done, carefully take them out and let cool for a few minutes. Serve warm, and watch your family gather around the table!
Why I Love Making This Dish: I adore these Cheesy Stuffed Peppers not only for their taste but also for the joy they bring to our family gatherings. There’s just something so comforting about a warm meal packed into a colorful bell pepper. It reminds me of the love and care that goes into nurturing my family through food, just like my mother did.
What You’ll Need: For this cheerful dish, the only special tool you’ll need is an air fryer. I love mine; it makes cooking so much easier and healthier! If you don’t have an air fryer, don’t worry—you can also bake them in the oven at 375°F until the peppers are tender, about 30-35 minutes.
Step-by-Step Guide:
- First, preheat the oven or air fryer as mentioned above. Trust me, this is key for the cooking process!
- Second, prepare your beautiful colored bell peppers.
- Third, make that filling mix! Get your hands in there, and don't be afraid to really combine those ingredients.
- Fourth, stuff those peppers generously but carefully.
- Fifth, spray the outsides with olive oil and place them neatly in your cooking vessel.
- Sixth, cook until bubbly and tender, knowing they’ll soon be the highlight of your dinner!
Tips for Perfect Results:
- If you want a little more spice, you can add chopped jalapeños to the filling. It gives your dish a nice kick!
- Roasting the bell peppers for 5-10 minutes before stuffing can enhance their sweetness. I sometimes do this for a little extra flavor.
- You can also substitute quinoa for rice for a lovely nutty flavor and added protein.
Serving Suggestions and Sides: These Cheesy Stuffed Peppers are a full meal on their own, but they pair wonderfully with a fresh green salad or some avocado slices. A side of guacamole or sour cream enhances the flavors even more. Don't forget a tangy salsa for some zest!
Leftovers: If you find yourself with leftovers—lucky you! They store beautifully in an airtight container in the refrigerator for about 3-4 days. Just reheat in the microwave or back in your air fryer for a few minutes until warmed through. Trust me, they taste just as delicious the next day!
FAQ Section: Can I use other types of meat in the filling? Absolutely! Ground turkey or beef can work wonderfully too. Just make sure to cook the meat ahead of stuffing the peppers.
What if I can’t find black beans? No problem! You can use pinto beans or even lentils as a tasty alternative.
Can I prepare these in advance? Definitely! You can prepare everything ahead of time, stuff the peppers, and store them in the fridge. Just pop them in the air fryer when you’re ready to eat!
How do I tell when the peppers are done cooking? Look for tenderness in the peppers. You can poke them with a fork to check if they’re soft enough. If the cheese is melted and bubbling, you’re good to go!
What if I don’t have an air fryer? You can bake these stuffed peppers in the oven! Just preheat it to 375°F and bake for about 30-35 minutes until everything is nice and cooked through.
I hope you feel inspired to try this dish at home. I can’t tell you enough how much joy it brings to my family—and I know you’ll find it just as delightful! When I made this for my family recently, they couldn’t stop raving about it, and I’m excited for you to experience the same!
This dish has become a favorite in my house, and I’m so excited for you to try it. Not only is it easy to make, but it also bursts with flavors that come together beautifully. Get ready for happy faces around your dinner table—let me know how it turns out, and if your family asks for seconds, just like mine does every time. Enjoy your cooking!
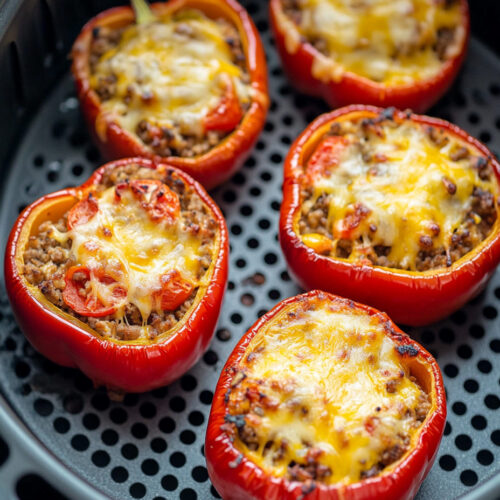
Cheesy Stuffed Peppers
Ingredients
Main Ingredients
- 4 pieces bell peppers Mix of colors: red, yellow, and green.
- 1 cup cooked rice Helps to bulk up the filling.
- 1 cup shredded cheese (cheddar, mozzarella, or your choice) Cheese is the star of this dish!
- 1 can black beans, drained and rinsed Adds texture and flavor.
- 1 cup diced tomatoes Fresh or canned works for juiciness.
- 1 teaspoon cumin Brings a warm, earthy note.
- Salt and pepper to taste Always important to season well.
- Olive oil spray To prevent sticking and add crispness.
Instructions
Preparation
- Preheat your air fryer to 360°F (182°C).
- Cut the tops off the bell peppers and remove the seeds.
- In a large bowl, combine the cooked rice, shredded cheese, black beans, diced tomatoes, cumin, salt, and pepper. Mix well.
Cooking
- Stuff each bell pepper with the filling, pressing down gently.
- Lightly spray the outside of each stuffed pepper with olive oil.
- Place the stuffed peppers in your air fryer basket.
- Cook for about 15-20 minutes, or until the peppers are tender and the cheese is bubbly.
- Once done, let them cool for a few minutes before serving.