
Every time I make this Chocolate Cream Pie, it transports me back to my childhood kitchen where the sweet aroma of rich chocolate filled the air. I remember helping my mother whip up this indulgent dessert for special family gatherings. The best part was always the waiting—listening to everyone’s excited chatter as we anticipated that first slice. If you’re anything like me, you know that the magic of baking isn’t just in the flavors; it’s in the love and memories woven into each bite. When you take that first forkful, you’ll not only taste the chocolatey goodness but also feel a wave of warmth and nostalgia. I can’t wait for you to experience this joy!
How to Make Chocolate Cream Pie
Ingredients:
- 1 1/2 cups graham cracker crumbs: This creates the delicious crust with a nice crunch.
- 1/4 cup sugar: A little sweetness balances the flavors perfectly.
- 1/2 cup unsalted butter, melted: This binds your crust and adds richness.
- 2 cups milk: Essential for your creamy filling.
- 1/2 cup sugar: Again, for sweetness in the filling.
- 1/3 cup unsweetened cocoa powder: This is where the deep chocolate flavor comes from—don’t skimp on it!
- 1/4 cup cornstarch: This thickens the filling beautifully.
- 1/4 teaspoon salt: A pinch of salt heightens the sweetness.
- 4 large egg yolks, beaten: They enrich the filling, making it smooth and velvety.
- 2 tablespoons unsalted butter: More butter = more creaminess!
- 1 teaspoon vanilla extract: This adds an aromatic sweetness that complements the chocolate.
- 1 cup heavy cream: For the decadent whipped topping.
- 2 tablespoons powdered sugar: Sweetens the whipped cream to perfection.
- Chocolate shavings (for garnish): A little extra chocolate never hurt anyone!
Why I Love Making This Dish: Making Chocolate Cream Pie is a cherished tradition in my home. I love gathering my family and friends around the table, sharing stories over slices of this luscious pie. It’s more than just a dessert; it’s a conversation starter and a way to bring people closer together. Each time I present it at the table, I can already hear the “oohs” and “aahs” as everyone admires its glossy filling and fluffy topping. My family looks forward to it and often nudges me to make it more frequently. Once you see the joy on their faces as they savor every last bite, you’ll understand why I hold this recipe so dear.
What You’ll Need: To get started, you’ll want to gather a few essential tools. A mixing bowl, measuring cups, and a whisk will be your best friends in this kitchen adventure. Don’t forget your pie dish; I love using a 9-inch glass pie dish so I can admire my work as it bakes!
Cooking Steps:
- Preheat the Oven: First, preheat your oven to 350°F (175°C). Trust me, this is key to achieving a perfectly set crust!
- Make the Crust: In a medium bowl, combine the graham cracker crumbs, sugar, and melted butter. Mix until it resembles wet sand. Press this mixture firmly into the bottom and up the sides of your pie dish. Bake for 8 to 10 minutes until it’s golden brown. Allow it to cool completely.
- Prepare the Filling: In a saucepan, whisk together the milk, sugar, cocoa powder, cornstarch, and salt. Place it over medium heat, stirring constantly to prevent sticking, until the mixture thickens nicely. This might take about 5-7 minutes.
- Mix in the Egg Yolks: Once thickened, take a little bit of the hot mixture and gradually add it to the beaten egg yolks in a separate bowl to temper them. This ensures the eggs don’t scramble when you add them back in. Stir this mixture back into the saucepan and keep cooking for an additional 2 minutes.
- Add Butter and Vanilla: Remove the saucepan from heat, stirring in the butter and vanilla extract until smooth and glossy.
- Fill the Crust: Pour the chocolate filling into the cooled crust, smoothing it out with a spatula. Cover the pie with plastic wrap and refrigerate for at least four hours or until set.
- Make the Whipped Cream: When you’re ready to serve, whip the heavy cream and powdered sugar together until soft peaks form. This fluffy topping is what makes the pie truly special.
- Top the Pie: Spread the whipped cream over the chilled chocolate filling. Feel free to be generous!
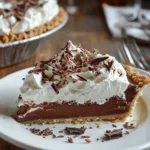
- Garnish: Finally, shower your masterpiece with chocolate shavings to give it that professional touch.
- Slice and Serve: Cut into wedges and step back to soak in the looks of delight as everyone digs in.
Tips for Perfect Results: To elevate your Chocolate Cream Pie experience, here are a few personal tricks:
- Make sure your ingredients are at room temperature before you begin; this helps everything blend seamlessly.
- When whipping the cream, be sure not to overwhip, or you’ll end up with butter! Just whip until soft peaks form, and then stop.
- If you want to give your crust an extra flavor, try adding a pinch of cinnamon to the graham cracker mixture.
- A touch of espresso powder in the filling can intensify the chocolate flavor beautifully.
Serving Suggestions and Sides: This pie stands beautifully on its own, but why not make it even more special? I love serving it alongside fresh berries or a fruit coulis. A scoop of vanilla or coffee ice cream complements its richness perfectly.
Leftovers: If you’re lucky enough to have leftovers (though it usually disappears quickly!), store them in the fridge with plastic wrap over the pie to keep it fresh. When ready to indulge again, simply serve it cold; there’s no need to reheat.
FAQ Section: Can I use a store-bought crust? While I prefer making my own graham cracker crust, a store-bought version is perfectly fine. Just make sure it’s a quality one.
What can I do if the filling doesn’t thicken? If your filling isn’t thickening as expected, make sure you’re stirring constantly. If it’s still runny, you can sprinkle a little extra cornstarch into it as it cooks to help thicken.
Why is my whipped cream not holding its shape? This can happen if you haven’t whipped it long enough or if your cream is too warm. Ensure your heavy cream is chilled before starting.
Can I make this pie ahead of time? Oh, absolutely! In fact, it tastes even better the next day. Just make sure to cover it well in the fridge!
This Chocolate Cream Pie has become a staple in my kitchen. I can’t express how excited I am for you to try it. I know you’ll love it just as much as my family does. So, roll up your sleeves and let’s create some sweet memories together! I can’t wait to hear how your pie turns out—let me know if your family asks for seconds, just like mine does every time!
Chocolate Cream Pie
Ingredients
For the crust
- 1 1/2 cups graham cracker crumbs This creates the delicious crust with a nice crunch.
- 1/4 cup sugar A little sweetness balances the flavors perfectly.
- 1/2 cup unsalted butter, melted This binds your crust and adds richness.
For the filling
- 2 cups milk Essential for your creamy filling.
- 1/2 cup sugar For sweetness in the filling.
- 1/3 cup unsweetened cocoa powder This is where the deep chocolate flavor comes from.
- 1/4 cup cornstarch This thickens the filling beautifully.
- 1/4 teaspoon salt A pinch of salt heightens the sweetness.
- 4 large egg yolks, beaten They enrich the filling, making it smooth and velvety.
- 2 tablespoons unsalted butter More butter = more creaminess!
- 1 teaspoon vanilla extract Adds aromatic sweetness that complements the chocolate.
For the whipped topping
- 1 cup heavy cream For the decadent whipped topping.
- 2 tablespoons powdered sugar Sweetens the whipped cream to perfection.
For garnish
- Chocolate shavings A little extra chocolate never hurt anyone!
Instructions
Preparation
- Preheat your oven to 350°F (175°C).
- In a medium bowl, combine graham cracker crumbs, sugar, and melted butter. Mix until it resembles wet sand.
- Press this mixture firmly into the bottom and up the sides of your pie dish. Bake for 8 to 10 minutes until it’s golden brown.
- Allow the crust to cool completely.
Making the filling
- In a saucepan, whisk together the milk, sugar, cocoa powder, cornstarch, and salt. Place over medium heat, stirring constantly until thickened (about 5-7 minutes).
- Take a little of the hot mixture and gradually add it to the beaten egg yolks in a separate bowl to temper them. Stir this back into the saucepan and cook for an additional 2 minutes.
- Remove from heat and stir in the butter and vanilla extract until smooth.
- Pour the chocolate filling into the cooled crust, smoothing it out with a spatula. Cover with plastic wrap and refrigerate for at least four hours or until set.
Whipping the cream
- When ready to serve, whip the heavy cream and powdered sugar together until soft peaks form.
- Spread whipped cream over the chilled chocolate filling generously.
Garnishing and serving
- Garnish with chocolate shavings and slice into wedges.
- Serve and enjoy the looks of delight as everyone digs in.