
Every time I make this Chocolate Pudding, I am transported back to my childhood kitchen, filled with the comforting aroma of sweet chocolate simmering on the stove. There’s just something magical about standing over that pot, stirring the mixture until it thickens, and watching as it transforms from simple ingredients into a velvety dessert that brings everyone together. I remember the joy on my children’s faces when they would sneak spoonfuls of the warm pudding before it even made it to the fridge. And trust me, once you make this easy treat for your family, you’ll create memories that will last a lifetime.
How to Make Chocolate Pudding
Ingredients: To whip up this decadent Chocolate Pudding, you’ll need:
- 2 cups milk: This is the base of your pudding, and using whole milk will give it a richer flavor and creamier texture.
- 1/2 cup sugar: The sweet element for our rich pudding. You can reduce this a bit if you prefer less sweetness.
- 1/3 cup unsweetened cocoa powder: This is where the intense chocolate flavor comes from, so don’t skimp on quality here.
- 1/4 cup cornstarch: This is what thickens our pudding, giving it that perfect consistency.
- 1/4 teaspoon salt: It might seem small, but it really enhances all the flavors in your pudding.
- 1 teaspoon vanilla extract: Adds a lovely warmth to the pudding.
- 2 tablespoons butter: This gives your pudding that luscious finish and richness.
Cooking Steps:
-
Gather your ingredients: Before you start, make sure you have everything laid out. It always helps to have a clear workspace, so you can easily grab what you need.
-
Whisk the dry ingredients: In a medium saucepan, combine 1/3 cup of cocoa powder, 1/2 cup of sugar, 1/4 cup of cornstarch, and 1/4 teaspoon of salt. Whisk these together until well blended. This prevents clumping later on.
-
Add the milk: Slowly pour in 2 cups of milk while whisking continuously. This helps to create a smooth base for your pudding.
-
Cook over medium heat: Place the saucepan on the stove over medium heat. Keep stirring! This part is crucial to prevent the pudding from sticking to the bottom and burning. You want it to cook evenly.
-
Watch for thickening: As you stir, you’ll notice the mixture starting to thicken. It can take about 5-10 minutes. Keep watching closely, because once it begins to bubble, it will also start to thicken more rapidly.
-
Remove from heat: As soon as you see the pudding bubble up and thicken to your desired consistency, remove the saucepan from the heat.
-
Add vanilla and butter: Stir in 1 teaspoon of vanilla extract and 2 tablespoons of butter. The butter will melt into the warm pudding and add a lovely richness that takes it to the next level.
-
Pour into serving dishes: Now comes the fun part! Pour the pudding into your favorite serving dishes. I love using small ramekins or dessert cups for a more elegant presentation, but any dish will work.
-
Chill in the refrigerator: Let the pudding cool on the counter for a bit, then place it in the refrigerator. It needs at least 2 hours to set properly.
-
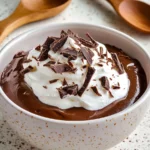
Serve and enjoy: Once your pudding is set, you can serve it straight from the fridge. You can top it with whipped cream, chocolate shavings, or even some fresh berries for a pop of color.
Why I Love Making This Dish: There’s something so comforting about Chocolate Pudding. It reminds me of my mother, who would make it for us as an after-school treat. I love that I can share that experience with my children and now even my grandchildren. As I watch them enjoy this dessert, I feel a wave of nostalgia wash over me, and I’m reminded of the simple joys that come from homemade treats.
What You’ll Need: Aside from your ingredients, having a good whisk is vital for mixing everything smoothly, and a medium saucepan is perfect for cooking the pudding. You might also want some small bowls or ramekins for serving.
Step-by-Step Guide:
- Preheat your kitchen with the warmth of nostalgia as you prepare to make this delight.
- Gather all your ingredients and tools ready and within reach.
- Whisk the dry ingredients lovingly, remembering that the mixture will soon give you a chocolate hug.
- Pour in the milk and watch as everything blends together beautifully.
- Keep stirring over medium heat, reminding yourself that patience is key.
- When it thickens, revel in the joy of creating something wonderful.
- Don’t forget the vanilla and butter; they’re like the cherry on top!
- Pour into your chosen dishes and wait (if you can) for it to cool and set.
- Finally, dig in and share the love with your family!
Tips for Perfect Results: If you want to ensure your pudding comes out silky smooth, use whole milk for richness and always stir continuously as it cooks. This is the part I always look forward to! And if you like a deeper chocolate flavor, feel free to add a bit more cocoa powder. Just keep in mind that a little goes a long way.
Serving Suggestions and Sides: Chocolate Pudding can be a star on its own, but there are so many delightful pairings. Think about serving it with some homemade whipped cream on top or a sprinkling of crushed graham crackers for a bit of crunch. Fresh strawberries or raspberries can add a lovely tartness that contrasts beautifully with the sweetness of the pudding.
Leftovers: If you happen to have any leftovers (and that’s a big if in my house), simply cover them with plastic wrap and store them in the fridge. They’ll stay fresh for about 3 days. You can serve them cold, or for a special treat, pop them in the microwave for about 15-20 seconds to enjoy a warm chocolate delight again.
FAQ Section: Can I use non-dairy milk? Yes, you can! I’ve made this pudding with almond milk before, and it turned out great. Just choose a non-dairy milk that you enjoy.
What if I want to make it sugar-free? You can certainly use a sugar substitute! I’ve even tried using monk fruit sweetener in the past, and it worked well.
Can I double the recipe? Absolutely! If you’re serving a larger group, just double all the ingredients and use a larger pot to cook it.
Will it thicken more in the fridge? Yes! The pudding will continue to firm up while it chills, so don’t worry if it’s still a little soft when you take it off the stove.
Conclusion: This Chocolate Pudding has become a cherished staple in my home, and I can’t wait for you to experience its joy, too. It’s not just a dessert; it’s a way to create sweet moments with your loved ones. When you gather around the table with bowls of this chocolate goodness, I know your family will ask for seconds, just like mine does every time. So grab your ingredients and get cooking—I promise you won’t regret it!
Chocolate Pudding
Ingredients
Pudding Base
- 2 cups milk Use whole milk for a richer flavor.
- 1/2 cup sugar Adjust based on your sweetness preference.
- 1/3 cup unsweetened cocoa powder Choose high-quality cocoa for intense flavor.
- 1/4 cup cornstarch This thickens the pudding.
- 1/4 teaspoon salt Enhances flavor.
- 1 teaspoon vanilla extract Adds warmth to the flavor.
- 2 tablespoons butter Gives a luscious finish.
Instructions
Preparation
- Gather your ingredients and ensure a clear workspace.
- In a medium saucepan, combine cocoa powder, sugar, cornstarch, and salt. Whisk until well blended.
- Slowly pour in the milk while whisking continuously.
- Cook over medium heat, stirring constantly to prevent sticking.
- Watch for thickening, which takes about 5-10 minutes until it bubbles.
- Remove from heat as soon as it thickens to your desired consistency.
- Stir in vanilla extract and butter until melted and combined.
- Pour the pudding into serving dishes.
- Let the pudding cool on the counter, then refrigerate for at least 2 hours to set.
- Serve chilled, optionally topped with whipped cream or fruits.