
Every time I make this Cookie Monster Cheesecake, a warm wave of nostalgia washes over me. It reminds me of those special moments spent in the kitchen with my grandchildren, who eagerly await their "Cookie Monster" treat after dinner. The joyful giggles, the messy hands covered in frosting, and the delicious smiles on their faces as they take their first bite — it’s truly priceless. If you’re like me, and love to create lasting memories in the kitchen with your loved ones, this cheesecake will surely bring a smile to your face. Today, I invite you to join me in making this whimsical and undeniably delicious dessert that has quickly become a family favorite.
How to make Cookie Monster Cheesecake
Ingredients:
- 1 1/2 cups crushed chocolate sandwich cookies (like Oreos): These make up the base of your cheesecake and add that rich chocolate flavor.
- 1/4 cup granulated sugar: Just a touch of sweetness to enhance the crust.
- 1/2 cup unsalted butter, melted: This will bind everything together, creating a delicious crust.
- 4 packages (8 oz each) cream cheese, softened: The star of the show! Cream cheese gives the cheesecake its rich and creamy texture.
- 1 cup granulated sugar: This adds sweetness to the filling; trust me, it’s essential!
- 1 cup sour cream: This adds a nice tang and creaminess.
- 1 cup heavy cream: For that luscious mouthfeel and richness.
- 4 large eggs: Eggs help bind everything together and create a fluffy texture.
- 1 teaspoon vanilla extract: A hint of vanilla enhances the flavor beautifully.
- 1/2 cup all-purpose flour: This helps to stabilize the filling.
- 1 cup mini chocolate chips: Because what’s a Cookie Monster cake without some chocolate!
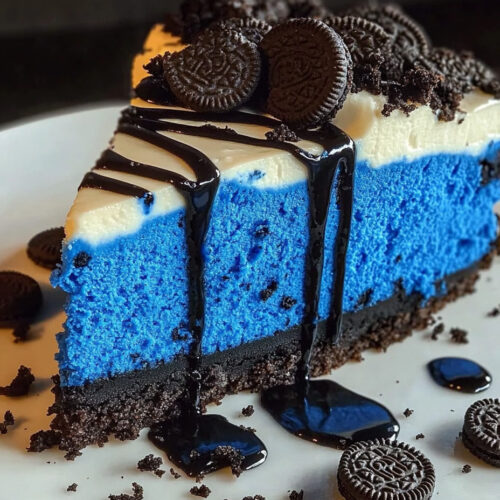
- 1 cup blue-colored chocolate chip cookies (store-bought or homemade): This gives the "Cookie Monster" look, making it super fun!
- 1/4 cup mini chocolate chips: These will be mixed into the crumbles for added texture.
- Blue frosting (store-bought or homemade): For spreading on top — this is where the magic happens.
- Mini chocolate chips or candy eyes for decoration: To give your cheesecake that perfect Cookie Monster look.
Cooking Steps:
-
Prepare the Crust: Preheat your oven to 325°F (163°C). Greasing the sides of a 9-inch springform pan is crucial here. I always line the bottom with parchment paper too to ensure nothing sticks! In a medium bowl, mix the crushed chocolate sandwich cookies, granulated sugar, and melted butter until well combined. Press the mixture firmly into the bottom of your prepared pan. Bake in the oven for about 10 minutes, and then let it cool. This crust is simple yet oh-so-delicious, creating the perfect foundation for your cheesecake.
-
Prepare the Cheesecake Filling: In a large bowl, beat the cream cheese until it’s smooth and creamy. You want it to be fluffy, so take your time with this. Add the granulated sugar and mix well. Then, mix in the sour cream and heavy cream until it’s all blended smoothly.
-
Add the Eggs: Trust me on this one—add the eggs one at a time. Beat well after each addition! This method is key that allows the cheesecake to rise just perfectly.
-
Combine Remaining Ingredients: Mix in the vanilla extract and all-purpose flour until just combined. You don’t want to overmix your filling, so gently fold in those mini chocolate chips next — they give little bursts of chocolate throughout!
-
Pour into Crust: Now, pour your creamy filling over the cooled crust, smoothing the top with a spatula. This part always excites me because it starts to look like a cheesecake!
-
Bake the Cheesecake: Bake in the oven for 60-70 minutes. You’ll know it’s done when the edges are lightly golden and the center has a slight jiggle when you move the pan. This is such an important moment! It feels so rewarding when you know your hard work is paying off.
-
Cool Down: Once it’s done, turn off the oven and crack the oven door a bit. Let the cheesecake cool in the oven for an hour — this helps keep the cheesecake from cracking. I’ve had my share of cheesecakes that have cracked, and it’s heartbreaking! Once cooled, refrigerate for at least 4 hours, or preferably overnight.
-
Prepare Cookie Monster Crumbles: While your cheesecake sets, crush those blue-colored chocolate chip cookies into small pieces. Mix these with the mini chocolate chips to create your "crumbles."
-
Decorate the Cheesecake: After your cheesecake is nice and chilled, spread the blue frosting over the top to create that fun whimsical look. Then sprinkle those cookie crumbles evenly over the frosting. Add the mini chocolate chips or candy eyes for the finishing touches to make your dessert look just like our beloved Cookie Monster.
-
Serve and Enjoy: It’s finally time to slice that beautiful cheesecake and serve it! You’re going to love the joy on your family’s faces when they see (and taste!) it.
Why I Love Making This Dish: This Cookie Monster Cheesecake holds a special place in my heart. Every bite is a delightful combination of textures and flavors — the creamy filling against the crunchy crust, the sweet frosting, and, of course, the chocolate chips. It’s like a party for your taste buds! Plus, it’s perfect for gatherings or just a cozy family night at home. There’s something so whimsical about this dessert that brings out the kid in all of us, making it ideal for family celebrations or just an interactive baking session with your grandkids.
What You’ll Need: You’ll need a 9-inch springform pan, a couple of mixing bowls, a hand mixer, and a spatula for spreading. A good measuring cup and spoons, too, of course!
Tips for Perfect Results:
- Using softened** cream cheese** is vital; you want it to blend smoothly without lumps.
- When mixing the ingredients, take your time. This isn’t a race, and I promise it’s worth the extra mixing time for that creamy texture!
- If you want to make it a little healthier, you can use light cream cheese, but the texture won’t be quite the same.
Serving Suggestions and Sides: This cookie monster cheesecake stands wonderfully on its own, but if you want to get a little fancy, serve it with a drizzle of chocolate sauce or a scoop of vanilla ice cream on the side. Fresh berries also add a nice tartness that complements the sweetness of the cheesecake.
Leftovers: If there are any leftovers — which I sincerely doubt there will be — simply cover your cheesecake tightly and store it in the refrigerator. It should last for about 3-4 days. To reheat, just let it sit out at room temperature for a little while before diving back in.
FAQ Section:
Can I use any kind of cookies for the crust?
Of course! While I love the classic taste of chocolate sandwich cookies, feel free to experiment with other flavors, like graham crackers or even vanilla cookies.
Can I make this ahead of time?
Yes, indeed! This cheesecake actually tastes even better the next day after the flavors have had time to meld together. Just remember to let it cool completely before refrigerating.
What if I can’t find blue-colored chocolate cookies?
No problem at all! You can simply use regular chocolate chip cookies or any cookies your heart desires. The color may change, but the taste will still be fantastic!
How can I ensure my cheesecake doesn’t crack?
Cooling it slowly in the oven, as mentioned earlier, definitely helps a lot, but you can also try baking it in a water bath (swaddling the cheesecake pan in another pan of water while it bakes) for extra moisture.
This Cookie Monster Cheesecake has become a cherished recipe in my home, bringing together my family for delightful gatherings. I’m so excited for you to try it, and I truly hope it becomes a favorite in your home, too. You won’t regret the smiles and laughter that will surround this special dessert. Let me know how it turns out, and if your family asks for seconds, just like mine does every time!
Cookie Monster Cheesecake
Ingredients
Crust Ingredients
- 1.5 cups crushed chocolate sandwich cookies (like Oreos) These make up the base of your cheesecake and add that rich chocolate flavor.
- 0.25 cups granulated sugar A touch of sweetness to enhance the crust.
- 0.5 cups unsalted butter, melted This will bind everything together, creating a delicious crust.
Filling Ingredients
- 32 oz cream cheese, softened The star of the show! Gives the cheesecake its rich and creamy texture.
- 1 cups granulated sugar Adds sweetness to the filling; essential for flavor.
- 1 cups sour cream Adds a nice tang and creaminess.
- 1 cups heavy cream Provides a luscious mouthfeel and richness.
- 4 large eggs Help bind everything together and create a fluffy texture.
- 1 teaspoon vanilla extract A hint of vanilla enhances the flavor.
- 0.5 cups all-purpose flour Helps stabilize the filling.
- 1 cups mini chocolate chips For bursts of chocolate throughout.
- 1 cups blue-colored chocolate chip cookies Gives the 'Cookie Monster' look, making it super fun!
- 0.25 cups mini chocolate chips Mixed into the crumbles for added texture.
Decoration Ingredients
- 1 batch Blue frosting For spreading on top.
- 1 batch Mini chocolate chips or candy eyes For decoration to create the perfect Cookie Monster look.
Instructions
Prepare the Crust
- Preheat your oven to 325°F (163°C). Grease the sides of a 9-inch springform pan and line the bottom with parchment paper.
- In a medium bowl, mix the crushed chocolate sandwich cookies, granulated sugar, and melted butter until well combined.
- Press the mixture firmly into the bottom of your prepared pan. Bake for about 10 minutes and then let it cool.
Prepare the Cheesecake Filling
- In a large bowl, beat the cream cheese until smooth and fluffy.
- Add the granulated sugar and mix well, then mix in the sour cream and heavy cream until smooth.
Add the Eggs
- Add the eggs one at a time, beating well after each addition.
Combine Remaining Ingredients
- Mix in the vanilla extract and all-purpose flour until just combined.
- Gently fold in the mini chocolate chips.
Pour into Crust
- Pour the filling over the cooled crust, smoothing the top with a spatula.
Bake the Cheesecake
- Bake in the oven for 60-70 minutes until the edges are lightly golden and the center has a slight jiggle.
Cool Down
- Turn off the oven and crack the oven door. Let the cheesecake cool in the oven for an hour.
- Once cooled, refrigerate for at least 4 hours, or preferably overnight.
Prepare Cookie Monster Crumbles
- While the cheesecake sets, crush the blue-colored chocolate chip cookies into small pieces and mix them with the mini chocolate chips.
Decorate the Cheesecake
- Spread the blue frosting over the chilled cheesecake and sprinkle the cookie crumbles on top.
- Add mini chocolate chips or candy eyes for decoration.
Serve and Enjoy
- Slice the cheesecake and serve, enjoying the joyful responses from your family.