
Every time I make this Easy Sesame Chicken, I’m brought back to cozy winter evenings when my family would gather around the table, laughter ringing through the air as we shared stories of our day. There’s something almost magical about the aroma that fills my kitchen—a delightful mix of spices, sweetness, and that unmistakable hint of soy sauce. It warms my heart and fills my home with love. When you prepare this dish, I promise you’ll feel that same warmth and comfort.
In today’s fast-paced world, it’s so easy to overlook the beauty of a simple, home-cooked meal. This Easy Sesame Chicken recipe is here to remind you of just how wonderful it can be to share a meal with your loved ones. It’s not just food; it’s a way to connect, to celebrate, and to enjoy life’s little moments. I can’t wait for you to try it!
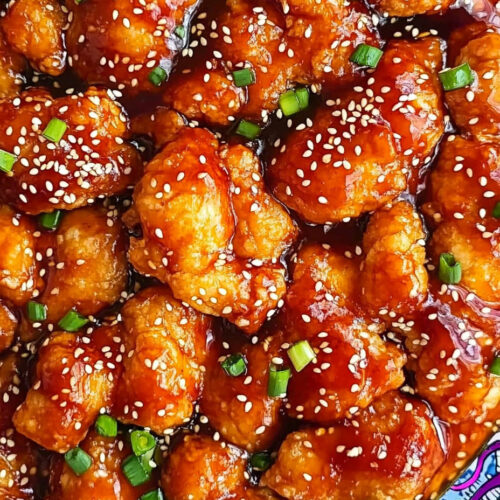
How to make Easy Sesame Chicken
Ingredients:
Let’s start by gathering our ingredients. Here’s what you’ll need to create this delicious dish:
- 1 lb chicken breast, cut into bite-sized pieces
- 1/2 cup cornstarch: This will give the chicken that wonderful crispy texture.
- 2 eggs, beaten: The eggs help the cornstarch stick to the chicken for a delightful crunch.
- Cooking oil (for frying): I usually use vegetable oil or canola oil; they work well for frying.
- 1/4 cup soy sauce: This adds that savory umami flavor that we all love!
- 1/4 cup honey: The sweetness of the honey perfectly balances the saltiness of the soy sauce.
- 1 tablespoon sesame oil: You can’t have sesame chicken without it! It infuses the dish with that aromatic flavor.
- 1 tablespoon rice vinegar: This brings a hint of acidity that brightens the dish.
- 1 teaspoon garlic, minced: Fresh garlic takes the flavor to a whole new level.
- 1 teaspoon ginger, minced: Ginger adds warmth and complexity; it really enhances the flavors.
- Sesame seeds (for garnish): These add a lovely crunch and a nutty flavor.
- Chopped green onions (for garnish): These are the perfect finishing touch to your dish!
Now that you have your ingredients, I want you to know that this dish is quite forgiving! If you’re missing something or want to switch things up a bit, feel free to experiment. For instance, you can use chicken thighs instead of breasts for a juicier result.
Cooking Steps:
Alright, let’s dive into the steps! It might seem a bit overwhelming at first, but I promise it’s simpler than it looks.
-
Prep the Chicken: Start by cutting your chicken breast into bite-sized pieces. This ensures even cooking and makes it easy to enjoy. I always wash my hands well after handling raw chicken. Safety first!
-
Coat the Chicken: In a bowl, add the cornstarch and toss your chicken pieces in it until they’re fully coated. This step is crucial for achieving that perfect crunch after frying.
-
Dip in Eggs: Next, beat your eggs in another bowl. Dip the cornstarch-coated chicken into the eggs, making sure each piece is fully covered. This helps the cornstarch adhere even better!
-
Heat the Oil: In a frying pan, pour in your cooking oil—enough to cover the bottom of the pan. Heat it over medium-high heat. You want it hot, but not smoking. If you’re unsure, drop a tiny bit of the chicken into the oil. If it starts to sizzle, you’re good to go!
-
Fry the Chicken: Carefully place the coated chicken pieces into the hot oil. Fry in batches so you don’t overcrowd the pan. This ensures a crispy texture. Cook them until golden brown and cooked through, usually about 3-4 minutes per side.
-
Drain the Chicken: Once your chicken is perfectly golden, remove it and place it on a plate lined with paper towels to drain excess oil.
-
Make the Sauce: In a separate bowl, mix together soy sauce, honey, sesame oil, rice vinegar, minced garlic, and minced ginger. Whisk it all together until it’s well combined.
-
Simmer the Sauce: In the same frying pan (use the leftover oil for flavor), pour in your sauce mixture. Let it simmer for a minute to bring all those flavors together.
-
Combine: Add your fried chicken back into the pan with the sauce. Gently toss everything together, so every piece of chicken is coated in that delicious sauce.
-
Garnish: Once beautifully coated, sprinkle sesame seeds and chopped green onions over the top. You’ll be amazed at how this little step brightens the dish!
-
Serve and Enjoy: Take a moment to admire your creation, then serve it hot. This dish pairs wonderfully with rice or steamed vegetables.
Why I Love Making This Dish:
There’s something so special about making Easy Sesame Chicken. It’s not just about following the steps; it’s about the memories created along the way. I remember the first time I made it for my family; their faces lit up as the aroma filled the kitchen. To see my loved ones enjoy a meal that I poured my heart into is an indescribable joy.
What you’ll need:
Besides the ingredients, here are a few tools that would be helpful in the process:
- A good frying pan: I recommend a non-stick one for easy cooking and clean-up.
- Tongs: These are handy for flipping the chicken without splattering oil everywhere!
- Two mixing bowls: One for the dry ingredients and one for the wet ingredients.
- A whisk: Perfect for mixing your sauce to ensure everything is combined smooth.
Step-by-Step Guide:
Now, let’s make sure you’re set for success:
- First, preheat your oil! Trust me, this is key for that crispy chicken!
- Make sure your chicken is well-coated; it makes all the difference!
- Fry in batches to keep that crunch intact.
- Don’t rush the sauce! Let it simmer for maximum flavor.
Tips for Perfect Results:
- Use fresh ingredients! Fresh garlic and ginger elevate the taste significantly.
- Avoid overcrowding the pan when frying. It helps maintain that wonderful crunch.
- If you want an extra touch of flavor, try adding a dash of chili flakes to the sauce for a mild kick.
- For an even more aromatic experience, toss in some sliced green onions while the sauce simmers.
Serving Suggestions and Sides:
When it comes to sides, I love pairing my Easy Sesame Chicken with a bed of fluffy jasmine rice or steamed broccoli. The rice soaks up that delicious sauce, and the veggies add a lovely crunch. You could even serve it with a simple salad or some egg rolls for a complete meal. Believe me, your family will be asking for seconds!
Leftovers:
Now, let’s talk about those leftovers. If you have any, you’re in for a treat! Store them in an airtight container in the fridge, and they should last for about 3-4 days. When you’re ready to enjoy them again, simply reheat in a pan on low heat or pop them in the microwave. If the chicken seems a bit dry after reheating, add a splash of water or a bit of extra soy sauce to revive it.
FAQ Section:
Can I use boneless chicken?
Absolutely! You can, but trust me, the bone-in version is so much more flavorful. I’ve tried both, and bone-in is always juicier!
What if I don’t have honey?
No worries! You can substitute it with maple syrup or brown sugar. It won’t be exactly the same, but it will still be delicious!
Is there a vegetarian option?
Yes! You can easily substitute the chicken with tofu or your favorite vegetables. Just make sure to cook them appropriately to get that perfect texture.
Can I make this dish ahead of time?
While this dish is best served fresh, you can prepare the sauce and coat the chicken ahead of time. Just fry it up right before serving!
Can I freeze leftovers?
I wouldn’t recommend freezing it after cooking, as it may alter the texture. However, you can freeze the raw marinated chicken if you want to prepare it ahead of time.
This Easy Sesame Chicken has become a favorite in my house, and I’m so excited for you to try it. It’s simple, yet packed with flavor, and brings about beautiful moments with family. When you take that first bite, you’ll know what I mean. I can’t wait to hear how it turns out for you! If your family asks for seconds, just like mine does every time, you’ll know you’ve created something special. Enjoy this journey in the kitchen, and let’s keep cooking together!
Easy Sesame Chicken
Ingredients
For the Chicken
- 1 lb chicken breast, cut into bite-sized pieces You can substitute with chicken thighs for juiciness.
- 1/2 cup cornstarch This will give the chicken that wonderful crispy texture.
- 2 large eggs, beaten The eggs help the cornstarch stick to the chicken.
- as needed cooking oil (for frying) Vegetable oil or canola oil works well for frying.
For the Sauce
- 1/4 cup soy sauce Adds a savory umami flavor.
- 1/4 cup honey Balances the soy sauce's saltiness.
- 1 tablespoon sesame oil Infuses the dish with aromatic flavor.
- 1 tablespoon rice vinegar Brings a hint of acidity.
- 1 teaspoon garlic, minced Fresh garlic enhances the flavors.
- 1 teaspoon ginger, minced Adds warmth and complexity.
For Garnish
- to taste sesame seeds Adds crunch and nutty flavor.
- to taste chopped green onions Perfect finishing touch.
Instructions
Preparation
- Cut the chicken breast into bite-sized pieces and wash your hands.
- In a bowl, toss the chicken pieces in cornstarch until fully coated.
- Beat the eggs in a separate bowl and dip the cornstarch-coated chicken into the eggs.
Cooking the Chicken
- Heat oil in a frying pan over medium-high heat.
- Fry the coated chicken pieces in batches until golden brown and cooked through, about 3-4 minutes per side.
- Drain the fried chicken on a plate lined with paper towels.
Making the Sauce
- In a bowl, mix together soy sauce, honey, sesame oil, rice vinegar, garlic, and ginger until well combined.
- In the same frying pan, pour in the sauce mixture and let it simmer for a minute.
Combining and Serving
- Add the fried chicken back into the pan with the sauce and toss to coat.
- Garnish with sesame seeds and chopped green onions before serving.
- Serve hot, ideally with rice or steamed vegetables.