
Every time I make this Festive Meringue Wreath with Jewel-Toned Berries, I can’t help but be transported back to the holiday gatherings of my childhood. The sweet scent of meringue fills the air, mingling with laughter and the warmth of family around the table. It’s a dessert that not only looks breathtaking but also tastes light and delightful, making it the perfect ending to any holiday meal. I remember making it with my own mother, her expert hands guiding me as we folded the airy meringue onto the baking sheet, creating a masterpiece that was as much fun to decorate as it was to eat. When you try making this delightful wreath, I hope it brings you the same joy and memories that it brings me every year!
How to make Festive Meringue Wreath with Jewel-Toned Berries
Ingredients:
To create this beautiful meringue wreath, you will need:
- 4 large egg whites: This is the foundation of our meringue. The egg whites will whip up beautifully to give us that characteristic light and fluffy texture.
- 1 cup granulated sugar: This will sweeten the meringue and help create a glossy finish.
- 1 teaspoon cornstarch: This ingredient stabilizes the meringue, ensuring it holds its shape during baking.
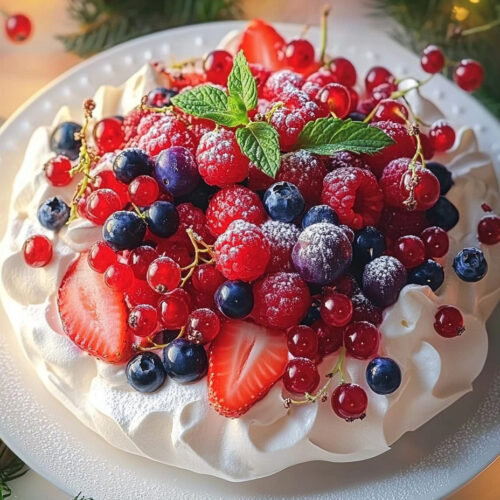
- Mixed jewel-toned berries (e.g., raspberries, blueberries, blackberries, strawberries): These add a gorgeous and colorful touch, not to mention a burst of flavor!
- Mint leaves for garnish (optional): A sprinkle of fresh mint makes this wreath not only pretty but adds a refreshing flavor too.
How to Make the Wreath
-
First, preheat your oven to 200°F (93°C). This low temperature will ensure that the meringue dries slowly, preventing it from cracking.
-
Next, in a clean, dry bowl, beat the egg whites. Using an electric mixer, whip them until soft peaks start to form. This is where the magic begins!
-
Gradually add the granulated sugar, a spoonful at a time, while continuing to beat. Trust me, this step is essential! Your meringue should transform into a glossy mixture with stiff peaks. It’s like watching a beautiful cloud take shape.
-
Gently fold in the cornstarch with a spatula. This step is like adding a little insurance to your meringue, making sure it holds its lovely shape during baking.
-
Now, here’s where the real fun begins: use a piping bag to carefully pipe the meringue into a festive wreath shape on a parchment-lined baking sheet. You don’t have to be a pastry chef for this; just make whirls and swirls that look pretty!
-
It’s time to bake! Place your wreath in the oven and let it bake for 1.5 to 2 hours. The meringue should feel dry to the touch and easily peel away from the parchment. Just think about how wonderful your kitchen will smell!
-
Once baked, remove the wreath from the oven and let it cool completely. Patience is key here. I know it’s hard to wait, especially with that sweet aroma wafting through the house!
-
Now, top your cooled meringue wreath with the mixed berries. Scatter them generously—this is what makes the wreath pop with festive color!
-
For an extra touch of elegance, garnish your wreath with a few mint leaves. It’s a small detail that makes a big difference!
-
Finally, serve the wreath and watch as your loved ones’ faces light up. It’s a delight to behold, and I promise it tastes as good as it looks!
Why I Love Making This Dish:
Each year, my family and I look forward to this meringue wreath, and every time I make it, I feel a little burst of joy. The way the vibrant berries contrast with the snowy meringue creates a stunning centerpiece for any holiday table. Not to mention, it harks back to my childhood, reminding me of the love and warmth that comes from preparing food with family. The moment you slice into it and see all those colors—it truly feels like a celebration!
What You’ll Need:
Besides the ingredients, you’ll need a few tools:
- A mixing bowl (glass or metal is best for whipping egg whites).
- An electric mixer (hand or stand).
- A piping bag fitted with a large round tip (or a zip-top bag with the corner snipped off).
- Parchment paper to line your baking sheet.
- A sturdy baking sheet.
Step-by-Step Guide:
- Begin by preheating your oven to 200°F (93°C). This low heat makes all the difference in getting that perfect, dry meringue. Trust me on this!
- In your mixing bowl, carefully separate the egg whites from the yolks. Remember, even a tiny bit of yolk can hinder your meringue from whipping up properly, so be cautious.
- Next, whip those egg whites with your mixer until they start to thicken—like soft fluffy clouds!
- Gradually add in the sugar. This is where you need to be patient; don’t rush it! Your meringue will thank you.
- After you’ve added all that sugar, keep whipping until it’s glossy and holds stiff peaks. If you can turn the bowl upside down (safely!), and it doesn’t fall out, you’re golden!
- Fold in the cornstarch. Be gentle here—you’re trying to keep all those lovely air bubbles you created.
- Pipe your meringue onto the parchment in a wreath shape. Have fun with it!
- Bake it slowly—this is a long process, but the end result is so worth it.
- Once cooled, add the berries and look at how gorgeous it becomes!
- Finally, enjoy every moment as you share it with your loved ones.
Tips for Perfect Results:
- Make sure your mixing bowl is completely clean and dry. Any residue can interfere with the egg whites whipping up.
- For a fun twist, you can add food coloring to the meringue if you’d like a bit of extra flair when piping. Just a little will go a long way!
- If the meringue cracks while baking, don’t worry! It’ll still taste delicious, and you can always cover it with berries.
Serving Suggestions and Sides:
This delightful wreath is lovely on its own, but it pairs great with a dollop of whipped cream on the side or a drizzle of chocolate sauce for a little added richness. If you’re thinking about sides, how about some vanilla ice cream? It’s a match made in dessert heaven!
Leftovers:
As if there will be any leftovers, but just in case! I recommend storing any uneaten meringue wreath in an airtight container at room temperature. The meringue itself might soften over time, but it will still taste fantastic! When you reheat it, do so on a low setting to maintain its integrity.
FAQ Section:
Can I use store-bought meringue?
While you can, nothing beats the homemade touch! Making it from scratch adds a personal touch and flavors that store-bought just can’t replicate.
What if it’s humid outside?
Humidity can affect meringue, so it’s best to save this recipe for a drier day if possible. If you need to make it in humid weather, keep it in an air-conditioned room until you serve it.
Can I use frozen berries?
Absolutely! Just make sure to thaw and drain them beforehand. This way, you won’t get extra moisture on your beautiful wreath.
What’s the best way to whip egg whites?
Using a clean bowl and whisk or mixer helps tremendously. The key is to begin at a low speed and gradually increase it as the egg whites begin to thicken.
Can I make this ahead of time?
Yes, you can bake the meringue a day ahead and store it in an airtight container. Just add the berries right before serving.
This recipe for Festive Meringue Wreath with Jewel-Toned Berries has become a highlight of my holiday celebrations, and I’m so excited for you to try it. Every bite is a little piece of joy that I know your family will love just as much as mine does. It’s beautiful, fun to make, and utterly delicious! I hope this festive treat fills your home with warmth and happiness just as it does mine. Please let me know how it turns out for you! Your feedback is music to my ears, and if your family requests seconds, I won’t be surprised one bit! Enjoy every moment in the kitchen, and happy baking!
Festive Meringue Wreath with Jewel-Toned Berries
Ingredients
For the Meringue
- 4 large egg whites Make sure the bowl is clean and dry for whipping.
- 1 cup granulated sugar Add gradually while beating egg whites.
- 1 teaspoon cornstarch Helps stabilize the meringue.
For the Topping
- 2 cups mixed jewel-toned berries e.g., raspberries, blueberries, blackberries, strawberries.
- to taste mint leaves for garnish Optional, for a refreshing touch.
Instructions
Preparation
- Preheat your oven to 200°F (93°C).
- In a clean, dry bowl, beat the egg whites until soft peaks start to form.
- Gradually add the granulated sugar, a spoonful at a time, while continuing to beat until the mixture is glossy and stiff peaks form.
- Gently fold in the cornstarch using a spatula.
- Pipe the meringue onto a parchment-lined baking sheet in a festive wreath shape.
Baking
- Bake the meringue in the oven for 1.5 to 2 hours until dry to the touch and easily peelable from the parchment.
- Allow the wreath to cool completely after removing from the oven.
Serving
- Top the cooled meringue wreath with mixed berries.
- Garnish with fresh mint leaves.
- Serve and enjoy the delightful presentation!