Every time I make this Holiday Cheesecake with Festive Decorations, I think back to the wonderful Christmas gatherings we’ve hosted over the years. The aromas wafting from the kitchen as it bakes bring me right back to those cozy moments with family, everyone’s faces lit up with delight as they dig into dessert. It’s not just a cheesecake; it’s a centerpiece of joy and warmth that brings us all together. I remember my grandma sharing her secrets, and now, I’m thrilled to share my version of her recipe with you. I know once you dive into this cheesecake, you’ll feel the love and happiness that goes into every slice!
How to make Holiday Cheesecake with Festive Decorations
Ingredients:
- 1 1/2 cups graham cracker crumbs: This forms the delicious, buttery crust that holds everything together.
- 1/4 cup granulated sugar: Just the right amount of sweetness to balance the creaminess.
- 6 tbsp unsalted butter, melted: Adds richness and binds the crumbs together for that perfect crust.
- 3 (8 oz) packages cream cheese, softened: The star of this dessert! It gives the cheesecake its creamy texture.
- 1 cup granulated sugar: Sweetens the filling so it’s pleasing, but not overpowering.
- 1/2 cup sour cream: Provides a lovely tang that cuts through the sweetness.
- 1 tsp vanilla extract: A touch of vanilla enhances all the flavors beautifully.
- 3 large eggs: These help to set the cheesecake and give it that perfect texture.
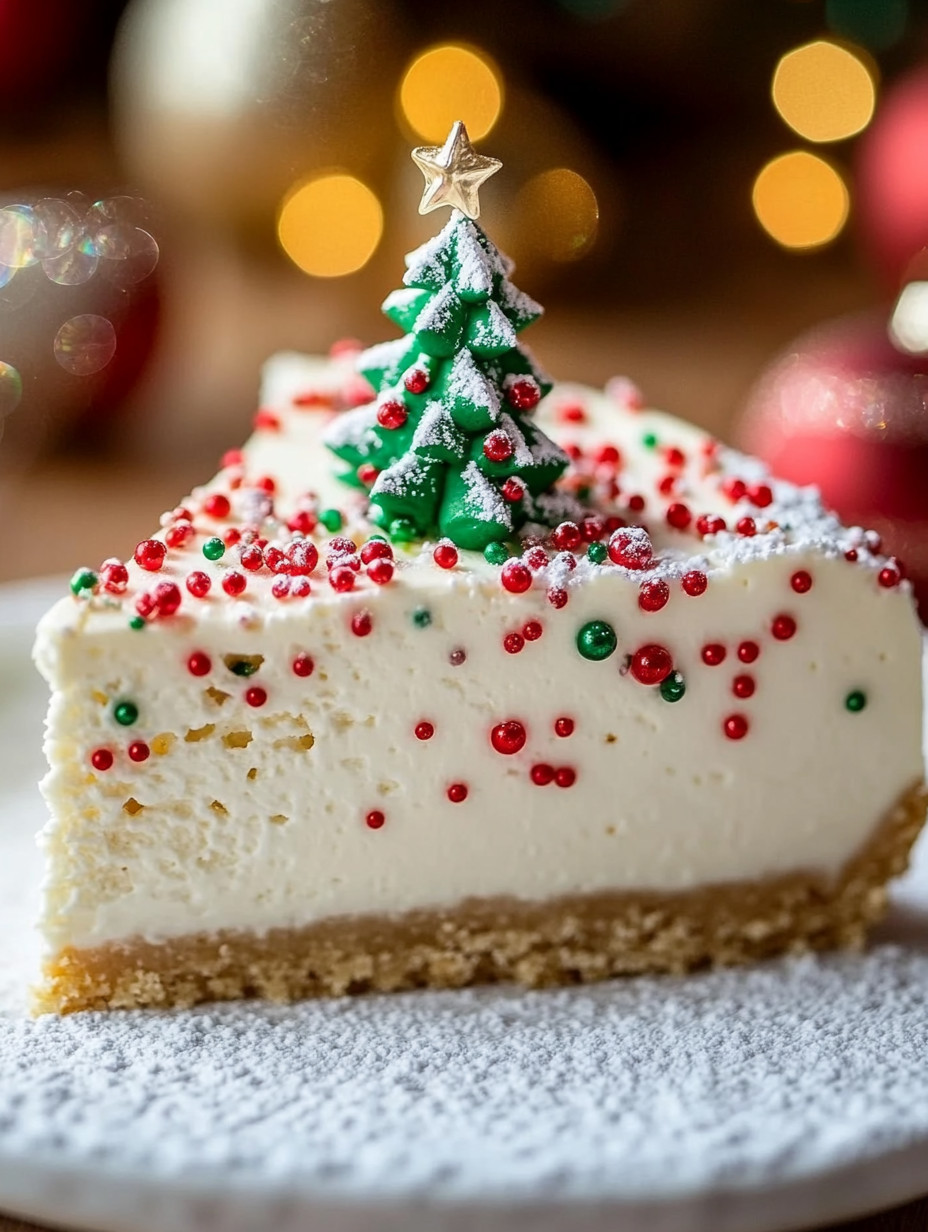
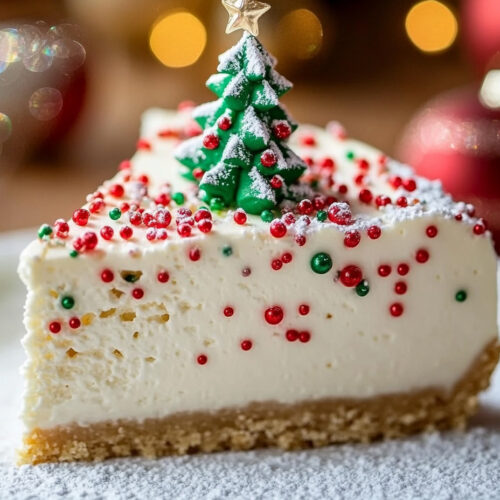
- 1/2 cup holiday sprinkles (red, green, white): Because what’s a holiday cheesecake without a pop of festive color?
- Whipped cream: For topping—light and fluffy perfection!
- Additional sprinkles: An extra sprinkle on top always makes things a little more festive.
- Powdered sugar for dusting: Because a little dusting is never too much!
- Edible Christmas tree topper (optional): This is just for fun and really makes it festive.
Now that we have what we need, let’s dive into the cooking steps!
-
Prepare the crust: In a medium bowl, mix the graham cracker crumbs, sugar, and melted butter until everything blends together nicely. You want it to be moist enough to hold together but not soggy. Press this mixture firmly into the bottom of a 9-inch springform pan. I always find that using the bottom of a measuring cup helps to get an even layer. Chill in the refrigerator while you whip up the filling.
-
Make the filling: In a large mixing bowl, beat the cream cheese and sugar together until the mixture is smooth and creamy. This is such a satisfying part! Add the sour cream and vanilla extract, mixing until well incorporated. Then, incorporate the eggs, one at a time, beating well after each addition. This ensures a nice, smooth texture without lumps. Finally, gently fold in the holiday sprinkles—this is where we bring the festive charm into play!
-
Bake the cheesecake: Pour this delightful filling over your prepared crust. Bake in a preheated oven at 325°F (160°C) for about 50-55 minutes. You want the center to be just set; it might still have a slight jiggle to it, which is perfectly fine. When you’re done, turn off the oven and leave the door slightly ajar. Let it cool in the oven for about an hour. Trust me, this step is crucial; it helps prevent cracking!
-
Chill and decorate: Once cooled, refrigerate the cheesecake for at least 4 hours, but overnight is even better if you can manage it! When you’re ready to serve, it’s time for the fun part. Top with whipped cream, sprinkle more festive sprinkles on top, a light dusting of powdered sugar, and if you’re feeling adventurous, add an edible Christmas tree topper for that extra flair.
-
Serve: Slice it up and enjoy this festive delight with your family and friends! Every bite should feel like a hug—creamy, sweet, and oh-so-delicious!
Why I Love Making This Dish: This cheesecake holds a special place in my heart. There’s something truly satisfying about gathering my family around the table and watching them indulge in something I’ve lovingly prepared. The laughter, the joy, and the gratitude I see on their faces as they enjoy this dessert make every moment worth it. It’s those little moments that create lasting memories, and I’ve come to cherish the holiday spirit shared over this delightful cheesecake.
What You’ll Need: Beyond the ingredients, make sure you have a few key tools on hand. A 9-inch springform pan is essential for easy removal of your cheesecake. You’ll also need an electric mixer to make whipping the cream cheese effortless. Don’t forget a rubber spatula for folding in those festive sprinkles and an offset spatula for serving!
Step-by-Step Guide:
- First, preheat the oven to 325°F (160°C). Trust me, this is key for that perfect, creamy texture!
- Mix your crust ingredients well, ensuring they’re combined before pressing them into the pan.
- While your crust chills, get to mixing that luscious filling.
- Always remember to beat those eggs in one at a time! It really makes a difference in texture.
- Follow the baking instructions carefully to avoid overcooking, which can lead to cracking.
- And finally, don’t rush the chilling! Letting it sit overnight makes a world of difference.
Tips for Perfect Results: I always say that patience is a virtue when it comes to baking, especially cheesecake. Allow the cheesecake to cool gradually in the oven—that’s my secret to eliminating cracks on top! Another tip is to use room temperature ingredients; it makes the mixing so much easier and results in a smoother batter. Oh, and don’t skimp on the whipped cream topping!
Serving Suggestions and Sides: This cheesecake is a star on its own, but it pairs beautifully with a warm cup of spiced tea or coffee. Consider serving it alongside some festive holiday cookies or a fruit garnish—fresh berries add a lovely touch of tartness that complements the sweetness perfectly.
Leftovers: If you happen to have any leftovers (which is rare at my house!), you can store them in the refrigerator for about 3-5 days. Just make sure to cover it tightly to keep that deliciousness intact. Reheat by letting it sit at room temperature for a little while, and it will taste just as good as the day you made it!
FAQ Section: Can I use low-fat cream cheese instead of regular? While you can use low-fat cream cheese, I’ve found it doesn’t quite give the same creamy texture. It’s best to stick with regular for that rich taste.
What if I don’t have a springform pan? You absolutely can make this in a regular round baking pan, but it may be a bit trickier to slice and serve. Just let it cool completely before trying to remove it.
Can I double the recipe for a larger gathering? Absolutely! Just be sure to adjust your baking time—you might need to add a bit more time if using a larger pan.
This Holiday Cheesecake with Festive Decorations has become a cherished tradition in my home, and I can’t wait for you to try it. It’s the perfect way to celebrate the season, and I just know you’ll love it as much as I do! Once you taste that creamy goodness, I promise it will earn a special place in your heart, too. Share your experiences with me, and let me know if your family loves it as much as mine does!
Holiday Cheesecake with Festive Decorations
Ingredients
For the crust
- 1 1/2 cups graham cracker crumbs This forms the delicious, buttery crust.
- 1/4 cup granulated sugar Balances the creaminess of the cheesecake.
- 6 tbsp unsalted butter, melted Adds richness to the crust.
For the filling
- 24 oz cream cheese, softened The star ingredient providing creaminess.
- 1 cup granulated sugar Sweetens the filling.
- 1/2 cup sour cream Provides a lovely tang.
- 1 tsp vanilla extract Enhances flavors.
- 3 large eggs Helps set the cheesecake.
- 1/2 cup holiday sprinkles (red, green, white) Adds festive color.
For topping and decoration
- Whipped cream For topping.
- Additional sprinkles For festive decoration.
- Powdered sugar For dusting.
- Edible Christmas tree topper (optional) For added fun.
Instructions
Preparation of the crust
- In a medium bowl, mix the graham cracker crumbs, sugar, and melted butter until blended. Press this mixture firmly into the bottom of a 9-inch springform pan and chill in the refrigerator.
Making the filling
- In a large mixing bowl, beat the cream cheese and sugar together until smooth. Add the sour cream and vanilla extract, mixing until well incorporated. Then, incorporate the eggs one at a time, beating well after each addition. Gently fold in the holiday sprinkles.
Baking the cheesecake
- Pour the filling over the prepared crust. Bake in a preheated oven at 325°F (160°C) for about 50-55 minutes until the center is just set with a slight jiggle. Turn off the oven and leave the door slightly ajar to cool for about an hour.
Chilling and decorating
- Once cooled, refrigerate the cheesecake for at least 4 hours or overnight. Before serving, top with whipped cream, festive sprinkles, a light dusting of powdered sugar, and consider an edible Christmas tree topper.
Serving
- Slice the cheesecake and enjoy with family and friends.