
Every time I make these Homemade Chocolate Turtles, I am transported back to my childhood. I remember sitting in my grandmother’s kitchen, the warm aroma of melting chocolate and caramel wafting through the air, making my mouth water. She would smile as she carefully crafted these delightful treats, her hands moving with both precision and joy. Now, as I stand in my own kitchen, I recreate that same magic for you and your family. The love and laughter surrounding those moments in my grandmother’s kitchen remind me of how food brings us together, and I truly believe that once you make these Chocolate Turtles, you’ll feel that same warmth and connection.
Let’s dive into how you can create these sweet, gooey, and utterly delicious chocolate turtles right in your home kitchen. Trust me; you’re going to love this!
How to Make Homemade Chocolate Turtles
Ingredients:
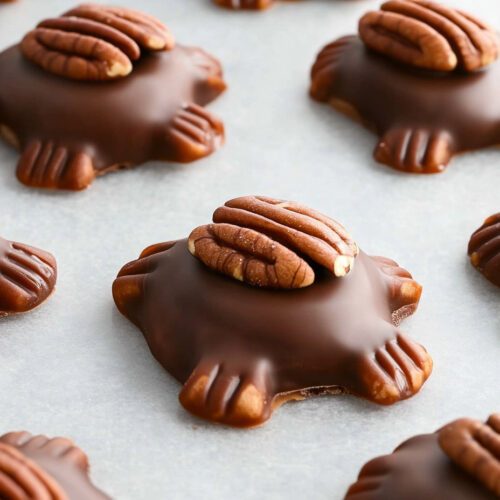
- Pecans: These buttery nuts are the star of our turtles. They add a delightful crunch and rich flavor. I personally like to use fresh pecans, roasted for that extra nuttiness.
- Caramel Candies: You’ll need some chewy caramel to create that luscious layer. I often opt for the classic wrapped caramel candies; they melt beautifully.
- Chocolate Chips: I prefer semi-sweet chocolate chips because they balance the sweetness of the caramel and pecans perfectly. However, if you’re a milk chocolate lover, that works too!
Cooking Steps:
-
Preheat Your Oven: First things first, preheat your oven to 350°F (175°C). It might seem like a small step, but trust me, this is key for toasting those pecans perfectly.
-
Toast the Pecans: Spread the pecans in a single layer on a baking sheet and pop them into the oven. Toast them for about 8-10 minutes or until they’re slightly golden and fragrant. Keep an eye on them because they can go from perfectly toasted to burnt in a blink!
-
Prepare the Caramel: While the pecans are toasting, unwrap those caramel candies and place them in a microwave-safe bowl. Heat them in the microwave in 30-second intervals, stirring in between until they are smooth and melted. Be patient, and don’t rush this step!
-
Shape the Clusters: Once the pecans are out of the oven and have cooled slightly, start forming small clusters. I usually take a handful of pecans and press them together. The caramel will bind them!
-
Spoon the Caramel: Take that beautiful melted caramel and spoon it over your pecan clusters. Make sure you drench them enough so they resemble little turtles! Leave a little bit of space, as the chocolate will go on top next.
-
Let the Caramel Set: Allow the caramel-covered clusters to sit for a bit until they hold together nicely. You can pop them in the refrigerator for about 10-15 minutes if you want a faster set.
-
Melt the Chocolate: While your caramel is setting, melt the chocolate chips in the microwave, just like you did with the caramel. Heat in 30-second intervals until smooth, stirring between.
-
Drizzle the Chocolate: Once your caramel has set, take a spoon and drizzle the melted chocolate over the clusters. Want to make them extra pretty? Swirl the chocolate on top and let it drip down the sides. You’ll be amazed at how lovely they look!
-
Allow to Set: Let the chocolate turtles sit at room temperature until the chocolate has hardened. If you’re in a hurry, you can refrigerate them for quicker setting.
-
Enjoy!: Once set, it’s time to enjoy your Homemade Chocolate Turtles! Trust me; these little bites of heaven won’t last long!
Why I Love Making This Dish
Every time I make these Homemade Chocolate Turtles, I feel a rush of nostalgia and warmth. Preparing them reminds me of my grandmother’s love for baking and how food made every family gathering special. These turtles have become a staple in my home; I often prepare them for family get-togethers or holiday celebrations. They are not just treats; they are little bites of joy that spark conversation and laughter when shared.
What You’ll Need
To whip up these turtles, you’ll simply need the ingredients listed above and a few special tools:
- Baking Sheet: For toasting the pecans.
- Microwave-Safe Bowls: For melting the caramel and chocolate.
- Spoon: To drizzle the melted chocolate.
- Parchment Paper: Optional, but it makes for easy cleanup and prevents sticking.
Step-by-Step Guide
- Preheat the Oven to 350°F: Remember, a comfy oven means comfy pecans!
- Toast the Pecans on a Baking Sheet: Keep a watchful eye on them.
- Melt the Caramel Carefully: Slow and steady wins the melted caramel race.
- Shape the Pecans into Clusters: Press them together lovingly.
- Spoon the Heavenly Caramel Over Each Cluster: Don’t be shy; this is what makes them turtles!
- Set in the Fridge: A little chill goes a long way.
- Melt the Chocolate: Keep it smooth and silky.
- Drizzle Over the Set Caramel: Make it look pretty; you’ll thank yourself later.
- Let Them Set Until Hardened: Patience pays off—trust me.
- Dig In with Glee!: Savor each bite; you’ve earned it!
Tips for Perfect Results
Here are some personal tricks I swear by when making these chocolate turtles:
- Choose Quality Ingredients: You’ll be amazed at how much of a difference fresh, high-quality ingredients can make in your finished product.
- Don’t Rush the Melting: Especially with chocolate and caramel; heat slowly and stir often to avoid burning.
- Experiment with Flavors: Sometimes, I add a pinch of sea salt on top of the finished turtles for that sweet and salty combo. It elevates them to a whole new level!
Serving Suggestions and Sides
These Chocolate Turtles can be enjoyed on their own, but I love to pair them with a cup of rich coffee or a glass of milk. They also make lovely gifts when placed in a decorative box, especially during the holidays or special occasions. Just imagine receiving a sweet little box filled with these delights! Trust me, it’s a treat that brings smiles.
Leftovers
If you’re lucky enough to have some turtles left over (though I can’t promise that’s likely!), just store them in an airtight container at room temperature. They should keep well for about a week. If you live in a particularly warm place, you might want to pop them into the fridge to keep the chocolate from melting.
Frequently Asked Questions
Can I use different nuts?
Absolutely! Walnuts or pecans work wonderfully, but I always come back to the classic pecan for its rich flavor and crunch.
What’s the best way to melt chocolate?
I always suggest melting chocolate in short bursts. It’s better to go slow—high heat can ruin chocolate, turning it grainy and unappetizing.
Can I make these turtles ahead of time?
Yes, you can make them a few days in advance and store them in an airtight container. Just try to keep them out of sight, or they might disappear before you get the chance to share!
In conclusion, making Homemade Chocolate Turtles is more than just a recipe; it’s about creating sweet memories in your kitchen. I can’t wait for you to try this delightful treat and share it with your loved ones. When I serve these turtles, I see the joy on my family’s faces, and I hope you experience that same joy. You’ll love how easy they are to make and how delicious they taste. So, roll up your sleeves, gather your ingredients, and enjoy the process! I can’t wait to hear how yours turn out!
Homemade Chocolate Turtles
Ingredients
Main Ingredients
- 2 cups Pecans, roasted For an extra nuttiness
- 14 oz Caramel candies Wrapped caramel candies work best
- 1 cup Semi-sweet chocolate chips Milk chocolate can be used if preferred
Instructions
Preparation
- Preheat your oven to 350°F (175°C).
- Spread the pecans in a single layer on a baking sheet and toast them for about 8-10 minutes or until they are slightly golden and fragrant.
- While the pecans are toasting, unwrap the caramel candies and place them in a microwave-safe bowl. Heat in the microwave in 30-second intervals, stirring in between until smooth.
Assembly
- Once the pecans are out of the oven and have cooled slightly, form small clusters by pressing together a handful of pecans.
- Spoon the melted caramel over the pecan clusters, drenching them but leaving space for the chocolate on top.
- Allow the caramel-covered clusters to sit until they hold together nicely, or refrigerate for 10-15 minutes.
- Melt the chocolate chips in the microwave in 30-second intervals until smooth.
- Drizzle the melted chocolate over the caramel-covered clusters, making them look decorative.
- Let the chocolate turtles sit at room temperature until the chocolate has hardened, or refrigerate for quicker setting.
- Once set, enjoy your Homemade Chocolate Turtles!