
Every time I make this Layered Cherry Cobbler, it brings me back to those long summer days spent in my grandmother’s kitchen. I can still recall the laughter and love that filled the air as we baked together, waiting for that delightful aroma to waft through the house. The moment I pop it into the oven, I can almost hear her voice and see her warm smile. I know that once you try this recipe, you’ll feel that same cozy nostalgia and warmth that reminds you of home.
When I shared this dish with my friends and family, their eyes lit up, and their smiles widened with every bite. It’s one of those comforting desserts that never fails to impress—simple yet delicious, and it’s made with love. I’m excited to share this recipe with you, and I hope it becomes a beloved favorite in your household too!
How to make Layered Cherry Cobbler
Ingredients:
- 1 can of cherry pie filling: This is the star of the show! Opt for a premium brand that uses good-quality cherries; it makes all the difference in flavor.
- 1 cup of all-purpose flour: This binds everything together to create a delicious base.
- 1 cup of sugar: A must for that sweetness that contrasts beautifully with the tart cherries.
- 1 cup of milk: It keeps the batter moist and fluffy; I love whole milk for a richer flavor.
- 1/2 cup of butter, melted: Adds that rich, buttery goodness that makes everything better!
- 1 teaspoon of baking powder: This is essential for helping the cobbler rise and get that perfect golden crust.
- 1/2 teaspoon of salt: Just a pinch to balance the sweetness.
- Whipped cream or vanilla ice cream for serving: Because who wouldn’t want a scoop of creamy goodness on top?
Cooking Steps:
-
Preheat the Oven: First things first, preheat your oven to 350°F (175°C). Trust me, this is key for achieving that golden crispy topping!
-
Mix the Dry Ingredients: In a mixing bowl, combine your flour, sugar, baking powder, and salt. Giving it a good stir now ensures even distribution in your cobbler!
-
Add Wet Ingredients: Pour in the milk and melted butter. Mix it just until combined; it’s okay if there are a few lumps. I like to use a wooden spoon—it makes me feel connected to the process!
-
Prepare the Baking Dish: Grease a 9×13 inch baking dish with butter or cooking spray to prevent sticking. Nobody wants to lose that delicious cobbler to the bottom of the dish, right?
-
Layer the Cherry Filling: Spread the cherry pie filling evenly across the bottom of your prepared dish. Make sure the cherries are spread out well. The better the distribution, the more cherries in each delicious bite!
-
Pour the Batter: Carefully pour the batter over the cherry filling. It might seem like the batter is a bit thin, but don’t worry! It will puff up beautifully.
-
Bake: Place the dish in the preheated oven and bake for about 30-35 minutes, or until the top is a lovely golden brown and a toothpick inserted comes out clean. The anticipation will be building—you’ll know it’s about to be delicious!
-
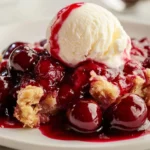
Cool and Serve: Allow your cobbler to cool for a few minutes before serving. This step is crucial because it allows the juices to settle. Serve warm with a dollop of whipped cream or a scoop of vanilla ice cream. I love watching the ice cream slowly melt into the warm cobbler—pure magic!
Why I Love Making This Dish: Layered Cherry Cobbler holds a special place in my heart because it’s beyond just food; it’s about memories and shared moments. Whenever I make it, I think of my grandma’s kitchen and the warmth of family gatherings. Watching my loved ones enjoy this cobbler brings me so much joy. Seeing their faces light up makes every moment in the kitchen worthwhile.
What You’ll Need: You won’t need any fancy equipment for this recipe, just the basics will do! You’ll need a mixing bowl, a spoon or spatula, a whisk for mixing the batter, and a nice baking dish. If you have a cooling rack, that’s great for letting your cobbler cool just a bit before serving.
Step-by-Step Guide:
- Preheat the oven to 350°F (175°C).
- Mix flour, sugar, baking powder, and salt in a bowl.
- Pour in the milk and melted butter; stir until just combined.
- Grease your baking dish well.
- Spread the cherry filling evenly in the dish.
- Pour the batter over the cherries.
- Bake for 30-35 minutes, until golden brown.
- Let cool slightly, then serve warm.
Tips for Perfect Results: To achieve that perfect crispy top, make sure to not overmix your batter. This keeps it light and fluffy! If you like a bit of texture, consider adding a sprinkle of oats or chopped nuts to the batter before pouring it into the dish. My secret? I sometimes drizzle a little almond extract into the batter—it pairs beautifully with cherries!
Serving Suggestions and Sides: This cobbler is heavenly on its own, but if you want to elevate the experience even further, consider serving it with a cup of hot coffee or tea. It’s a perfect companion for an afternoon treat! You could also serve it alongside a light salad or a charcuterie board for a lovely gathering—people will be coming back for seconds, I promise!
Leftovers: If you happen to have any leftovers (which is rare in my house!), let the cobbler cool completely before storing it. Keep it in an airtight container in the fridge for up to 3 days. To reheat, simply pop it in the microwave for a few seconds, or warm it in the oven at 350°F until heated through. I actually like it cold the next day—there’s something wonderfully comforting about it!
FAQ Section: Can I use fresh cherries instead of canned? Sure! If fresh cherries are in season, go for it! Just wash and pit them, then toss them with a bit of sugar to release their juices.
What if I don’t have baking powder? You can make a simple substitution by mixing 1/4 teaspoon of baking soda with 1/2 teaspoon of vinegar or lemon juice. It’s not the same, but it can work in a pinch!
Can I use a different fruit filling? Absolutely! This recipe is versatile. Try peaches, blueberries, or even mixed berries for a delightful twist. You can also experiment with different flavored extracts or spices to add your own unique touch.
How do I know when it’s done? You’ll know it’s ready when the top is golden brown and a toothpick comes out clean from the center. If it jiggles a lot, it might need a few more minutes!
Is it safe to freeze the cobbler? Yes, you can freeze it! Just make sure it’s in an airtight container. When you’re ready to enjoy it again, let it thaw overnight in the refrigerator before reheating.
This dish has become a favorite in my house, and I’m so excited for you to try it. You’ll love the comforting flavors of cherry and the sweet, buttery cobbler topping. It’s straightforward to make, and I know it’ll fill your home with love and warmth. Please let me know how it turns out, and if your family asks for seconds, just like mine does every time! You’re going to love this!
Layered Cherry Cobbler
Ingredients
Base Ingredients
- 1 can can of cherry pie filling Opt for a premium brand for best flavor.
- 1 cup all-purpose flour This binds everything together.
- 1 cup sugar For sweetness that contrasts beautifully with the tart cherries.
- 1 cup milk Whole milk for a richer flavor.
- 1/2 cup butter, melted Adds rich, buttery goodness.
- 1 teaspoon baking powder Essential for rising.
- 1/2 teaspoon salt Balances the sweetness.
Serving Suggestions
- as needed Whipped cream or vanilla ice cream For serving.
Instructions
Preparation
- Preheat your oven to 350°F (175°C).
- In a mixing bowl, combine flour, sugar, baking powder, and salt.
- Pour in the milk and melted butter; stir until just combined.
- Grease a 9x13 inch baking dish.
- Spread the cherry pie filling evenly in the dish.
- Carefully pour the batter over the cherry filling.
- Bake for about 30-35 minutes, or until golden brown and a toothpick comes out clean.
- Allow the cobbler to cool for a few minutes before serving.