
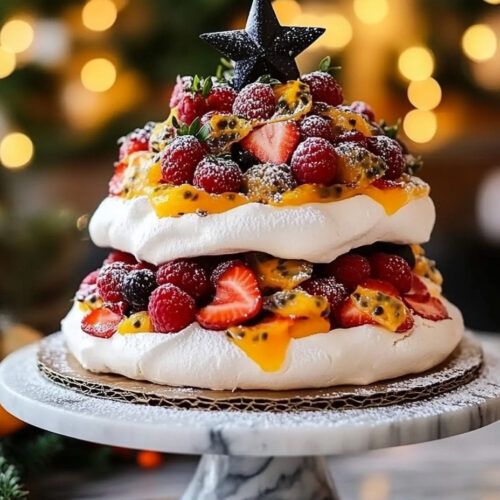
Every time I make this Pavlova Christmas Tree with Fresh Fruits, I can’t help but feel a wave of nostalgia wash over me. There’s something magical about crafting a dessert that’s not only delicious but also stunningly beautiful. I remember the first time I ever saw a pavlova: my dear friend Sarah brought one to our holiday gathering. It was like a whimsical tree all decked out in festive colors, adorned with ribbons of cream and a bounty of fruits that danced in the light. When I tasted it, I couldn’t believe how airy and sweet it was! Since then, I’ve made it an annual tradition in my kitchen, and I can’t wait to share it with you.
What’s so special about the Pavlova Christmas Tree is not just its looks; it’s the joy it brings to my family when we gather around the table to celebrate. This dessert brings everyone together, and every bite is a reminder that the holidays are all about sharing special moments with those we love. I just know that once you try making this dessert, you too will be enchanted by its charm, and it might just become a tradition in your home as well!
How to make a Pavlova Christmas Tree with Fresh Fruits
Ingredients:
To create a show-stopping Pavlova Christmas Tree, you will need the following ingredients:
- 6 large egg whites – The backbone of our pavlova! They provide that unforgettable fluffy texture we all adore.
- 1 1/2 cups (300 g) granulated sugar – This sweetens the meringue and contributes to the crisp outer shell.
- 1 tsp white vinegar – This helps stabilize the egg whites and gives our meringue that perfect chewy interior.
- 1 tbsp cornstarch – This is magical! It gives the pavlova a lovely, marshmallow-like center.
- 1 tsp vanilla extract – For that delightful flavor that pairs beautifully with our toppings.
- 1 1/2 cups heavy cream, whipped (or mascarpone cheese) – This creamy layer is essential for balancing the sweetness of the pavlova.
- Fresh strawberries, halved 🍓 – They add a burst of color and tartness.
- Kiwi slices 🥝 – Bright green slices that will make your tree look festive and vibrant.
- Raspberries 🍇 – Little jewels that burst with flavor!
- Blueberries 🫐 – A lovely contrast that adds even more color.
- Pomegranate arils ❤️ – They sprinkle such a delightful crunch and sweetness.
- Powdered sugar, for dusting – To give our tree that snowy look.
- Fresh mint leaves or sprigs of rosemary, for garnish – A beautiful touch that not only looks pretty but adds freshness.
Cooking Steps:
Let’s walk through the steps together; it’s easier than you think!
-
Preheat the oven to 225°F (110°C). This low temperature is essential for drying out the meringue while it bakes. Trust me, a slow bake makes all the difference for that perfect crisp shell!
-
Prepare baking sheets by lining them with parchment paper. Here’s a little tip: draw 3-4 circles of varying sizes on the underside of the parchment to help guide your meringue shapes. You want your meringues to look like the rings of a lovely tree!
-
Beat the egg whites in a large, clean mixing bowl with an electric mixer on medium speed until soft peaks form. This usually takes a few minutes, so be patient! It’s a beautiful sight when those fluffy peaks appear.
-
Gradually add the sugar, one tablespoon at a time, while continuously beating. This step is crucial as it creates that lovely glossy texture. Keep beating until you see stiff, glossy peaks. It will look glossy and oh-so-luxurious!
-
Gently fold in the vinegar, cornstarch, and vanilla extract. Be careful here; you want to keep all that lovely air you’ve just whipped into the egg whites. Use a gentle folding motion—think of it as giving your meringue a warm hug!
-
Spoon the meringue onto the prepared circles, spreading it evenly to form neat discs. Slightly raise the edges of each disc to help hold your beautiful toppings later. This is where you’ll see your artistic side come out!
-
Bake the meringues for 1 1/2 to 2 hours. You want them to be crisp on the outside, with the ability to lift them off easily from the parchment paper. After baking, turn off the oven and let your meringues cool completely inside with the door slightly ajar. This cooling step is so important for that delicate texture.
-
Once cooled, place the largest meringue disc on a serving platter. Spread a generous layer of whipped cream (or mascarpone, if you prefer) on top. Just imagine how creamy and dreamy that will be!
-
Layer in the fresh fruits. Start with some strawberries, then kiwi, raspberries, and blueberries, artfully arranging them. You want each layer to look vibrant and inviting.
-
Repeat the process with the smaller meringue discs, stacking them to form that beautiful tree shape. Just like building a snowman!
-
Dust the entire tree with powdered sugar for that wintry, snowy effect. Just picture it—your meringue will look like it’s covered in fresh-fallen snow!
-
Lastly, garnish with fresh mint leaves or rosemary sprigs. Not only does this make it look beautiful, but it also adds a lovely freshness. Don’t forget to arrange some extra fruits at the base for those extra special touches.
Why I Love Making This Dish
What I truly adore about the Pavlova Christmas Tree is how it perfectly captures the essence of the holidays. Gathering the family around the table and watching their eyes light up as I unveil this dessert is like unwrapping a perfectly packaged gift. The delicate sweetness of the meringue contrasts beautifully with the fresh, tart fruit. It’s a dessert that feels both light and indulgent at the same time.
What You’ll Need:
To make this Pavlova, you don’t need fancy equipment, just the basics: a good electric mixer, a mixing bowl, and some baking sheets. That’s it! It’s remarkable what you can create with simple tools and fresh ingredients.
Tips for Perfect Results
- Make sure your mixing bowl and beaters are spotless. Any grease can prevent the egg whites from whipping up properly.
- Use room temperature egg whites for the best volume; cold eggs just can’t perform!
- Be patient while whipping the sugar in; it’s worth the effort for that glossy finish.
- Keep an eye on your meringues while they’re baking. If they start to brown, turn the oven down slightly. We want them crisp, not burnt!
Serving Suggestions and Sides
The Pavlova Christmas Tree is perfect on its own, but you can elevate the experience by serving it alongside cookies or a rich hot chocolate. I always enjoy it after a festive holiday meal, where the lightness of the pavlova balances out the comforting richness of other dishes. You can also set out some extra fruit and whipped cream on the side—let your guests add their personal touch!
Leftovers
If you happen to have any leftovers (which I doubt you will, but just in case!), I recommend storing the meringued layers separately from the cream and fruits. Meringue tends to absorb moisture, which can make it chewy rather than crispy. So, keep those layers crisp and put the cream in a sealed container in the fridge. Just remember to enjoy it within a couple of days for the best taste!
FAQ Section
Can I make the meringue a day ahead?
- Absolutely! Just store the cooled meringue layers in an airtight container to keep them crisp. You can add the whipped cream and fruits right before serving.
Can I use a different kind of fruit?
- Yes! You can use pretty much any fruit you like. Just keep in mind that fruits with a high moisture content, like watermelon, might make the meringue soggy.
What if my pavlova collapses?
- Don’t worry! It can happen, especially if the weather is humid. Make sure to whip the egg whites until they are nice and stiff, and it should be fine!
How can I make it gluten-free?
- You’re in luck! This recipe is naturally gluten-free since it doesn’t use any flour. Just keep an eye on your ingredients to ensure everything is certified gluten-free.
This Pavlova Christmas Tree with Fresh Fruits has become a cherished part of my holiday celebrations, and I’m so excited for you to try it. I know you’ll love it as much as I do! The light, airy meringue combined with the luscious whipped cream and colorful fruits creates such a delightful experience. It’s a dessert that encourages togetherness, laughter, and joy at your table, just as it does in mine. So gather your loved ones, whip up this enchanting dessert, and watch as it brings warmth and sweetness to your holiday celebrations. Let me know how it turns out—I can’t wait to hear your stories about this lovely treat!
Pavlova Christmas Tree
Ingredients
Meringue Base
- 6 large egg whites The backbone of our pavlova! They provide that unforgettable fluffy texture.
- 1.5 cups granulated sugar This sweetens the meringue and contributes to the crisp outer shell.
- 1 tsp white vinegar Helps stabilize the egg whites.
- 1 tbsp cornstarch Gives the pavlova a lovely, marshmallow-like center.
- 1 tsp vanilla extract For that delightful flavor.
Toppings
- 1.5 cups heavy cream, whipped (or mascarpone cheese) Essential for balancing the sweetness of the pavlova.
- 1 cup fresh strawberries, halved Adds color and tartness.
- 1 cup kiwi slices Bright green slices for a festive look.
- 1 cup raspberries Burst with flavor.
- 1 cup blueberries Adds contrast and color.
- 1 cup pomegranate arils For delightful crunch and sweetness.
- powdered sugar, for dusting To give our tree that snowy look.
- fresh mint leaves or rosemary sprigs, for garnish Adds freshness and beauty.
Instructions
Preparation
- Preheat the oven to 225°F (110°C).
- Prepare baking sheets by lining them with parchment paper, drawing 3-4 circles on the underside for guidance.
- Beat the egg whites in a large mixing bowl with an electric mixer on medium speed until soft peaks form.
- Gradually add the sugar, one tablespoon at a time, beating until stiff, glossy peaks form.
- Gently fold in the vinegar, cornstarch, and vanilla extract.
- Spoon the meringue onto the prepared circles, forming neat discs with raised edges.
- Bake the meringues for 1.5 to 2 hours until crisp, then let cool completely in the oven.
Assembly
- Once cooled, place the largest meringue disc on a serving platter.
- Spread a generous layer of whipped cream on top.
- Layer in the fresh fruits in an artful arrangement.
- Repeat with smaller meringue discs to form the tree shape.
- Dust with powdered sugar and garnish with fresh mint or rosemary.