
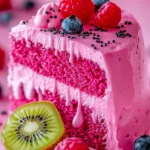
Every time I make this Pink Dragon Fruit Layer Cake, I’m transported back to summers spent picking fresh fruit in my garden. The vibrant colors and tropical taste remind me of the joy of childhood, where sweetness filled the air and laughter echoed amongst friends and family. I can still picture my grandchildren’s faces lighting up when I serve this stunning cake at our Sunday family gatherings. The way the pink layers stand tall and proud on the table, inviting everyone to dig in, brings such a warmth to my heart. I know that once you try it, you’ll feel the same sense of joy and comfort that it brings to my home.
How to make Pink Dragon Fruit Layer Cake
Ingredients:
To create this exotic masterpiece, here’s what you will need:
- 1 1⁄3 cups buckwheat flour: Buckwheat gives the cake a wonderful nutty flavor and is gluten-free, perfect for those with dietary restrictions.
- 1⁄2 cup fine shredded coconut: This adds a delightful chewiness and tropical flair to every bite.
- 3⁄4 tsp baking powder: Essential for making the cake rise and giving it a light texture.
- 1⁄2 tsp baking soda: Helps with the rising process, working in tandem with the baking powder.
- 1 tbsp pink pitaya powder: This is the star of the show! It not only gives the cake its lovely pink hue but also adds a subtle sweetness.
- 1⁄4 cup canned coconut cream: Rich and creamy, it helps to make the cake moist and luscious.
- 1⁄8 cup water: This allows for the right consistency in the batter.
- 1⁄4-1⁄2 cup light-colored sweetener (like rice malt syrup or maple syrup): A great alternative to refined sugar, bringing natural sweetness.
- 1⁄4 cup beetroot juice: This is for color and a hint of earthy flavor that balances the sweetness beautifully.
- 3 tbsp aquafaba: This whipped chickpea brine works wonders to replace eggs and gives the cake a fluffy texture.
- 1⁄4 cup raspberries: These fresh berries are perfect for making a jam that complements the cake.
- 1 tbsp chia seeds: They add fiber and help to thicken the jam mixture.
- 3⁄4 cup cashews, soaked overnight: Soaking makes them creamy and perfect for blending into our mousse.
- 3/4 cup canned coconut cream: Another layer of creaminess for our delicious mousse.
- 1 tbsp pink pitaya powder: More of this lovely powder to ensure that beautiful pink color shines throughout.
- 1/2 tsp agar powder: A natural gelling agent that helps our mousse set perfectly.
- 1 tsp agar powder: This will be used in our jelly to achieve a lovely texture.
- 3 tbsp light-colored sweetener: To sweeten our jelly layer.
- 1 tbsp pink pitaya powder: Again, to echo the flavors throughout the cake.
Cooking Steps:
Now onto the fun part – actually making the cake! Follow these steps, and I assure you, the process will be just as joyful as the finished result.
-
Preheat your oven: Begin by preheating your oven to 356°F (180°C). This is key for ensuring that your cake rises beautifully and bakes evenly.
-
Prepare the cake tin: Line a 15cm (6-inch) cake tin with baking paper. This makes it easy to remove the cake later without any sticking!
-
Mixing the dry ingredients: In a large bowl, mix together the buckwheat flour, shredded coconut, baking powder, baking soda, and pink pitaya powder. Set this mixture aside while we prepare the wet ingredients.
-
Create the wet mixture: In another bowl, whisk together the coconut cream, water, sweetener, and beetroot juice. The color of your beetroot juice will make your cake a feast for the eyes!
-
Whip the aquafaba: In a separate small bowl, whisk the aquafaba until it becomes bubbly. Don’t skip this step—this is what will give your cake that lovely light texture!
-
Combine wet and dry: Gently fold the bubbly aquafaba into the wet mixture, and then gradually incorporate the dry ingredients until well combined. You want to be careful not to overmix—just combine until there are no dry spots left.
-
Bake the cake: Pour the batter into the prepared tin and bake for about 20 minutes, or until a skewer comes out clean. Every oven is different, so keep an eye on it!
-
Cool the cake: Once baked, let the cake cool completely before flattening the top if needed. This helps when you spread the layers later.
-
Prepare the raspberry chia jam: While the cake is cooling, in a small bowl, mash the raspberries with chia seeds and your sweetener. This jam is going to add a delightful tartness that balances the sweetness of the cake.
-
Spread the jam: Spread the raspberry chia jam evenly over the cooled sponge cake. I like to use an offset spatula to make this easier.
-
Make the mousse: Blend the soaked cashews, coconut cream, sweetener, and pink pitaya powder until smooth and creamy. The creaminess will be heavenly!
-
Heat the agar: In a small saucepan, heat the remaining coconut cream with agar powder until fully dissolved. This is critical for getting that lovely mousse to set.
-
Combine the mousse: Combine the heated coconut cream with the cashew mixture and blend until smooth. You’ll love the vibrant color!
-
Pour the mousse: Pour the mousse mixture over the chia jam layer on the cake and chill in the refrigerator until set.
-
Prepare the jelly layer: In a small saucepan, simmer agar powder with the water until dissolved. This will help your jelly layer set perfectly.
-
Mix in sweetener and powder: Stir in sweetener and pink pitaya powder until fully combined, creating a gorgeous, glossy layer for your cake.
-
Complete the cake: Carefully pour the jelly mixture over the set mousse layer. Return to the refrigerator until firm.
Why I Love Making This Dish:
What makes this Pink Dragon Fruit Layer Cake so special to me is not just the vibrant visuals or the delightful taste but the memories it creates. There’s something truly magical about baking. It brings us closer to our family and friends. Every slice shared is a moment captured, laughter, joy, and connection. When I serve this cake, I’m not just serving dessert; I’m serving memories and love.
What You’ll Need:
Before you start, make sure you have a few essential tools ready. You’ll need a mixing bowl, a whisk, an offset spatula for spreading, and a blender or food processor for that silky mousse. Having a good-quality 6-inch cake tin will also help make a beautiful layered cake. Trust me; investing in a few good tools makes baking so much easier and more enjoyable!
Tips for Perfect Results:
Making this cake perfect is all about patience and care. Ensure your cashews are soaked overnight for the best texture in your mousse. When whisking the aquafaba, go until it’s bubbly but not too stiff; you want it to fold nicely into your batter. And when you prepare the jelly layer, be sure it’s completely cool before pouring it over the mousse to avoid disturbing the layers below. These little steps can make a world of difference!
Serving Suggestions and Sides:
I love serving this Pink Dragon Fruit Layer Cake with a dollop of whipped coconut cream on the side and some fresh fruit—maybe even a few more raspberries or slices of fresh dragon fruit. A scoop of vanilla ice cream also pairs beautifully! If you’re hosting a gathering, this cake is sure to impress your guests, but don’t forget to save a slice for yourself!
Leftovers:
If you happen to have any leftovers (which is rare in my house), store them in an airtight container in the fridge. It’s best enjoyed within a few days, but believe me, it’s so yummy that it probably won’t last that long! For reheating, just let it sit at room temperature for a bit—this will help maintain that soft texture.
FAQ Section:
Can I use other fruits in the jam?
Absolutely! While I adore the tartness of raspberries, feel free to experiment with strawberries, blueberries, or even a mix of your favorites. Each will give the jam a unique twist!
Is this cake gluten-free?
Yes, it is! The use of buckwheat flour makes it gluten-free, and your friends with dietary restrictions will love it!
Can I use frozen fruit for the jam?
Definitely! Just make sure to thaw and drain any excess moisture before mashing, and it will work beautifully.
Conclusion:
This Pink Dragon Fruit Layer Cake has become a cherished recipe in my home, one that brings family together and creates laughter and love around the table. I’m so excited for you to try this delightful treat. It’s not only beautiful but incredibly easy to make. I know you’ll love it as much as I do! When you take that first bite, let it transport you to sweet summer days filled with sunshine and joy, just like it does for me. Please let me know how it turns out for you—if your family asks for seconds, just like mine do every time, that will make me smile! Happy baking!
Pink Dragon Fruit Layer Cake
Ingredients
For the Cake
- 1 1/3 cups buckwheat flour Gluten-free, adds a wonderful nutty flavor.
- 1/2 cup fine shredded coconut Adds a delightful chewiness and tropical flair.
- 3/4 tsp baking powder Essential for making the cake rise.
- 1/2 tsp baking soda Helps the cake rise.
- 1 tbsp pink pitaya powder Provides the cake with its pink hue.
- 1/4 cup canned coconut cream Contributes to the cake's moistness.
- 1/8 cup water For batter consistency.
- 1/4-1/2 cup light-colored sweetener Like rice malt syrup or maple syrup.
- 1/4 cup beetroot juice Adds color and earthy flavor.
- 3 tbsp aquafaba Whipped chickpea brine for fluffiness.
For the Raspberry Chia Jam
- 1/4 cup raspberries Fresh berries perfect for making jam.
- 1 tbsp chia seeds Adds fiber and thickens the jam.
For the Mousse Layer
- 3/4 cup cashews Soaked overnight for creaminess.
- 3/4 cup canned coconut cream Provides creaminess.
- 1 tbsp pink pitaya powder Ensures beautiful color throughout.
- 1/2 tsp agar powder Natural gelling agent for setting.
For the Jelly Layer
- 1 tsp agar powder To achieve a lovely texture.
- 3 tbsp light-colored sweetener To sweeten the jelly layer.
- 1 tbsp pink pitaya powder To echo the flavors.
Instructions
Preparation
- Preheat your oven to 356°F (180°C).
- Line a 15cm (6-inch) cake tin with baking paper.
- In a large bowl, mix together the buckwheat flour, shredded coconut, baking powder, baking soda, and pink pitaya powder. Set aside.
- In another bowl, whisk together the coconut cream, water, sweetener, and beetroot juice.
- In a separate small bowl, whisk the aquafaba until bubbly.
Baking the Cake
- Gently fold the bubbly aquafaba into the wet mixture, and gradually incorporate the dry ingredients until well combined.
- Pour the batter into the prepared tin and bake for about 20 minutes, or until a skewer comes out clean.
- Let the cake cool completely before flattening the top if needed.
Making the Raspberry Chia Jam
- In a small bowl, mash the raspberries with chia seeds and your sweetener.
- Spread the raspberry chia jam evenly over the cooled sponge cake.
Preparing the Mousse Layer
- Blend the soaked cashews, coconut cream, sweetener, and pink pitaya powder until smooth.
- In a small saucepan, heat the remaining coconut cream with agar powder until fully dissolved.
- Combine the heated coconut cream with the cashew mixture and blend until smooth.
- Pour the mousse mixture over the chia jam layer on the cake and chill in the refrigerator until set.
Preparing the Jelly Layer
- In a small saucepan, simmer agar powder with water until dissolved.
- Stir in sweetener and pink pitaya powder until fully combined.
- Carefully pour the jelly mixture over the set mousse layer and return to the refrigerator until firm.