
Every time I make this Texas Sheet Cake, it takes me back to my childhood in the warm, bustling kitchen of my grandmother. I can still hear the sound of laughter and the joyful chatter of family gathered around the table. The air would be filled with a delicious aroma as that rich chocolate cake was baking, and when it came out of the oven, it looked absolutely divine! I knew, right then and there, that I was in for a treat. There’s nothing quite like the comfort of a homemade cake, especially one that brings everyone together. If you’ve ever had a moment like that, you know just how special a simple recipe can be.
So, whether you’re planning a potluck, celebrating a birthday, or just want to whip up something sweet for the family, this Texas Sheet Cake is the perfect choice. It’s easy to make, deliciously moist, and just bursting with rich chocolate flavor. You’re going to love how simple it is, and I promise, your family will keep coming back for more!
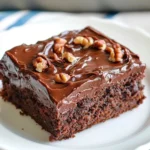
How to make Texas Sheet Cake
Ingredients:
- 2 cups all-purpose flour: This is the heart of your cake, providing structure and that comforting, fluffy texture we all adore.
- 2 cups sugar: Sweetness is key, and sugar helps to keep the cake moist as well.
- 1 teaspoon baking soda: This little ingredient helps the cake rise beautifully, creating that light texture.
- 1 teaspoon salt: Just a pinch will do to balance the sweetness and enhance the flavors.
- 4 large eggs: Eggs add richness and moisture. They’re the glue that holds everything together!
- 1 cup buttermilk: This is my secret weapon for ultra-moist cake. If you don’t have buttermilk, you can easily make your own by mixing milk with a splash of vinegar.
- 1 cup vegetable oil: This keeps the cake moist and adds to that luscious texture we all crave.
- 1 cup boiling water: Surprise! This will help melt the cocoa and ensure your cake is super moist.
- 1 cup unsweetened cocoa powder: The star of our cake! Go for a good quality cocoa to really elevate that chocolate flavor.
- 1 cup pecans, chopped: Optional, but I just love the crunch they add!
- 1 stick butter: You’ll use this for the frosting—so delicious when melted with sugar and cocoa!
- 1/3 cup milk: Adds creaminess to the frosting.
- 1 teaspoon vanilla extract: Always go for pure vanilla to achieve that rich, aromatic flavor everyone loves.
Cooking Steps:
-
Preheat your oven to 350°F (175°C). Trust me, this is key for a perfectly baked cake!
-
Grease a large sheet pan. You don’t want that beautiful cake to stick. I usually use butter for greasing, but any non-stick spray works fine too!
-
In a large mixing bowl, combine the flour, sugar, baking soda, and salt. You want to whisk it well so everything is evenly blended.
-
In another bowl, combine the eggs, buttermilk, and vegetable oil. Just look at how creamy it gets!
-
Gradually add the wet ingredients to the dry ingredients, mixing them together until everything is just combined. Don’t worry if it’s a little lumpy; that’s okay.
-
Now for the magic! Slowly stir in the boiling water and cocoa powder. It may look a little runny, but that’s perfect. It will create a rich, moist cake.
-
Pour this heavenly batter into your prepared sheet pan. Make sure it’s evened out so it bakes nicely.
-
Bake for 20-25 minutes. You’ll want to keep an eye on it; when a toothpick inserted in the center comes out clean, it’s done!
-
While the cake is baking, let’s make that luscious frosting. In a saucepan, melt the butter over medium heat. Once melted, add in the cocoa powder, milk, and sugar, stirring until smooth and well combined.
-
Remove from heat and stir in the vanilla extract and chopped pecans, if using.
-
As soon as the cake is out of the oven, pour the warm frosting over the cake. Watch it soak in; it’s pure magic!
-
Allow the cake to cool slightly before cutting into it. This is the hardest part; the smell will be wafting through your kitchen, and your family won’t be able to resist!
Why I Love Making This Dish:
There’s something so special about Texas Sheet Cake. It’s a recipe that’s been passed down through generations in my family, and I cherish the memories it brings. When I bake this cake, I can almost hear my grandmother’s laughter, see her smiling face, and taste the love she poured into every bite. This cake is not just food; it’s a way to keep those beautiful memories alive and share them with my own family.
What You’ll Need:
In addition to your ingredients, make sure you have the following tools ready before you begin:
- Large mixing bowls
- Whisk
- Measuring cups and spoons
- Rubber spatula
- Sheet pan (a larger one works great for this recipe)
- Saucepan for making frosting
- Toothpick for testing doneness
Step-by-Step Guide:
-
First, preheat the oven to 350°F. This is crucial, and I always mention it because starting with a hot oven makes such a difference for even baking.
-
Grease your sheet pan so the cake doesn’t get stuck. Think of it like giving your cake a warm hug!
-
In a large bowl, whisk together the dry ingredients. This helps to incorporate air for a fluffy cake.
-
Mix the wet ingredients in a separate bowl, and you’ll notice the beautiful creamy texture it creates!
-
Share your joy with your family while you mix everything together. Let them catch a whiff of that chocolate goodness as you stir in the boiling water.
-
Pour the batter into the pan carefully. Don’t forget to scrape the bowl for every last drop!
-
Bake until a toothpick comes out clean. The aroma in your home will be absolutely heavenly.
-
As your cake cools, start on that amazing frosting. Melt the butter and mix in the deliciousness—it’s a treat in itself.
-
Once the cake is out of the oven, immediately cover it with that warm frosting. The way it glistens will have your family wandering into the kitchen like moths to a flame.
-
Finally, let it cool. Enjoy the sweet anticipation—you’ll be rewarded handsomely once it’s ready!
Tips for Perfect Results:
- For an even more decadent cake, use a combination of dark cocoa and regular cocoa.
- Store your cake covered to keep it moist. Remember, you want that yummy flavor preserved!
- If you’re feeling adventurous, try adding a bit of cinnamon or espresso powder to the batter for an extra flavor kick.
Serving Suggestions and Sides:
This cake stands beautifully on its own, but it’s also delicious with a scoop of vanilla ice cream. You can even top it with fresh berries for a pop of color and flavor. If you want to serve it as a dessert after a lovely dinner, pair it with a rich cup of coffee or a refreshing glass of sweet tea.
Leftovers:
If you’re lucky enough to have some leftovers, they store well in an airtight container at room temperature for up to three days. If you want to keep it fresh for longer, you can refrigerate it for about a week. Just make sure to let it come to room temperature before you dive in—it tastes best that way!
FAQ Section:
Can I use a different type of nut in the frosting?
Absolutely! Walnuts or even hazelnuts would work wonderfully. Just make sure to chop them up before adding them—your family will love the added crunch!
Can I make this cake ahead of time?
Of course! This cake stays moist for several days, so feel free to make it a day or two in advance. Just remember to store it well so it stays fabulous!
What if I don’t have buttermilk?
No need to worry! You can make a quick substitute by adding a tablespoon of vinegar or lemon juice to a cup of milk. Let it sit for about five minutes, and you’re good to go!
Is there a gluten-free option for this cake?
Yes, you can substitute the all-purpose flour with a gluten-free blend. Just make sure it includes xanthan gum for the right texture.
Conclusion:
This Texas Sheet Cake has become a treasured recipe in my home, bringing joy to my loved ones, just as it did in my grandmother’s kitchen. I can’t wait for you to try it! I know you’ll experience the warmth and sweetness that this cake offers. So, gather your ingredients, roll up your sleeves, and make some beautiful memories with your family around the table. Let me know how it turns out! I bet your family will be asking for seconds, just like mine does every time. Happy baking!
Texas Sheet Cake
Ingredients
For the Cake
- 2 cups all-purpose flour Provides structure and fluffy texture.
- 2 cups sugar Keeps the cake moist.
- 1 teaspoon baking soda Helps the cake rise.
- 1 teaspoon salt Balances sweetness.
- 4 large eggs Adds richness and moisture.
- 1 cup buttermilk Secret weapon for moistness; can substitute with milk + vinegar.
- 1 cup vegetable oil Keeps the cake moist.
- 1 cup boiling water Melts cocoa for moisture.
- 1 cup unsweetened cocoa powder Key ingredient for chocolate flavor.
- 1 cup pecans, chopped Optional topping for crunch.
For the Frosting
- 1 stick butter Melted for frosting.
- 1 cup milk Adds creaminess.
- 1 teaspoon vanilla extract Use pure vanilla for the best flavor.
- 3 cups powdered sugar Sweetness for frosting.
Instructions
Preparation
- Preheat your oven to 350°F (175°C).
- Grease a large sheet pan with butter or non-stick spray.
- In a large mixing bowl, combine the flour, sugar, baking soda, and salt. Whisk together.
- In another bowl, mix the eggs, buttermilk, and vegetable oil until creamy.
- Gradually add the wet ingredients to the dry ingredients, mixing until just combined.
- Stir in the boiling water and cocoa powder until well mixed.
Baking and Frosting
- Pour the batter into the prepared sheet pan, spreading evenly.
- Bake for 20-25 minutes, or until a toothpick inserted comes out clean.
- For the frosting, melt the butter in a saucepan over medium heat, then add cocoa powder, milk, and sugar, stirring until smooth.
- Remove from heat and stir in vanilla extract and chopped pecans, if using.
- Pour the warm frosting over the cake immediately after it is out of the oven.
- Allow the cake to cool slightly before cutting into pieces.