Every time I make this Chicken, Onion, and Green Pepper Pizza, it brings me back to cozy evenings spent with my family. Just imagining the aroma wafting through the house, filling every corner, makes my heart swell with joy. I can still recall those lovely summer nights when I would make this pizza on the grill, surrounded by laughter and sharing stories with my loved ones. The moment everyone gathered around the table, a slice in hand, ready to enjoy a meal filled with love—that’s what makes cooking so special to me. And believe me, once you try it, you’ll feel that same warmth and comfort in your own home!
How to make Chicken, Onion, and Green Pepper Pizza
Ingredients:
- 1 pizza dough (store-bought or homemade): You can use either, but I strongly encourage you to give homemade a try at least once. The taste and texture just can’t be beaten.
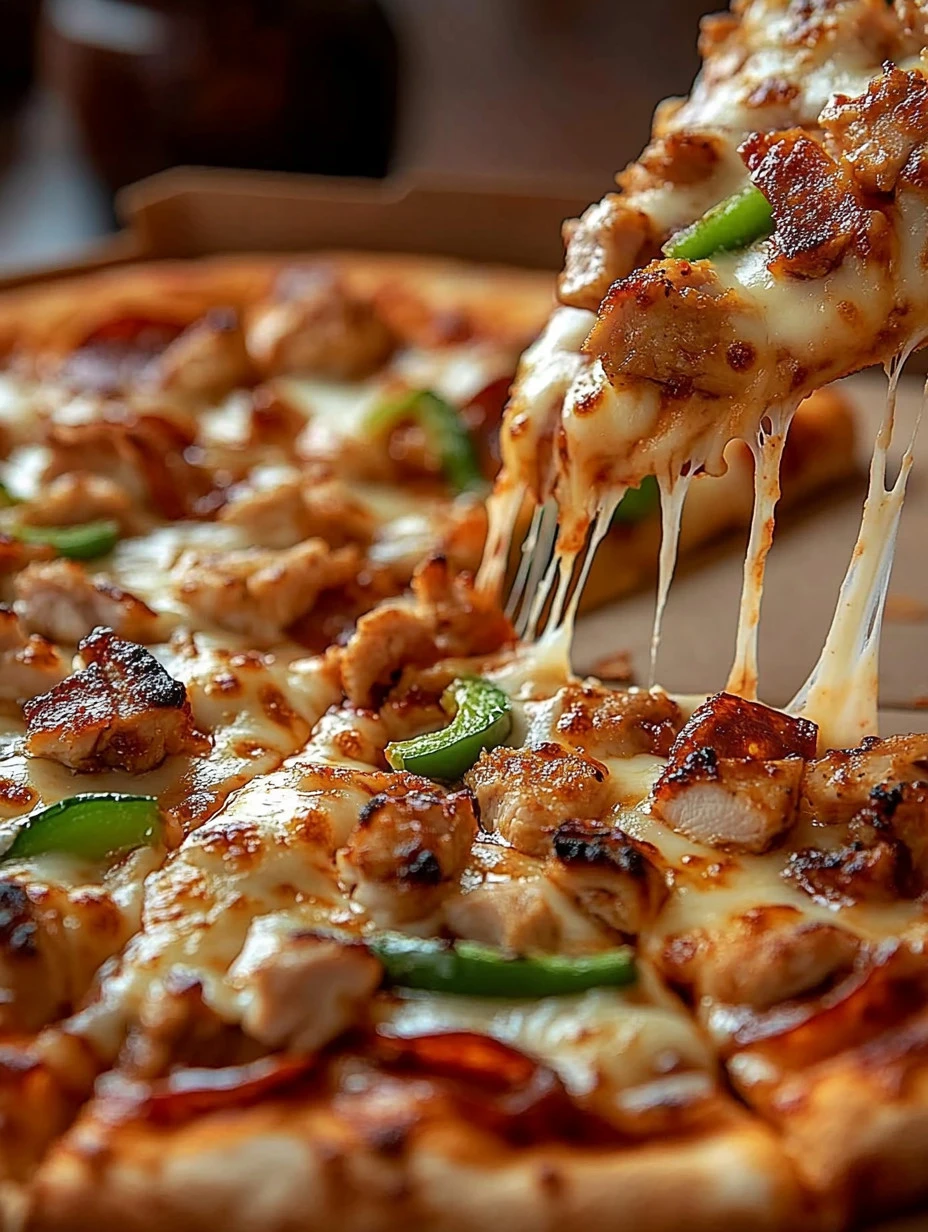
- 1 cup cooked chicken breast, diced: This adds a heartiness to your pizza—it’s like a warm hug in every bite! Don’t hesitate to swap it for leftover rotisserie chicken; it’ll save you time and still taste divine.
- 1/2 cup pizza sauce: The foundation of any great pizza! You can also use marinara sauce if that’s what you have on hand.
- 1 cup mozzarella cheese, shredded: There’s something magical about that gooey, melted cheese bubbling on your pizza. Choose whole milk mozzarella for a richer taste!
- 1/2 cup red onion, thinly sliced: They give a nice crunch, and their sweetness balances out the dish beautifully.
- 1/2 cup green bell pepper, sliced: This adds a vibrant color and a fresh taste! You can mix it up with other veggies if you’re feeling adventurous.
- 1 tablespoon olive oil: A drizzle of this will enhance the natural sweetness of the veggies and the seasoning.
- Salt and pepper to taste: A pinch of salt and some black pepper will elevate all the flavors.
- 1 teaspoon dried oregano: This gives your pizza that classic Italian flavor. Adding fresh oregano is a fantastic alternative if you have it!
Personal note: I love adding fresh herbs like rosemary or basil—they make the chicken smell and taste amazing!
Cooking Steps
Step 1: Preheat the oven
- First, preheat the oven to 475°F (245°C). Trust me, this is key for that crispy crust you dream of!
Step 2: Prepare the pizza dough 2. Roll out the pizza dough on a well-floured surface. Aim for your desired thickness; just keep in mind that thinner means crispier!
Step 3: Transfer the dough 3. Gently transfer the rolled dough onto a baking sheet or pizza stone. If it’s sticking, sprinkle a little more flour to prevent that!
Step 4: Prepare the chicken 4. In a bowl, toss the diced chicken with a pinch of salt, pepper, and a splash of olive oil. This coats the chicken nicely and adds flavor.
Step 5: Slice the onions and bell peppers 5. Slice your red onion and green peppers into thin rings or strips. Make them as slim as you like for that perfect bite!
Step 6: Build the pizza 6. Spread a thin layer of pizza sauce over the rolled-out dough. Don’t overdo it, or the pizza might end up soggy!
Step 7: Add the cheese 7. Sprinkle a generous layer of shredded mozzarella cheese over the sauce. Yes, more is definitely better when it comes to cheese!
Step 8: Top it off 8. Distribute the seasoned diced chicken, onions, and green peppers evenly over the pizza. I love making sure every slice has a bit of everything!
Step 9: Bake 9. Place the pizza in the oven and bake for 12-15 minutes, or until the cheese is melted and bubbly, and the crust reaches a golden brown perfection.
Step 10: Garnish and enjoy 10. Once it’s done, sprinkle a little dried oregano over the top for extra flavor. Slice and serve hot, and oh, the joy you’ll see on everyone’s faces will warm your heart!
Why I Love Making This Dish
There’s just something magical about making Chicken, Onion, and Green Pepper Pizza that makes me feel alive in the kitchen. Perhaps it’s the colors of the ingredients that bring a smile to my face or the comfort of knowing that I’m creating a dish that unites my family. Each bite is reminiscent of that carefree time spent laughing and sharing stories over dinner. I remember one evening, making this very dish, and my grandkids were helping me sprinkle the cheese. Their giggles filled the room when one of them accidentally sent a mountain of cheese cascading off the pizza. Moments like that make cooking worthwhile!
What You’ll Need
Before you dive into the process, ensure you have everything ready. Gather your ingredients and tools. You’ll need a rolling pin, a baking sheet (or a pizza stone if you’ve got one!), and a good serrated knife for slicing. Having a pizza cutter on hand makes things easier when it’s time to serve, too.
Step-by-Step Guide
- First, preheat the oven to 475°F. Trust me; this is critical for achieving that nice, crispy crust!
- Flour your surface generously before rolling out the pizza dough.
- Once you’ve rolled it out, transfer it to your baking sheet or pizza stone—this is where the magic begins!
- Prepare your chicken! Toss it with salt, pepper, and olive oil so each bite is packed with flavor.
- Next, it’s time to slice your veggies, making them as thin as you can—that way, they cook perfectly in the oven.
- Spread the sauce over your pizza dough, taking care to cover it without overwhelming it.
- Add a layer of that lovely mozzarella cheese—your pizza’s best friend.
- Now, top it with the seasoned chicken and slices of onion and green pepper.
- Bake it until the crust is golden and the cheese is bubbly—this is when your kitchen will start to smell heavenly!
- Once it’s finished, sprinkle with oregano, slice it up, and enjoy the happiest of moments with your family and friends.
Tips for Perfect Results
To get that crispy crust you’re dreaming of, you may want to try preheating your pizza stone in the oven before placing the dough on it. If you want to up your cheese game, consider mixing mozzarella with some Parmesan for an extra flavor boost. And don’t forget to let your pizza cool for a few minutes before slicing; it helps the cheese set beautifully!
Serving Suggestions and Sides
This pizza pairs beautifully with a simple side salad drizzled with vinaigrette. You might enjoy adding a light green salad with cherry tomatoes and cucumbers to keep it fresh. If you want a bit of indulgence, adding some garlic bread on the side could take your meal to the next level! And don’t forget a nice glass of lemonade or iced tea to sip—you’ll feel like you’re on a lovely summer day.
Leftovers
If you ever find yourself with leftover pizza (though it’s rare in my house), let it cool completely before wrapping it in aluminum foil. When it’s time to enjoy it again, just reheat it in the oven at 375°F for about 10-12 minutes, and it’ll taste as wonderful as it did the first day.
FAQ Section
Can I use boneless chicken?
You can, but trust me, the bone-in version is so much more flavorful. I’ve tried both, and bone-in is always juicier! The bone adds a richness to the chicken, making it a delightful topping.
Can I add different vegetables?
Absolutely! Feel free to get creative! Zucchini, mushrooms, and even spinach can make great additions depending on what you have in the fridge. Your pizza can be as colorful and healthy as you choose!
What if I don’t have a pizza stone?
No worries at all! A regular baking sheet works great. Just make sure to grease it lightly or use parchment paper so the pizza doesn’t stick.
How do I prevent a soggy crust?
Be sure not to overload your pizza with sauce, and pre-baking your dough for a couple of minutes before adding the toppings can help, too. A crisp crust is always the goal!
What are some good toppings?
You can never go wrong with classic pepperoni or fresh basil! Get creative; the combinations are endless. I love experimenting with different cheeses as well, like feta or goat cheese.
This Chicken, Onion, and Green Pepper Pizza has become a staple in our home, filled with love and laughter. I invite you to make it this week—I can’t wait for you to experience the joy that comes along with every slice. Your family will love it just as much as mine does! If they start asking for seconds, remember—it’s a compliment!
There’s nothing like gathering around the table, sharing a meal, and creating memories that last a lifetime. You’re going to love this dish, and I can’t wait to hear how it turns out for you! Let me know if your family enjoys it as much as mine does. Happy cooking!

Chicken, Onion, and Green Pepper Pizza
Ingredients
Pizza Base
- 1 pizza dough pizza dough (store-bought or homemade) Homemade is highly encouraged for the best taste.
Toppings
- 1 cup cooked chicken breast, diced Can substitute with leftover rotisserie chicken.
- 1/2 cup pizza sauce Marinara sauce can also be used.
- 1 cup mozzarella cheese, shredded Use whole milk mozzarella for richer flavor.
- 1/2 cup red onion, thinly sliced Provides a sweet crunch.
- 1/2 cup green bell pepper, sliced Can mix with other vegetables.
- 1 tablespoon olive oil Enhances sweetness of veggies.
- to taste salt and pepper Elevates the overall flavor.
- 1 teaspoon dried oregano Classic Italian flavor; fresh oregano can be used instead.
Instructions
Preparation
- Preheat the oven to 475°F (245°C).
- Roll out the pizza dough on a well-floured surface to your desired thickness.
- Gently transfer the rolled dough onto a baking sheet or pizza stone.
- In a bowl, toss the diced chicken with a pinch of salt, pepper, and a splash of olive oil.
- Slice your red onion and green peppers into thin rings or strips.
Assembly
- Spread a thin layer of pizza sauce over the rolled-out dough.
- Sprinkle a generous layer of shredded mozzarella cheese over the sauce.
- Distribute the seasoned diced chicken, onions, and green peppers evenly over the pizza.
Baking
- Place the pizza in the oven and bake for 12-15 minutes, or until the cheese is melted and bubbly and the crust is golden brown.
Serving
- Once done, sprinkle a little dried oregano over the top, slice, and serve hot.