Every time I make this Chicken Quesadilla, I am reminded of the delicious meals I shared with my family at home. This dish has a special place in my heart because it’s quick to prepare, packed with flavor, and brings smiles to the dinner table. I can still picture my grandchildren eagerly waiting for me to serve this tasty treat. The aroma of sizzling bacon and melted cheese fills the air, creating a warm and inviting atmosphere. I know once you try it, you’ll feel the same warmth and comfort!
How to make Chicken Quesadilla
Ingredients:
- 1 rotisserie chicken, shredded: Using a rotisserie chicken saves so much time! It’s juicy and full of flavor.
- 4 slices of bacon, cooked and crumbled: Bacon adds a delightful crunch and smoky taste. Trust me, it elevates the whole dish!
- 1 cup of ranch dressing: Ranch is what ties this dish together, giving it that creamy texture we all love.
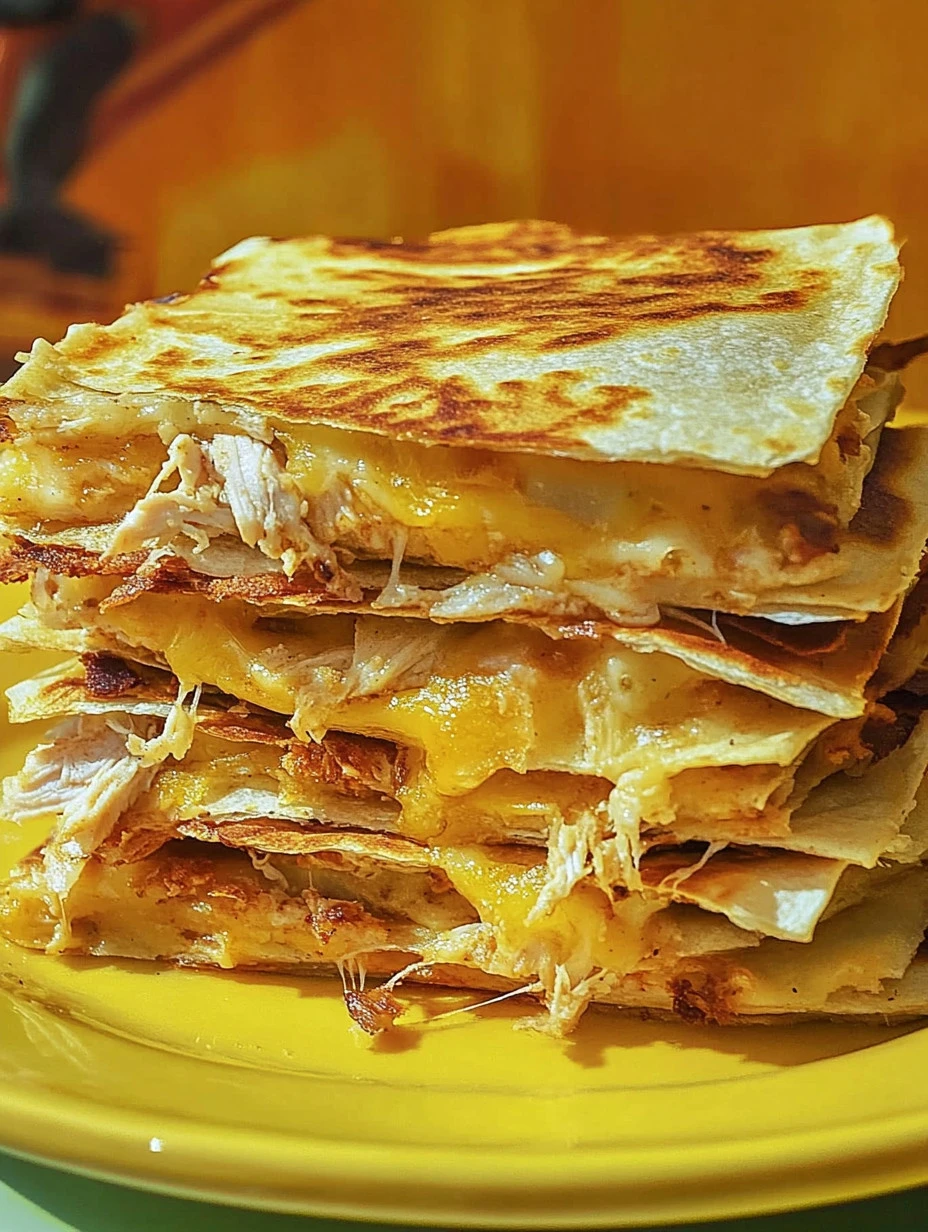
- 2 cups of Colby Jack cheese, shredded: This cheese melts beautifully, offering the perfect gooeyness.
- 4 large flour tortillas: Flour tortillas are soft and easy to fold!
- Oil or butter for frying: A bit of oil or butter ensures your quesadillas get that lovely golden color.
How to create this scrumptious meal is a fun and simple adventure! Let me walk you through the process step by step.
Step 1: Prepare the Filling
First, grab a bowl and mix your shredded rotisserie chicken with the crumbled bacon and ranch dressing. Yielding delightful flavors, this step makes it easy to get everything well-combined. I love using a fork to break up any large chunks so that the ingredients can mesh together nicely. You’ll see—this stuff is irresistible!
Step 2: Heat Your Pan
Next, heat a non-stick skillet over medium heat. Add a splash of oil or a small pat of butter. This is where the magic begins! Don’t be shy about this step; it helps get the quesadillas nice and crispy.
Step 3: Create the Quesadilla
When your skillet is hot, take one tortilla and place it in the pan. Then, sprinkle half of the Colby Jack cheese on one half of the tortilla. It’s important to get a good amount on there so that your quesadilla will be nice and cheesy!
Step 4: Add the Filling
Now it’s time to spread a portion of that delicious chicken mixture over the cheese. Make sure to cover it evenly, then sprinkle a little more cheese on top! This extra layer of cheese ensures everything will hold together when you fold the tortilla.
Step 5: Fold and Cook
Fold the tortilla in half like a taco! Gently press down to help it adhere. Cook until the tortilla is golden and crispy, which usually takes about 3-4 minutes. Then, carefully flip it over and cook the other side for another 2-3 minutes. The sizzling sound is music to my ears!
Step 6: Repeat
Once your first quesadilla is done, transfer it to a cutting board and repeat the process with the remaining tortillas and filling. It’s okay if you have to work in batches; it makes the kitchen feel busy and lively!
Step 7: Cut and Serve
Finally, cut each quesadilla into wedges for easy serving. Once your family sees these golden, cheesy delights, they’ll be racing to the table!
Why I Love Making This Dish
Chicken Quesadilla is not just a meal; it’s a memory! I love how it brings everyone together, often serving it on weeknights when we’re busy but still want to share some time together. This dish is all about comfort food at its finest. The explosions of flavor make it a family favorite, and I often find my grandkids asking when we’ll have it again!
What You’ll Need
In addition to your ingredients, you only need a few simple tools: a good non-stick skillet, a cutting board, and some sharp knives for cutting those golden quesadillas. It also helps to have spatulas or tongs for expertly flipping them without making a mess.
Step-by-Step Guide
- Begin by preheating your non-stick pan. Trust me; a well-heated pan is key for a perfectly crispy quesadilla!
- Mix shredded chicken, bacon, and ranch in a bowl.
- Add oil or butter to your pan, allowing it to melt.
- Layer cheese on one half of the tortilla in the hot pan.
- Spread the chicken and bacon mixture over the cheese.
- Sprinkle a bit more cheese on top, then fold your tortilla.
- Cook on both sides until golden brown, then serve your creation!
Tips for Perfect Results
One trick I’ve learned over the years is to not overcrowd the pan. Cooking one or two quesadillas at a time ensures that they cook evenly and become beautifully crispy. Additionally, if you want an extra kick, consider adding jalapeños or diced bell peppers to the filling for a burst of color and flavor. Your taste buds will thank you!
Serving Suggestions and Sides
When serving Chicken Quesadillas, I like to pair them with a fresh garden salad or some guacamole and salsa on the side. The coolness of the guacamole compliments the warmth of the quesadilla perfectly. You could also consider serving it with sour cream for those who enjoy a touch of tanginess.
Leftovers
If you have any leftovers (though I doubt you will!), simply store them in an airtight container in the refrigerator. When you’re ready to enjoy them again, reheat them on the skillet for that crispy texture, or pop them in the microwave for a quick meal. I promise they’ll still taste amazing!
FAQ Section
-
Can I use boneless chicken?
Yes, but trust me, the bone-in version is much more flavorful! I’ve tried both, and bone-in chicken always yields juicier results. -
Can I make this vegetarian?
Absolutely! You can make a veggie version by using a mix of sautéed vegetables like mushrooms, bell peppers, and corn instead of chicken and bacon. -
What kind of cheese works best?
While I prefer Colby Jack, you can certainly use a blend of cheeses or even Monterey Jack or cheddar cheese. Experimenting with flavors can be fun! -
Can I freeze these quesadillas?
Yes, you can! Just place them in a freezer-safe bag or container, and they will keep for up to three months. When you want to eat them, thaw and reheat them in a pan for the best texture!
This Chicken Quesadilla recipe has become a favorite in my house, and I’m so excited for you to try it. Every bite is worth savoring! With its creamy, cheesy filling and crispy exterior, this dish is the perfect comfort food for any occasion. I know you’ll love it as much as I do! Let me know how yours turns out, and if your family asks for seconds, just like mine does every time. Let’s continue creating those beautiful memories together, one delicious meal at a time.

Chicken Quesadilla
Ingredients
Main Ingredients
- 1 each rotisserie chicken, shredded Using a rotisserie chicken saves so much time! It’s juicy and full of flavor.
- 4 slices bacon, cooked and crumbled Bacon adds a delightful crunch and smoky taste.
- 1 cup ranch dressing Ranch ties this dish together, giving it that creamy texture.
- 2 cups Colby Jack cheese, shredded This cheese melts beautifully.
- 4 large flour tortillas Flour tortillas are soft and easy to fold!
- as needed none Oil or butter for frying Ensures quesadillas get that lovely golden color.
Instructions
Preparation
- Mix shredded chicken, crumbled bacon, and ranch dressing in a bowl until well combined.
- Heat a non-stick skillet over medium heat and add oil or butter.
Cooking
- Place one tortilla in the hot skillet and sprinkle half of the Colby Jack cheese on one half of the tortilla.
- Spread the chicken and bacon mixture over the cheese, then sprinkle more cheese on top.
- Fold the tortilla in half and gently press down. Cook until golden and crispy, about 3-4 minutes.
- Flip and cook the other side for another 2-3 minutes until crispy.
- Transfer the cooked quesadilla to a cutting board and repeat the process with the remaining tortillas and filling.
- Cut each quesadilla into wedges for easy serving.