
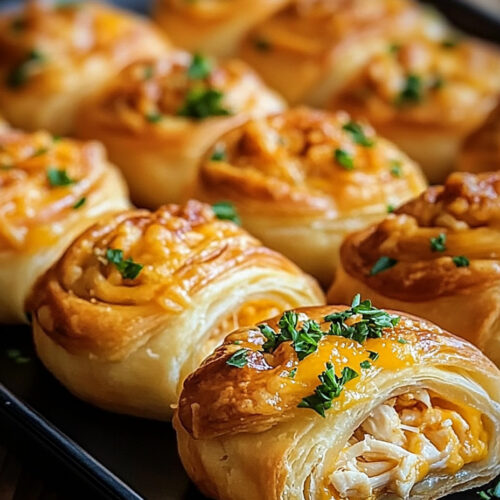
Every time I make these Chicken Stuffed Crescent Rolls, it takes me back to cozy family gatherings at my home. The smell wafting through the house is simply heavenly and instantly brings everyone to the kitchen, ready to dive into these delicious treats. Let me tell you, the first time I served these to my kids, their eyes lit up, and the laughter that followed as they devoured them filled my heart with joy. I know once you try this recipe, you’ll feel that same warmth and comfort wrap around you like a soft blanket on a chilly day!
Now, when I say these rolls are easy to make, I mean it. They're perfect for a quick dinner, a snack during movie night, or even as a finger food for a gathering. The crispy golden crescent rolls, combined with the creamy chicken and cheese filling, create a delightful texture and flavor explosion that people simply adore. Seriously, you might want to double the recipe because they disappear faster than you can say "yum"!
Let’s get started on how to make these delectable Chicken Stuffed Crescent Rolls.
Ingredients:
- 2 cups cooked chicken, shredded: This is the star of the show! You can use rotisserie chicken for convenience or toss some chicken breasts in the slow cooker for a tender and juicy flavor.
- 1 cup cream cheese, softened: This makes the filling delightfully creamy and helps to bind everything together.
- 1/2 cup shredded cheddar cheese: The sharpness of cheddar adds a fantastic flavor that complements the chicken perfectly.
- 1 tablespoon ranch seasoning mix: This gives an extra zing to the filling. If you're like me and love ranch, feel free to add a bit more!
- 1 can crescent roll dough (8 rolls): This is what wraps everything up nicely. I love the flaky texture!
- 2 tablespoons butter, melted: Brushing these rolls with butter gives them that beautiful golden color and rich flavor.
- Salt and pepper, to taste: Always essential for seasoning, so don’t skip this step!
Now that we’ve gathered our ingredients let’s dive into the cooking steps.
Step-by-Step Guide:
-
Preheat Your Oven: First things first, preheat your oven to 375°F (190°C). Trust me, this is key for that crispy, golden outcome you’re looking for!
-
Prepare the Filling: In a mixing bowl, combine the shredded chicken, cream cheese, cheddar cheese, ranch seasoning, salt, and pepper. Mix until everything is well-combined and creamy. I usually use a spatula for this job, but a hand mixer also works wonders if you really want to get it creamy.
-
Unroll the Crescent Dough: Open that can of crescent roll dough and carefully unroll it. You’ll find it’s made up of triangles. It's always a bit satisfying to do this!
-
Spoon the Filling: Take a generous spoonful of your chicken mixture and place it at the wide end of each triangle. Don't be shy with the filling; this is what makes these rolls so tasty!
-
Roll Them Up: Now, roll the dough up around the filling, starting from the wide end. Pinch the edges to seal them well—this helps keep all the deliciousness tucked inside.
-
Arrange on a Baking Sheet: Place your stuffed rolls on a baking sheet. Give them a little space to breathe because they’ll puff up and expand in the oven.
-
Brush with Butter: Using a basting brush, gently brush the tops of the rolls with melted butter. This not only adds richness but also helps achieve that lovely golden color.
-
Bake the Rolls: Pop your baking sheet in the preheated oven and bake for 12-15 minutes or until the rolls are golden brown. My kitchen starts filling with the most amazing aroma at this point—you’ll be drooling!
-
Let Them Cool for a Moment: Once they’re out of the oven, let them cool for a couple of minutes. Trust me; they're extremely hot and the filling will be scorching!
-
Serve and Enjoy: Finally, serve them warm. You won’t believe how heavenly these Chicken Stuffed Crescent Rolls taste right out of the oven!
Why I Love Making This Dish: These rolls bring back memories of family dinners and holidays. There’s just something about food that brings us together. When I first served these to my family, the silence at the dinner table spoke volumes—everyone was too busy enjoying the rolls to chat! I always encourage you to try adding your personal touch, like different herbs or spices, and see how it turns out. You’ll soon make this recipe a staple in your home, just like I have!
Tools You’ll Need:
- Mixing bowl
- Baking sheet
- Spatula
- Basting brush
- Measuring cups and spoons
Tips for Perfect Results:
- For extra flavor, consider adding some chopped green onions or even crispy bacon bits into the filling.
- I always suggest using room temperature cream cheese to make it easier to combine with the chicken mixture.
- To achieve crispier edges, use a slightly higher oven rack while baking.
Serving Suggestions and Sides: These rolls are perfect on their own, but I often serve them with a side of ranch dressing or marinara sauce for dipping. A fresh garden salad or some roasted veggies make a great addition, too! My family loves them with a slight drizzle of balsamic reduction over the salad; it’s a beautiful flavor pairing.
Leftovers: If there are any leftovers (which is rare!), you can store them in an airtight container in the fridge for up to three days. To reheat, pop them in the oven at 350°F (175°C) for about 10 minutes or until heated through. You can also use the microwave, but keep an eye on them so they don’t get too chewy.
FAQ Section: Can I use boneless chicken?
You absolutely can! However, I’ve found that using bone-in chicken gives more flavor. If you do use boneless chicken, try to season it well before cooking for better taste!
Can I make these ahead of time?
For sure! You can prepare them up to the baking step, cover them tightly, and pop them in the fridge. Simply bake them when you're ready. They can be great for prepping for gatherings or busy weeknights!
What if I don’t have crescent dough?
You can substitute with puff pastry! Just roll it out and cut it into triangles. They’ll be a bit flakier, but equally delightful!
This dish has become a favorite in my house, and I’m so excited for you to try it. It’s an easy recipe that’s guaranteed to impress your loved ones. I know you’ll love it as much as I do! Don’t forget to let me know how it turns out, and if your family asks for seconds, just like mine does every time. Enjoy your cooking adventure!
Chicken Stuffed Crescent Rolls
Ingredients
Main Ingredients
- 2 cups cooked chicken, shredded You can use rotisserie chicken for convenience or toss some chicken breasts in the slow cooker.
- 1 cup cream cheese, softened This makes the filling delightfully creamy.
- 1/2 cup shredded cheddar cheese The sharpness of cheddar complements the chicken perfectly.
- 1 tablespoon ranch seasoning mix Feel free to add more if you love ranch.
- 1 can crescent roll dough (8 rolls) This is what wraps everything up nicely.
- 2 tablespoons butter, melted Brushing these rolls with butter gives them a rich flavor.
- to taste salt and pepper Always essential for seasoning.
Instructions
Preparation
- Preheat your oven to 375°F (190°C).
- In a mixing bowl, combine the shredded chicken, cream cheese, cheddar cheese, ranch seasoning, salt, and pepper. Mix until well-combined and creamy.
- Open the can of crescent roll dough and carefully unroll it into triangles.
- Spoon a generous amount of the chicken mixture at the wide end of each triangle.
- Roll the dough up around the filling, starting from the wide end, and pinch the edges to seal.
- Place the stuffed rolls on a baking sheet with space between them.
- Brush the tops of the rolls with melted butter.
Baking
- Bake in the preheated oven for 12-15 minutes or until golden brown.
- Let the rolls cool for a couple of minutes before serving.