
Every time I make this Pineapple Dream Dessert, I’m taken back to sun-soaked summer days spent with my family. The kitchen fills with a delightful aroma that reminds me of backyard barbecues and laughter echoing through the air. I can vividly remember my grandmother whipping up her famous desserts, and this one always made an appearance. She would serve it up on hot, humid days, and I can see us all gathered around the table, eagerly anticipating our first bite. If you’ve ever felt that warm sense of nostalgia from a dessert, then you know exactly what I mean!
I’m excited to share this recipe with you because it’s so simple yet incredibly satisfying. Pineapple Dream Dessert is not only delicious but also brings joy to any gathering. With layers of creaminess and a crunchy crust, it's sure to be a hit at your next family dinner or neighborhood gathering. I promise, once you try it, you’ll feel that same warmth and happiness that comes with sharing sweet treats.
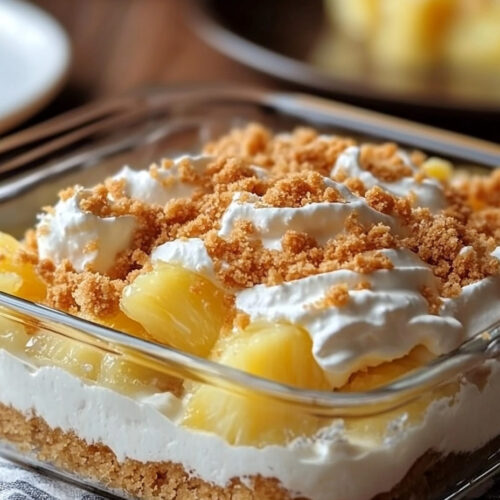
How to make Pineapple Dream Dessert
Ingredients:
Let’s get to the fun part—the ingredients! When I gather my supplies for Pineapple Dream Dessert, I make sure to have the following on hand:
- 21⁄2 cups graham cracker crumbs: This is the base of our crust, providing that delicious crunch.
- 1/2 cup unsalted butter, melted: This helps bind the crust ingredients together and adds richness.
- 2 cups powdered sugar: Sweetness is key, and powdered sugar combines seamlessly into our creamy layers.
- 1/2 cup unsalted butter, softened: This gives the cream layer a smooth texture and enhances the flavor.
- 1/2 cup cream cheese: It adds a beautifully creamy element that balances the sweetness perfectly.
- 1 cup Cool Whip: This lightens the mixture up, making it airy and fluffy.
- 1 large can (21⁄2 cups) crushed pineapple, well-drained: This is the star of the show, bringing a juicy and fruity explosion to every bite.
I know some folks might be thinking about substituting ingredients. Feel free to use low-fat cream cheese or sugar substitutes if you’re watching your intake. But trust me, the original is always a crowd-pleaser!
Cooking Steps
Now, let’s walk through this delicious recipe together! Follow these easy steps, and you’ll have a delightful dessert that everyone will love.
-
Prepare the Crust: Preheat your oven to 300°F (148°C). In a large mixing bowl, combine the graham cracker crumbs with the melted butter. Make sure everything is mixed well; this will create a solid base for our dessert.
-
Press the Mixture: Once your mixture is ready, take 2 cups of it and press it into the bottom of a 9×9-inch baking dish. This is where a little elbow grease comes in handy! You want it tightly packed to ensure the crust holds its shape after baking.
-
Bake the Crust: Pop it into your preheated oven for about 8–10 minutes. Don’t wander too far; you want it just lightly golden. Once it’s done, remove it from the oven and let it cool completely—this is very important!
-
Make the Cream Layer: In another bowl, grab your softened butter and cream cheese and beat them together using an electric mixer. It should be nice and creamy. Gradually add in the powdered sugar until everything is smooth. I always find that adding the sugar slowly helps prevent a powdered sugar cloud in my kitchen!
-
Spread the Cream Cheese Mixture: With the crust cooled, take your cream cheese mixture and spread it evenly over the crust. This creamy layer is where the dessert gets its name!
-
Prepare the Pineapple Layer: In a separate bowl, combine the well-drained crushed pineapple with the Cool Whip. Gently fold them together until they are mixed through. This fruity layer is so refreshing—you’re going to love it!
-
Top It Off: Now, spread the pineapple and Cool Whip mixture over the cream cheese layer. You want it to be evenly distributed so each bite has that perfect balance.
-
Add the Crumble: Finally, sprinkle any remaining graham cracker mixture over the top. This adds a lovely crunch and makes it look appealing, too!
-
Chill Time: Here comes the hardest part—waiting! Cover the dish and refrigerate it for at least 4 hours, but if you can wait overnight, it’s even better. This allows all the flavors to meld together.
-
Serve and Enjoy: When you’re ready to serve, simply slice it into squares and dig in! I love enjoying this dessert on warm days and sharing it with friends and family.
Why I Love Making This Dish
Pineapple Dream Dessert holds a special place in my heart. The combination of textures—the crunch of the crust, the smooth cream layer, and the juicy pineapple—creates such a delightful experience. But what truly makes this dessert special is the memories attached to it. It’s my go-to dessert for family gatherings, and I love watching everyone enjoy it together, just like I did in my childhood.
What You’ll Need
You don’t need fancy kitchen tools for this recipe. Just grab a mixing bowl, an electric mixer, measuring cups, and a 9×9-inch baking dish. If you have a spatula and a measuring spoon, you’re all set!
Tips for Perfect Results
-
Draining the Pineapple: Make sure to drain your crushed pineapple well. If there’s too much liquid, it can make your dessert watery. I always put it in a fine-mesh sieve for a while before adding it to the Cool Whip.
-
Chill Thoroughly: Don’t skip the chilling time; it helps the layers set properly. You want each slice to hold its shape when you serve it.
-
Add a Twist: If you want to put a fun twist on this dessert, consider adding toasted coconut or chopped nuts on top. It gives that crunchy topping an extra boost of flavor!
Serving Suggestions and Sides
While Pineapple Dream Dessert is a star on its own, it pairs wonderfully with light fruit salads or a scoop of vanilla ice cream. I often serve it alongside a tropical punch to keep the theme going. Imagine a sunny afternoon with friends, bright fruit drinks, and this delicious dessert ready to be enjoyed!
Leftovers
If you happen to have any leftovers (which, let’s be honest, never really happens in my house!), you can easily store it in the refrigerator. Just cover it tightly with plastic wrap or foil to keep it fresh. It usually stays good for about 3–4 days, but I always recommend enjoying it soon after making it for the best flavor and texture.
FAQ Section
Can I make this dessert ahead of time?
Absolutely! I often whip it up a day in advance. Just remember to keep it covered in the fridge until you’re ready to serve.
What if I can’t find Cool Whip?
You can use homemade whipped cream instead. Just whip heavy cream with a bit of sugar until it forms stiff peaks. It’ll still be fantastic!
Can I use fresh pineapple?
Sure! Just make sure to chop it finely, and you might want to lightly crush it to achieve a similar texture to crushed canned pineapple.
Will this work in a different size dish?
Yes, just keep an eye on your baking time if you change the size of the dish. You may need to adjust it a bit based on depth.
Conclusion
This Pineapple Dream Dessert has become a beloved favorite in my home. I’m so thrilled to share it with you, and I can’t wait for you to try it for yourself! It’s an easy recipe that brings a splash of joy and warmth to any occasion. Trust me—when your family takes that first bite, they’ll be asking for more, just like mine does every single time. I know you’ll love it as much as we do! Let me know how it turns out for you, and I can’t wait to hear your stories because, after all, cooking is all about creating memories together.
Pineapple Dream Dessert
Ingredients
For the crust
- 2.5 cups graham cracker crumbs Provides the delicious crunch.
- 0.5 cups unsalted butter, melted Helps bind the crust ingredients together.
For the cream layer
- 2 cups powdered sugar Adds sweetness to the creamy layers.
- 0.5 cups unsalted butter, softened Gives the cream layer a smooth texture.
- 0.5 cups cream cheese Adds creaminess and balances the sweetness.
- 1 cups Cool Whip Lightens the mixture to make it airy.
For the pineapple layer
- 1 large can crushed pineapple, well-drained Brings a juicy and fruity explosion.
Instructions
Preparation
- Preheat your oven to 300°F (148°C).
- In a large mixing bowl, combine the graham cracker crumbs with the melted butter until mixed well.
- Press 2 cups of the mixture into the bottom of a 9x9-inch baking dish.
- Bake the crust in the preheated oven for about 8–10 minutes until lightly golden.
- Remove from oven and let cool completely.
- In another bowl, beat together the softened butter and cream cheese until creamy.
- Gradually add in the powdered sugar, mixing until smooth.
- Spread the cream cheese mixture evenly over the cooled crust.
- Combine the well-drained crushed pineapple with the Cool Whip in a separate bowl and gently fold together.
- Spread the pineapple and Cool Whip mixture over the cream cheese layer evenly.
- Sprinkle any remaining graham cracker mixture over the top for added crunch.
- Cover the dish and refrigerate for at least 4 hours, or overnight if you can wait.
- Slice into squares and serve chilled.