
Every time I whip up a batch of Chocolate Peanut Candies, it takes me back to my childhood. I can still remember the joy of gathering around the kitchen table with my family, the air thick with laughter and the sweet aroma of melting chocolate. It was one of those family bonding moments that stitched our hearts together. Chocolate and peanut butter have always held a special place in my life—there’s something about that creamy, sweet goodness that can brighten even the gloomiest of days. Whether it’s a Saturday afternoon or a holiday get-together, these delightful candies are an absolute treat that always bring smiles. And trust me, once you make them, you’ll be wanting to share them with everyone!
How to make Chocolate Peanut Candies
Ingredients: Let’s chat about what you’ll need to create these sweet delights. Gathering the right ingredients is a big part of the fun! Here’s what you’re looking for:
- 1 cup chocolate chips: The star of the show! You can use semi-sweet or dark chocolate, depending on your preference.
- 1 cup peanut butter: Creamy or crunchy—totally your choice! This brings that nutty richness.
- 2 cups powdered sugar: This helps to give our candies that lovely sweetness and texture.
- 1 cup chopped peanuts: These add crunch and a lovely nutty flavor.
- 1 teaspoon vanilla extract: Just a splash for that extra depth of flavor!
So what are you waiting for? Gather these ingredients and get ready to create something wonderful!
Cooking Steps:
Here’s your step-by-step guide to making these delightful candies! I promise you it’s easier than it sounds.
-
Melting the Chocolate and Peanut Butter: Start by combining the chocolate chips and peanut butter in a crockpot or microwave-safe bowl. If you’re using a microwave, heat them in 30-second intervals, stirring in between until they’re perfectly melted and smooth. When I make these, I usually opt for the crockpot since it’s a bit more forgiving and keeps everything warm while I get everything else ready.
-
Mixing in the Sweetness: Once you have that luscious chocolate and peanut butter mixture, it’s time to stir in the powdered sugar. This part can get a bit messy—don’t be surprised if some sugar clouds up! Just keep stirring until it’s all well combined. This is when it starts smelling absolutely divine.
-
Add the Crunch: Now, fold in those chopped peanuts and the vanilla extract. This adds both crunch and that delightful, aromatic flavor that pairs so well with chocolate.
-
Pouring it Out: Line an 8×8 baking dish with parchment paper (this helps with easy removal later), and pour the mixture into the dish, spreading it evenly with a spatula. It’s starting to look like candy, isn’t it?
-
Letting It Set: This step is crucial! Allow your mixture to cool at room temperature until it’s firm. This usually takes a couple of hours. If you’re in a rush, you can pop it in the fridge to speed things up.
-
Cutting into Pieces: Once it’s set, remove it from the baking dish using the parchment paper. Now it’s time to cut them into squares! I love making mine a little smaller, so they’re perfect for popping into your mouth.
-
Enjoy or Gift: You can enjoy them right away, or package them up in little boxes or bags as gifts for family and friends. I always find joy in gifting these during the holidays—they bring about so many smiles!
Why I Love Making This Dish: What makes these Chocolate Peanut Candies so special? Well, for starters, it’s the memory-making aspect of it all. Every batch I make feels like a mini celebration. I love that they’re not only delicious but also an easy recipe that even my grandchildren can help with. Watching them mix and pour brings back my own childhood memories of cooking with my mother.
What You’ll Need: A couple of special tools make this process easier. A microwave or a crockpot is essential for melting the chocolate and peanut butter. You’ll also need a wooden spoon for mixing—trust me, it’s the best tool for this job! Lastly, have a good sharp knife ready for cutting your candies into perfect squares.
Tips for Perfect Results: Over the years, I’ve picked up some little tricks to make the process even better. For instance, if you want a little extra flair, you can sprinkle some sea salt on top before letting them set! It adds a lovely contrast to the sweetness. Also, be careful not to overheat the chocolate—keep an eye on it and stir gently.
Serving Suggestions and Sides: These candies are delightful all on their own, but if you want to add a little something extra, you could whip up some whipped cream or serve them alongside vanilla ice cream for a marvelous dessert. Imagine a scoop of ice cream topped with a few of these candies—heaven!
Leftovers: If you ever have leftovers (which is a rare feat in my house!), store them in an airtight container at room temperature for up to a week. You can also freeze them for longer storage—though, I have to say, they often don’t last that long in the freezer!
FAQ Section: Can I use different types of chocolate? Absolutely! I’ve experimented with white chocolate and even butterscotch chips. They all taste fantastic!
Can I use natural peanut butter? You can, but remember that it tends to be runnier, so using a general peanut butter is best for maintaining the right texture.
Do I have to use chopped peanuts? Not at all! If you prefer, you can use finely chopped pretzels or even leave them out completely. Get creative!
Can I make these ahead of time? Yes, these candies can easily be made days in advance, which is great for holidays and get-togethers!
Conclusion: I’m so excited for you to try this Chocolate Peanut Candies recipe! It’s a simple and heartfelt treat that just brings happiness to any occasion. From the smell of melting chocolate to the joy of sharing with your loved ones, every step fills your home with love and warmth. I know you and your family will treasure these candies just like mine do. So, roll up your sleeves, grab those ingredients, and start creating delightful memories in the kitchen. And please, come back and let me know how they turn out! I can’t wait to hear about all the smiles at your table!
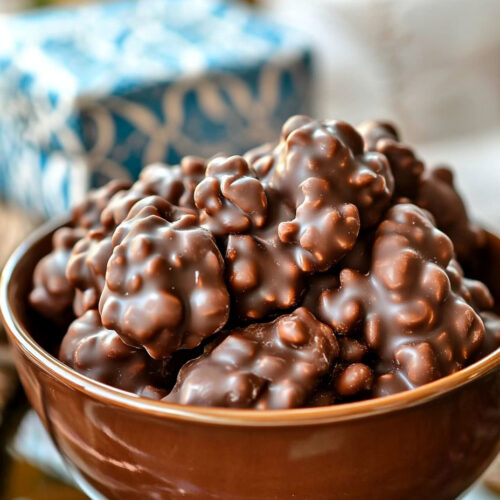
Chocolate Peanut Candies
Ingredients
Main ingredients
- 1 cup chocolate chips Semi-sweet or dark chocolate, depending on preference.
- 1 cup peanut butter Creamy or crunchy as per personal choice.
- 2 cups powdered sugar Adds sweetness and texture.
- 1 cup chopped peanuts Adds crunch and nutty flavor.
- 1 teaspoon vanilla extract For extra depth of flavor.
Instructions
Melting the Chocolate and Peanut Butter
- Combine the chocolate chips and peanut butter in a crockpot or microwave-safe bowl. If using a microwave, heat in 30-second intervals, stirring between until melted and smooth.
Mixing in the Sweetness
- Stir in the powdered sugar until well combined.
Add the Crunch
- Fold in the chopped peanuts and vanilla extract.
Pouring it Out
- Line an 8×8 baking dish with parchment paper and pour the mixture into the dish, spreading it evenly with a spatula.
Letting It Set
- Allow the mixture to cool at room temperature for a couple of hours until firm, or refrigerate to speed up the process.
Cutting into Pieces
- Remove the set mixture from the baking dish using parchment paper and cut into squares.
Enjoy or Gift
- Enjoy them immediately or package them as gifts for family and friends.