
Every time I make Hasselback Potatoes, I’m taken back to those warm family gatherings around the dinner table. You know the ones—everyone relaxed, laughter filling the air, and the aroma of delicious food wafting through the house. Those sweet moments are what I cherish, and this recipe always brings that cozy feeling back. When I first stumbled upon this delightful dish, I knew I had to share it with you all!
Hasselback Potatoes are simple to make, yet they elevate any dinner to a special occasion. They have that lovely crispy exterior, and layers of potato that virtually melt in your mouth. The best part is that you’ll impress your friends and family without spending hours in the kitchen. Honestly, you’re going to love how easy and beautiful they look!
Let’s dive right into how to make these scrumptious Hasselback Potatoes. It’s a fun and rewarding cooking project that’s sure to bring smiles to your table. I promise, once you’ve baked these up, they will quickly become a go-to dish in your home!
Ingredients:
- Potatoes: I like to use medium-sized russet potatoes because they become fluffy inside while getting crispy on the outside. You’ll want them to be firm and even-sized.
- Olive oil: This is essential for adding flavor and helping the potatoes crisp up nicely.
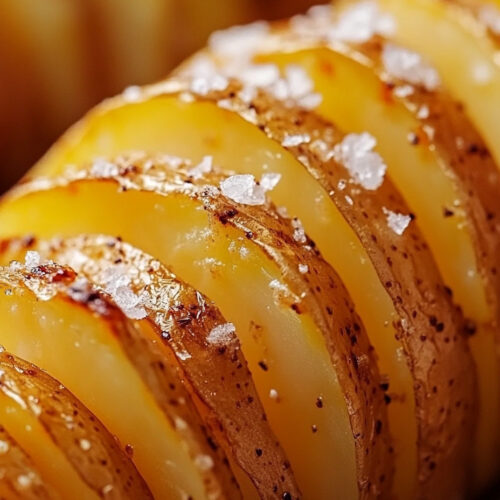
- Salt: Don’t skimp on the salt—this will draw out the flavors and enhance the taste of the potatoes.
- Fresh parsley: It adds a burst of color and freshness at the end. I love the way it brightens the dish!
- Garlic cloves: Minced garlic will sneak into those potato slices and release its wonderful aroma while baking.
- Freshly ground black pepper: A little sprinkle adds just the right amount of heat.
- Parmesan cheese: This is the icing on the cake, or in this case, the cheese on the potatoes! It melts beautifully and creates a cheesy crust that’s hard to resist.
How to Make Hasselback Potatoes
Step 1: Preheat the Oven
First off, you’re going to want to preheat your oven to 425°F (220°C). Trust me, this step is vital to achieving the crispy goodness we all love!
Step 2: Prepare Your Potatoes
Next, wash your potatoes thoroughly under cool running water to remove any dirt. Don’t forget to dry them with a towel afterward; we want them nice and dry for the olive oil to stick.
Step 3: Cut the Potatoes
Now here comes the fun part! Place each potato between two wooden spoons or chopsticks. This trick helps you make those lovely thin slices without cutting all the way through. Carefully make cuts about a quarter-inch apart, down the length of each potato. It might take a little practice, but don’t worry—your potatoes don’t need to be perfect!
Step 4: Add the Olive Oil
Once you’ve sliced your potatoes, brush them generously with olive oil. Make sure the oil seeps into the cracks of the potato. This is key for that yummy, crispy finish.
Step 5: Season with Salt and Pepper
Now it’s time to sprinkle a generous amount of salt and freshly ground black pepper over your beautifully sliced potatoes. This will help to flavor every inch of goodness.
Step 6: Mince the Garlic
Mince your garlic cloves and gently tuck them into the slices of the potatoes. The aroma will fill your kitchen and make your mouth water!
Step 7: Bake the Potatoes
Place your prepared potatoes on a baking sheet lined with parchment paper—this makes for easy cleanup later. Bake them in the oven for about 45-50 minutes, or until they’re golden brown and crispy on the edges. Keep an eye on them; your kitchen will smell amazing!
Step 8: Add the Parmesan
In the last 10 minutes of baking, sprinkle the grated Parmesan cheese over the potatoes. This is where the magic happens! The cheese melts and forms a savory crust that you won’t be able to resist.
Step 9: Garnish and Serve
Once they’re out of the oven and bubbly, let them cool for a minute. Then, garnish with freshly chopped parsley to give them that beautiful pop of color. Serve them warm and watch your family’s faces light up!
Why I Love Making This Dish
Hasselback Potatoes hold a special place in my heart, and I can see why you’ll fall in love with them too! They’re not just a side dish; they’re a treat that brings everyone to the table with excitement. The blend of textures—from the crispy outside to the soft, fluffy inside—creates a delightful experience bite after bite.
Every time I make them, I can’t help but reminisce about those precious family dinners where we’d gather to share our days. My kids would rush in from outside, and as soon as they caught a whiff of the baking potatoes, they’d dash to the kitchen. I cherish that chaos and love that Hasselback Potatoes have a way of turning a simple meal into a cherished memory.
Tips for Perfect Results
- If you want even crispier potatoes, rub a little extra olive oil over the tops before they go in the oven.
- Keep an eye on them towards the end; every oven is different, and you want that golden crisp.
- Feel free to experiment with different toppings! Sometimes I add breadcrumbs for an extra crunch or rosemary for an earthier flavor.
Serving Suggestions and Sides
Hasselback Potatoes pair beautifully with just about anything! I love serving them alongside roasted chicken or grilled steak. The flavors complement each other so well!
If you want to keep it simple, a fresh green salad with a tangy vinaigrette balances out the richness perfectly. You could also serve them with a homemade dip, like sour cream mixed with chives or a zesty yogurt sauce to drizzle on top.
Leftovers
If you happen to have any leftovers (which is rare in my house!), simply store them in an airtight container in the fridge. They’ll stay good for about 3-4 days. Reheat them in the oven at 350°F until they’re warmed through, and you’ll have that crispy exterior back!
I also like to slice them up and pop them on a sandwich—such a fun way to give a little twist to your lunch!
FAQ Section
Can I use different kinds of potatoes?
Absolutely! While I love russet potatoes for their fluffiness, you can use other varieties too. Just make sure they’re a good baking potato.
What do I do if I don’t have Parmesan cheese?
No worries! You can actually use cheddar, mozzarella, or whatever cheese you have on hand. Each one gives a different but delicious flavor!
Can I make these ahead of time?
You can prepare them up to the baking step and store them in the fridge. Just make sure to drizzle them with olive oil before baking to keep them from drying out!
In conclusion, I can’t say enough how much joy making Hasselback Potatoes has brought to my family and me. This dish is not just about nourishment, but about gathering together, sharing stories, and enjoying delicious food. When you try this recipe, I hope it creates new memories in your kitchen, just like it has in mine. I can’t wait for you to give it a try, and I know your family will love it just as much! Please share how it turns out, and if they ask for seconds like mine do, you’ll know you’ve made a hit!
Hasselback Potatoes
Ingredients
Potato Ingredients
- 4 medium Russet potatoes Firm and even-sized
Seasoning and Toppings
- 4 tablespoons Olive oil For brushing on potatoes
- 1 teaspoon Salt To enhance flavor
- 1 teaspoon Freshly ground black pepper For a little spice
- 2 cloves Garlic, minced To tuck in the potato slices
- 1 cup Parmesan cheese, grated To create a cheesy crust
- 2 tablespoons Fresh parsley, chopped For garnish
Instructions
Preparation
- Preheat your oven to 425°F (220°C).
- Wash the potatoes thoroughly under cool running water and dry them.
- Place each potato between two wooden spoons or chopsticks to guide your cuts. Cut about a quarter-inch apart down the length of each potato.
Seasoning
- Brush the sliced potatoes generously with olive oil.
- Sprinkle salt and freshly ground black pepper over the potatoes.
- Mince the garlic and tuck it into the potato slices.
Baking
- Place the prepared potatoes on a baking sheet lined with parchment paper.
- Bake for about 45-50 minutes or until golden brown and crispy.
- In the last 10 minutes of baking, sprinkle grated Parmesan cheese over the potatoes.
Serving
- Let the potatoes cool for a minute, then garnish with freshly chopped parsley and serve warm.