Every time I make these delightful Mini No-Bake Cheesecakes, it takes me back to those warm summer afternoons spent with my grandchildren in my cozy kitchen. The sound of laughter fills the air as we whip up delicious treats together, their eyes lighting up at the mention of cheesecake. I can still hear their giggles as they help me mix the ingredients, and the joy on their faces when they taste that creamy goodness fresh out of the fridge. There’s just something about making treats that creates such beautiful memories.
You see, these cheesecakes are not just a dessert; they are a bond. They remind me of family gatherings and birthday celebrations, where everyone fights for the last slice. I know once you give this recipe a try, you’ll feel that warmth and comfort too. So let’s make this sweetness together!
How to Make Mini No-Bake Cheesecakes
Ingredients:
- 1 cup cream cheese, softened: This is your star ingredient! It gives the cheesecake that rich and creamy texture we all love.
- 1/4 cup powdered sugar: Adds just the right amount of sweetness—make sure to sift it for a smooth texture!
- 1 teaspoon vanilla extract: A splash of this magic ingredient elevates the flavors beautifully.
- 1/2 cup heavy cream: Whipped to fluffy perfection, it gives the cheesecake that light feel.
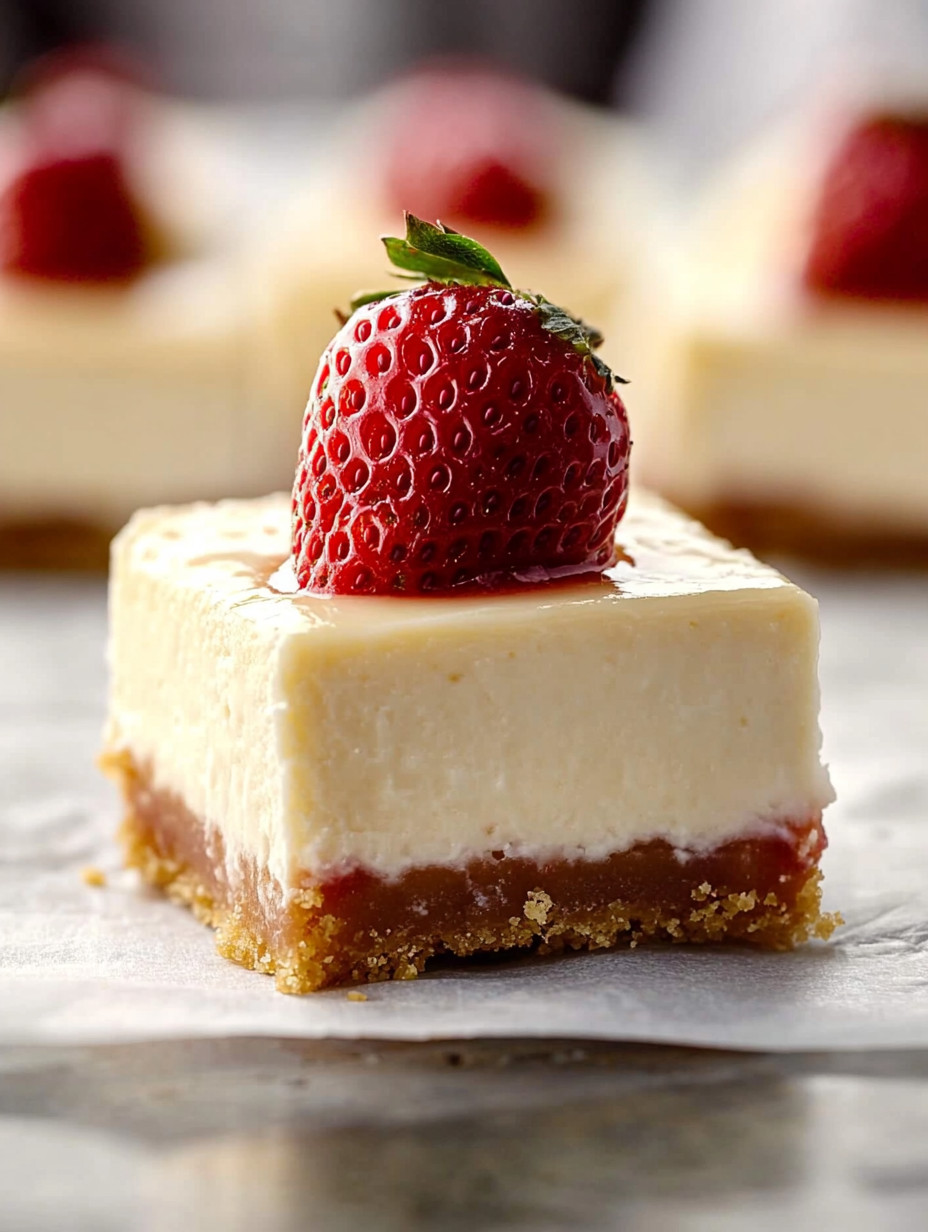
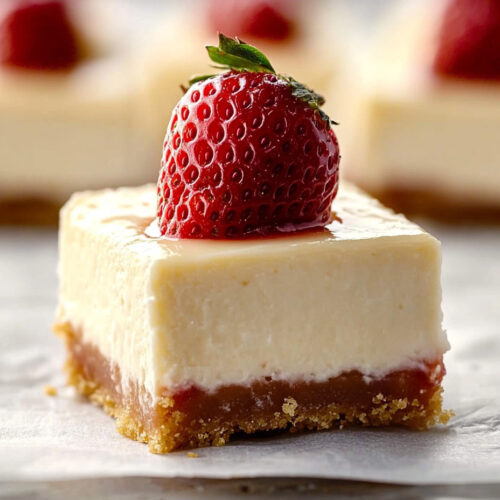
- 1 cup graham cracker crumbs: These make the perfect base for your cheesecakes, giving it that classic cheesecake crust flavor.
- 1/4 cup butter, melted: This binds the crumbs and adds that buttery richness—oh, it’s heavenly!
- Fresh berries (for topping): I love using strawberries or blueberries; they add a pop of color and freshness.
- Optional: chocolate sauce or caramel for drizzling: If you want to take it over the top, this is where you do it!
Cooking Steps:
-
Make the Crust: Start by mixing your graham cracker crumbs and melted butter in a medium bowl. You want every crumb coated nicely. Believe me, this is the foundation of your cheesecake, and you don’t want to skip this step!
-
Chill the Crust: Once mixed, distribute the crumb mixture evenly into mini dessert cups or muffin tins. Press down firmly to create those beautiful little bases. Now, pop them in the fridge while we work on the filling. The chill time is essential, and you’ll thank me later!
-
Prepare the Cheesecake Filling: In a large mixing bowl, beat the softened cream cheese until it’s super smooth. This might take a minute, so don’t rush. After that, gradually mix in the powdered sugar and vanilla extract until everything is well combined. You’ll love how heavenly it smells already!
-
Whip the Cream: In a separate bowl, whip the heavy cream until soft peaks form. This is a crucial step for that airy texture. Gently fold this whipped cream into the cream cheese mixture. Take your time here; we want to keep that fluffiness!
-
Fill the Cups: Now, spoon the fancy cheesecake filling over those chilled crusts, smoothing the tops with a spatula. At this point, you’ll be tempted to eat it straight from the bowl, but hold your horses—that’s not how we do it!
-
Chill and Set: Cover your mini cheesecakes with plastic wrap and place them in the refrigerator for at least 2 hours (or longer if you can resist!). This is where the magic happens. You want them set so they hold up beautifully when you serve them.
-
Top with Berries: Before serving, it’s time to jazz up those cheesecakes! Add fresh berries on top and, if your heart desires, drizzle some chocolate sauce or caramel. It’s all about personal touches, and I adore making them look pretty!
Why I Love Making This Dish
I love making these Mini No-Bake Cheesecakes for countless reasons. Not only are they simple to prepare, but they are also a fantastic way to involve the family. Whether it’s my grandkids or friends, everyone loves pitching in, and it becomes a fun activity. Plus, the best part? You can customize them however you like! Different toppings, flavors, or even crusts—oh, the possibilities are endless!
What You’ll Need
You won’t need any fancy equipment for this, just good old-fashioned items from your kitchen! I recommend having a mixing bowl, measuring cups, a whisk or electric mixer, and mini dessert cups or muffin tins. A spatula will also be your best friend for smoothing out that filling!
Step-by-Step Guide
- First, gather all your ingredients. Trust me; it makes everything easier!
- Next, make that sweet crust by mixing the graham cracker crumbs and melted butter together.
- Chill the crust in the fridge while preparing the cheesecake filling.
- Beat your cream cheese until smooth, then add the powdered sugar and vanilla.
- Whip the heavy cream in a separate bowl until soft peaks form.
- Fold the whipped cream into the cream cheese mixture gently.
- Spoon the mixture on top of the chilled crusts and smooth out the tops.
- Refrigerate for at least 2 hours to set.
- When ready, add your toppings and drizzle with chocolate or caramel if you’re feeling adventurous!
Tips for Perfect Results
- Make sure your cream cheese is at room temperature for the best texture! If it’s too cold, you’ll get lumps in your filling, and nobody wants that.
- Don’t rush the whipping of the heavy cream. It’s all about patience!
- If you want to experiment, try different kinds of cookies for the crust—Oreo crusts are a hit in my house!
Serving Suggestions and Sides
These Mini No-Bake Cheesecakes are perfect on their own, but they can be paired beautifully with fresh fruit salads or a simple scoop of vanilla ice cream. If you have them ready for a family gathering, consider serving them with a nice cup of coffee or tea. It adds a touch of warmth to the experience!
Leftovers
If you happen to have any leftovers (which is a rarity in my home!), they store beautifully in the refrigerator. Just cover them with plastic wrap, and they’ll stay fresh for up to 3 days. I also love to pack them carefully for special lunches. Just think about the smiles on your family’s faces when they discover a sweet surprise!
FAQ Section
Can I use low-fat cream cheese? You can, but trust me, regular cream cheese gives the best texture and flavor! It really makes a difference in the creaminess.
What if I don’t have heavy cream? You can substitute with whipped topping if you’re in a pinch, but the texture won’t be as fluffy. We’re all about that lightness here!
Can I make these ahead of time? Oh, absolutely! In fact, they’re even better when made a day in advance, letting all those flavors meld together.
These Mini No-Bake Cheesecakes have truly become a staple in my home, one that sparks joy and loving memories. I know once you try making these for your family, they’ll be asking for seconds and thirds! It’s such a joy for me to share this recipe with you, and I can’t wait for you to experience the delight it brings.
So, roll up your sleeves and let’s get baking (well, no baking required!). I can’t wait to hear how it turns out for you; I’m always here to share in the excitement of treats and deliciousness. Happy cheesecaking!
Mini No-Bake Cheesecakes
Ingredients
For the Cheesecake Filling
- 1 cup cream cheese, softened This is your star ingredient! It gives the cheesecake that rich and creamy texture we all love.
- 1/4 cup powdered sugar Adds just the right amount of sweetness—make sure to sift it for a smooth texture!
- 1 teaspoon vanilla extract A splash of this magic ingredient elevates the flavors beautifully.
- 1/2 cup heavy cream Whipped to fluffy perfection, it gives the cheesecake that light feel.
For the Crust
- 1 cup graham cracker crumbs These make the perfect base for your cheesecakes, giving it that classic cheesecake crust flavor.
- 1/4 cup butter, melted This binds the crumbs and adds that buttery richness—oh, it’s heavenly!
Toppings
- Fresh berries (for topping) I love using strawberries or blueberries; they add a pop of color and freshness.
- Optional: chocolate sauce or caramel for drizzling If you want to take it over the top, this is where you do it!
Instructions
Prepare the Crust
- Start by mixing your graham cracker crumbs and melted butter in a medium bowl.
- Distribute the crumb mixture evenly into mini dessert cups or muffin tins. Press down firmly to create the crust.
- Chill the crust in the refrigerator while working on the filling.
Make the Cheesecake Filling
- In a large mixing bowl, beat the softened cream cheese until it’s super smooth.
- Gradually mix in the powdered sugar and vanilla extract until well combined.
- In a separate bowl, whip the heavy cream until soft peaks form.
- Gently fold the whipped cream into the cream cheese mixture.
Assemble the Cheesecakes
- Spoon the cheesecake filling over the chilled crusts, smoothing the tops with a spatula.
- Cover the mini cheesecakes with plastic wrap and refrigerate for at least 2 hours to set.
- Before serving, add fresh berries on top and drizzle with chocolate sauce or caramel.