
Every time I bake a loaf of Whole Wheat Bread, it brings me back to my childhood kitchen, where the warm, inviting aroma of fresh bread would greet us as we walked in from the chilly air. There’s something magical about bread, isn’t there? It has this incredible ability to make a house feel like a home. I still remember those cozy afternoons spent kneading dough alongside my mother, her hands dusted with flour and a warm smile lighting up her face. I know that once you try this Whole Wheat Bread recipe, you’ll feel the same warmth and comfort, gathering your family around the table to share slices of goodness slathered in butter or jam.
Now, let’s dive in and make this delicious bread together!
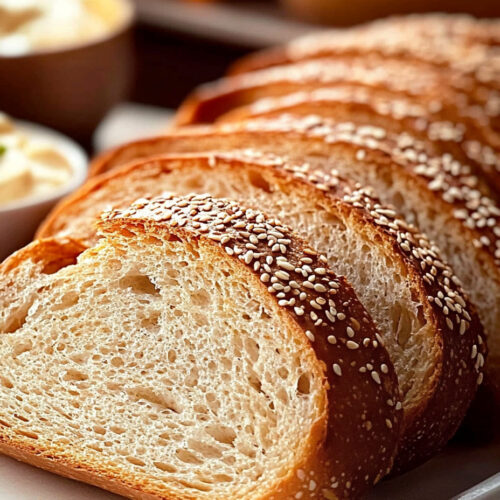
How to make Whole Wheat Bread
Ingredients: To get started, here’s what you’ll need for this nourishing Whole Wheat Bread. Each ingredient plays a special role, so let’s take a closer look.
- 3 cups whole wheat flour: This is the star of the show! Whole wheat flour adds a lovely nutty flavor and is packed with nutrients.
- 1 teaspoon salt: Salt isn’t just for taste; it strengthens the dough’s structure and enhances the overall flavor.
- 2 tablespoons honey or sugar: A bit of sweetness helps the yeast grow and adds a delightful hint of flavor—trust me, you can use either!
- 1 packet active dry yeast: This little packet is what makes the magic happen, giving your bread that wonderful rise.
- 1 cup warm water: The warm water helps activate the yeast, so it’s important to get it just right—not too hot, not too cold!
- 2 tablespoons olive oil or melted butter: This adds moisture and richness, creating a tender crumb. Olive oil keeps it a little lighter!
How to Bring Your Bread to Life
-
Prep Your Yeast: In a small bowl, combine 1 cup of warm water, the packet of active dry yeast, and 2 tablespoons of honey (or sugar if that’s your preference). Give it a little stir, then set it aside for about 5 to 10 minutes. You’re looking for it to get frothy—it’s like magic in a bowl!
-
Mix the Dry Ingredients: In a large mixing bowl, whisk together the whole wheat flour and salt. It’s so important to make sure they are well combined—the salt should be evenly distributed!
-
Combine Wet and Dry: Once your yeast mixture is ready and bubbly, pour it into your flour mixture along with the olive oil (or melted butter). Stir it all together until a dough begins to form. If you find the dough is a bit sticky, sprinkle in a little more flour until it feels just right.
-
Knead the Dough: Now it’s time to give that dough some love! Turn it out onto a floured surface and knead it for about 8 to 10 minutes. You want to make it smooth and elastic—this part always reminds me of those sweet moments in the kitchen with my family.
-
First Rise: Place your kneaded dough in a greased bowl, cover it with a cloth, and let it rise in a warm spot for about 1 to 1.5 hours. This is when the yeast does its magic—it will double in size, and the anticipation is half the fun!
-
Shape the Dough: After it’s risen, gently punch it down to release the air. Then, shape it into a loaf—don’t worry if it’s not perfect; rustic is always charming!
-
Second Rise: Place your shaped loaf in a greased loaf pan. Cover it again and let it rise for another 30 to 45 minutes. Just imagine the smell filling your home soon!
-
Preheat Your Oven: While the dough is rising for the second time, preheat your oven to 350°F (175°C). Trust me, the right temperature is key!
-
Bake the Bread: Once the dough has risen again, pop the loaf into the oven for about 30 to 35 minutes, or until it sounds hollow when tapped. You’ll want to keep an eye on it—the aroma will be hard to resist!
-
Cool Down: After baking, allow the bread to cool on a wire rack before slicing. This part is important; it helps the bread finish baking and makes slicing it so much easier!
Why I Love Making This Dish: There’s something incredibly satisfying about baking bread at home. It’s like therapy for me! The feel of the dough, the smell of it baking, and the joy of sharing it with my family make it all worthwhile. When I serve this Whole Wheat Bread, I can see the smiles on my loved ones’ faces as they take that first heavenly bite. It’s a simple act, but it feels so nourishing to my soul.
What You’ll Need: You won’t need much to make this bread, but here are a few helpful tools: a large mixing bowl, a floured surface for kneading, a loaf pan, and a wire rack for cooling. A wooden spoon works wonders for mixing, but you can always use your hands if you’d like to feel connected to the dough!
Tips for Perfect Results:
- Make sure your water is warm but not hot! Too hot, and it’ll kill the yeast.
- Knead your dough long enough for that incredible elastic texture.
- Don’t rush the rising times. Good things come to those who wait!
- If you like, you can add seeds or oats for extra texture and flavor.
Serving Suggestions and Sides: There’s no wrong way to enjoy this Whole Wheat Bread! I love to eat it warm with a slather of butter or homemade jam—yum! It’s also perfect for sandwiches. Try it with turkey and avocado, or even just a simple slice topped with peanut butter for a snack. I’ll tell you, it never lasts long in our house!
Leftovers: If you’re lucky enough to have some leftovers, storing this bread is easy. Wrap it tightly in plastic wrap or place it in an airtight container. It’ll stay fresh for a few days at room temperature. You can also freeze it! Just slice it before freezing, and pull out pieces as needed. Toasting slices straight from the freezer is a delightful way to enjoy it!
FAQ Section:
-
Can I use all-purpose flour instead of whole wheat flour? Absolutely! But remember, it’ll change the flavor and texture a bit. Whole wheat adds that lovely nuttiness.
-
What if my yeast doesn’t bubble? Don’t worry! It might not be active. Make sure you’re using fresh yeast and warm water.
-
Can I double the recipe? You sure can! Just make sure you have a big enough bowl for that dough to rise.
This Whole Wheat Bread recipe has become a favorite in my home, and I can’t wait for you to try it. I know it’ll bring warmth and joy to your table just like it does for mine. Happy baking! If your family asks for seconds, you’ll know you’ve nailed it! Let me know how it goes; I always love hearing your stories and experiences in the kitchen.
Whole Wheat Bread
Ingredients
Dry Ingredients
- 3 cups whole wheat flour Adds a lovely nutty flavor and is packed with nutrients.
- 1 teaspoon salt Strengthens dough's structure and enhances flavor.
Wet Ingredients
- 2 tablespoons honey or sugar Helps yeast grow and adds flavor.
- 1 packet active dry yeast Makes the bread rise.
- 1 cup warm water Helps activate the yeast.
- 2 tablespoons olive oil or melted butter Adds moisture and richness.
Instructions
Preparation
- In a small bowl, combine 1 cup of warm water, the packet of active dry yeast, and 2 tablespoons of honey (or sugar). Stir and set aside for 5 to 10 minutes until frothy.
- In a large mixing bowl, whisk together the whole wheat flour and salt until well combined.
- Once the yeast mixture is bubbly, pour it into the flour mixture along with the olive oil (or melted butter). Stir until a dough begins to form.
- If the dough is sticky, sprinkle in a little more flour until it feels just right.
Kneading and Rising
- Turn the dough out onto a floured surface and knead for about 8 to 10 minutes until smooth and elastic.
- Place the kneaded dough in a greased bowl, cover with a cloth, and let it rise in a warm spot for 1 to 1.5 hours until doubled in size.
- After it has risen, gently punch the dough down to release the air. Shape it into a loaf.
- Place the shaped loaf in a greased loaf pan, cover, and let it rise for another 30 to 45 minutes.
Baking
- Preheat your oven to 350°F (175°C) while the dough is rising for the second time.
- Once risen, bake the loaf in the oven for about 30 to 35 minutes, or until it sounds hollow when tapped.
- Allow the bread to cool on a wire rack before slicing.