
Every time I make this No Knead Bread, it fills my heart with warmth and nostalgia. I can still hear my mother’s voice as I watched her bake her own version many years ago. The smell that wafts through the kitchen when this bread is in the oven brings back memories of family gatherings and cozy evenings spent together. There’s something magical about homemade bread that just makes a house feel like a home.
You know those days when you want to make something comforting but don’t have hours to spend in the kitchen? That’s where this No Knead Bread comes in! It’s so delightfully simple and requires minimal effort, letting you enjoy the process without the stress. And I promise, once you try it, you’ll be hooked! You’ll find yourself wanting to bake it every week, just like I do.
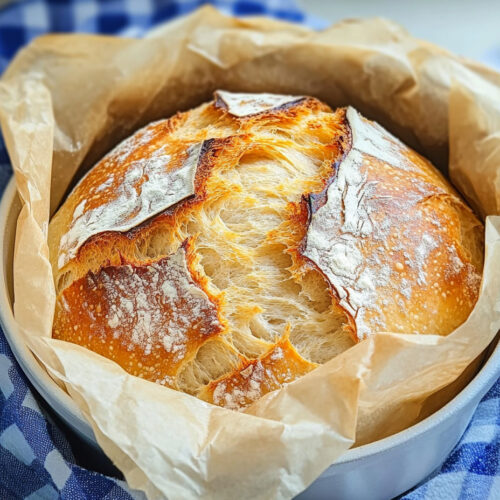
How to make No Knead Bread
Ingredients:
- 3 cups all-purpose flour: This is the main ingredient that forms the base of your bread. Using all-purpose flour gives you that perfect texture.
- 1/4 teaspoon instant yeast: This is what helps your bread rise, creating that fluffy center we all love.
- 1 1/4 teaspoons salt: Salt not only adds flavor but also strengthens your dough.
- 1 1/2 cups warm water: This helps activate the yeast and brings everything together.
Now, I often add a sprinkle of dried herbs like rosemary or thyme. It really elevates the flavor and makes the kitchen smell divine! Don’t worry if you don’t have herbs; the bread is incredible on its own too.
Cooking Steps:
-
Mix Dry Ingredients: Start by grabbing a large mixing bowl. Combine the 3 cups of all-purpose flour, 1/4 teaspoon of instant yeast, and 1 1/4 teaspoons of salt. Stir them together to make sure they are well mixed. This is the base of your bread, so give it a good whirl!
-
Add Warm Water: Now it’s time to add in 1 1/2 cups of warm water. Gently stir the mixture until you see a shaggy dough starting to form. Don’t worry if it looks a little messy at this point; that’s perfectly okay!
-
Cover and Let it Rest: Cover the bowl with a piece of plastic wrap or a clean kitchen towel. You’ll want to let it rest at room temperature for 12 to 18 hours. This long wait is where all the magic happens, allowing the flavors to develop and the dough to rise.
-
Preheat the Oven: When the resting period is almost over, preheat your oven to 450°F (230°C). This is usually when I get excited because I know soon my kitchen will be filled with the most amazing smell!
-
Prepare the Pot: Place a heavy pot (with a lid) in the oven while it preheats. It’s really important to have a hot pot ready for your dough. This will help create steam, which is essential for that crispy crust!
-
Shape the Dough: After your dough has rested, turn it out onto a floured surface. Gently shape it into a ball, being careful not to deflate it too much. Take a moment to admire your work; doesn’t it look beautiful?
-
Transfer to Pot: Once your pot is hot, carefully remove it from the oven. Place your dough ball inside and cover with the lid. Make sure you’re cautious – that pot is really hot!
-
Bake Covered: Bake your bread for 30 minutes with the lid on. This step traps all the moisture, ensuring a perfect crumb texture.
-
Bake Uncovered: After 30 minutes, take off the lid and let it bake for an additional 15 to 20 minutes. Keep an eye on it, as you want it to turn a lovely golden brown. This part truly tests your patience, but trust me, the reward is worth it!
-
Cool and Slice: Once it’s done, remove the pot from the oven and allow the bread to cool slightly before slicing. I often find this to be the hardest part—waiting for it to cool while the delicious aroma fills the kitchen.
Why I Love Making This Dish:
This No Knead Bread has a special place in my heart. Not only is it a conversation starter at my dinner table, but it also gives me a delightful sense of achievement every time I pull a warm loaf from the oven. My family loves when I make this, and honestly, so do I. It’s a simple recipe that brings us together. Whether it’s with soup on a chilly day or topped with butter and jam for breakfast, this bread is always a winner.
What You’ll Need:
For this recipe, you won’t need any fancy tools. Just a bowl for mixing, a measuring cup, a wooden spoon (or something to stir with), and a heavy pot with a lid. I always prefer using a cast iron Dutch oven, but any heavy pot that can withstand high temperatures will work just fine.
Step-by-Step Guide:
- Start by mixing the dry ingredients in your bowl.
- Pour in the warm water and stir until combined.
- Cover and let the dough rest for 12 to 18 hours.
- Preheat your oven to 450°F (230°C) and place your heavy pot inside.
- Shape your dough into a ball and carefully place it in the hot pot.
- Bake it covered for 30 minutes.
- Remove the lid and bake for another 15 to 20 minutes until golden brown.
- Let it cool before slicing and enjoy!
Tips for Perfect Results:
To get the crispiest crust possible, make sure your pot is really hot when you add your dough. I love to sprinkle a little extra salt on top right before baking—it gives it that artisanal touch! You can also play around with flavor by adding herbs or cheese; the possibilities are endless!
Serving Suggestions and Sides:
This bread pairs wonderfully with a steaming bowl of soup or can be used to make a scrumptious sandwich. It also works beautifully as a base for bruschetta topped with tomatoes and basil. Just thinking about it makes my mouth water!
Leftovers:
If you’re lucky enough to have leftovers (though I often don’t), just wrap them in a paper towel and keep them in a bag or container. They’ll stay fresh for a couple of days. I usually pop mine in the oven for a few minutes to refresh the crust before enjoying it again!
FAQ Section:
Can I use bread flour instead of all-purpose flour? Absolutely! I’ve tried both, and it works wonderfully. You might get a chewier texture, which some folks really love.
What if I forget to add salt? While it’s not the end of the world, salt plays an important role in flavor. I promise you’ll notice a difference, as the bread will taste a little bland.
Can I add mix-ins, like herbs or cheese? Oh, for sure! I often add a blend of herbs when I’m feeling adventurous, and it makes such a difference! Just remember that adding ingredients can change the texture slightly, so adjust your water if needed.
Conclusion:
I hope you feel inspired to try this No Knead Bread! It’s become a staple in my kitchen, and I can’t wait for you to discover how easy and rewarding it is. The best part is how it brings my family together around the dinner table, and I know yours will love it too. Please let me know how it turns out for you. I’m excited for you to share in the joy of baking this bread. Trust me, once you taste that warm, fresh loaf, you’ll be reaching for it again and again! Enjoy every delicious bite!
No Knead Bread
Ingredients
Dry Ingredients
- 3 cups all-purpose flour This is the main ingredient that forms the base of your bread.
- 1/4 teaspoon instant yeast This helps your bread rise.
- 1 1/4 teaspoons salt Strengthens the dough and adds flavor.
Wet Ingredients
- 1 1/2 cups warm water Helps activate the yeast and bring everything together.
Optional Flavorings
- to taste dried herbs (e.g., rosemary or thyme) Elevates flavor and aroma.
Instructions
Preparation
- Start by mixing the dry ingredients in a large mixing bowl: 3 cups of all-purpose flour, 1/4 teaspoon of instant yeast, and 1 1/4 teaspoons of salt. Stir well.
- Add 1 1/2 cups of warm water and gently stir until a shaggy dough forms.
- Cover the bowl with plastic wrap or a kitchen towel and let it rest at room temperature for 12 to 18 hours.
Baking
- Preheat your oven to 450°F (230°C) and place a heavy pot (with a lid) inside to heat up.
- Turn the rested dough onto a floured surface and shape it into a ball.
- Carefully remove the hot pot from the oven, place the dough ball inside, and cover with the lid.
- Bake covered for 30 minutes.
- After 30 minutes, remove the lid and bake for an additional 15 to 20 minutes until golden brown.
- Let the bread cool slightly before slicing.