
Every time I make Taco-Stuffed Shells, I am transported back to those warm Sunday dinners with family, where laughter mingled with the aroma of hearty food filling the air. I can still hear my mother bustling around the kitchen, her laughter bubbling up as she layered meal upon meal, bringing us all closer together. Cooking for my family has always been a way to share love, stories, and create memories, and Taco-Stuffed Shells hold a special place in my heart.
Just imagine the scene: the table is set, candles flickering, and everyone eagerly waiting for that first bite. The combination of flavors as the ground beef meets the spicy salsa, all wrapped snugly in a pasta shell, is sheer magic. I know that once you try this dish, you’ll feel that same warmth and comfort that I do. It’s more than just a meal; it’s a celebration of family, food, and connection.
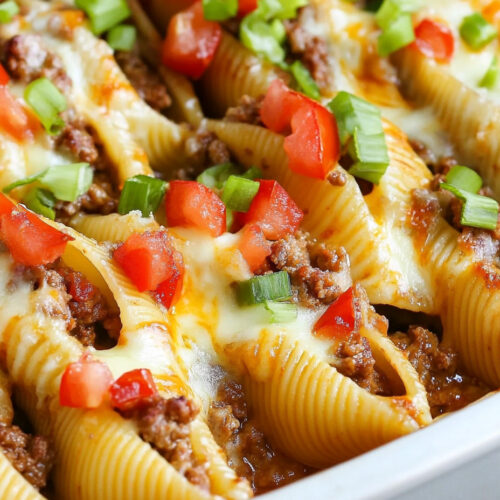
How to make Taco-Stuffed Shells
Ingredients: Let’s delve into the simple yet flavorful ingredients that make this dish so special. Each one plays a crucial role in creating a comforting meal that warms your heart and your belly. Here's what you'll need:
- Jumbo pasta shells: These are the stars of the show! They're perfect for holding all the delicious fillings.
- Ground beef: This is what provides that hearty, savory flavor that makes the dish satisfying.
- Onion: A little bit of chopped onion goes a long way in enhancing the taste, adding a sweet and aromatic depth.
- Salsa: Use your favorite salsa to bring in that zesty kick. It’s the perfect addition to meld the flavors together.
- Cheddar cheese: I love how the sharpness of cheddar blends beautifully with our filling.
- Monterey Jack cheese: This cheese melts wonderfully, giving a creamy texture that binds everything together.
- Additional cheese for topping: You can never have too much cheese, right? Trust me, a little extra melted on top makes all the difference.
Each ingredient contributes to a symphony of flavors that I know you will adore. And if you want to swap out any of them for something else—like using ground turkey or chicken instead of beef—go for it! Cooking should be a joyful expression of what you love.
Cooking Steps:
-
Preheat your oven: Start by preheating your oven to 350°F (175°C). Trust me, this is key to getting everything perfectly cooked. You want that cheese bubbly and golden!
-
Cook the pasta shells: Bring a large pot of salted water to a boil. Carefully add the jumbo pasta shells. Cook them according to the package instructions until they’re al dente. Remember, they will bake further, so don’t overcook them! After cooking, drain and set them aside.
-
Brown the ground beef: In a skillet, heat a bit of oil over medium heat. Add the ground beef and cook until it’s browned, breaking it apart with a spatula. This step brings out all that glorious flavor. Make sure to drain any excess fat; you want to keep the filling light.
-
Add the onions: Toss in the chopped onion. Stir it well with the beef. Let the onion soften for about five minutes. You’ll love the smell of the savory beef and sweet onion wafting through your kitchen—pure heaven!
-
Introduce the salsa: This is where the magic begins! Pour in the salsa and mix it all together. Allow it to simmer for a few minutes. This will help meld the flavors, and I promise you’ll want to steal a bite.
-
Stuff those shells: Take a generous spoonful of the beef mixture and carefully stuff it into each cooked pasta shell. Place them upright in a baking dish, and don’t be shy with the filling. It’s all about the flavor!
-
Top with cheeses: Once all the shells are filled, sprinkle the cheddar and Monterey Jack cheese on top. I like to give it a generous layer because who doesn’t love a cheesy topping?
-
Bake it: Cover the dish with foil and bake in the preheated oven for about 20 minutes. After that, remove the foil, and let it bake for another 10 minutes until the cheese is bubbly and golden.
-
Serve and enjoy: Once done, take it out of the oven and let it cool for a few minutes. Serve it up with a fresh garden salad or some tortilla chips, and watch your family dive into it with delight!
Why I Love Making This Dish: This recipe is special to me because it marries the comfort of a classic Italian dish with the zesty flavors of Mexican cuisine. It reminds me of family gatherings filled with laughter and stories shared over food. Each bite is a little adventure, and the best part is seeing the smiles on my loved ones' faces as they savor every mouthful.
What You’ll Need: For this recipe, you really don’t need any fancy tools. Just a large pot for boiling the pasta, a skillet, and a baking dish will do. But here’s a little tip: using a sturdy spatula is crucial for mixing the filling evenly—you don’t want any clumps.
Step-by-Step Guide:
- Start by preheating the oven. This is essential, so you get perfectly melted cheese and a lovely golden color.
- Cook those pasta shells until they’re just right. They should hold their shape but have a soft enough bite that it feels like a hug in your mouth.
- Brown up the ground beef with the onions until you can’t resist the fragrance wafting through your kitchen.
- Stir in that salsa, letting it simmer just enough for all the flavors to mingle.
- Stuff those shells with as much filling as you can. Seriously, don’t be shy!
- Top it all off with loads of cheese.
- Bake and wait—trust me; the wait is worth it!
- Finally, slice into it and serve while it’s still warm, and don’t forget to enjoy it with family or friends.
Tips for Perfect Results: One little trick I’ve discovered over the years is to add some chopped fresh herbs like cilantro or parsley to the filling. It adds a burst of freshness that contrasts beautifully with the rich meat and cheese. Also, consider using a mix of salsas—maybe a mild one and a spicy one. This gives your shells a complex flavor profile that keeps everyone guessing and coming back for more!
Serving Suggestions and Sides: I love pairing these Taco-Stuffed Shells with a simple side salad made with fresh greens and a light vinaigrette. It cuts through the richness of the cheese and beef nicely. Sometimes, I throw in some Mexican street corn on the side for that extra pop of flavor. And don’t forget to have some sour cream and guacamole on hand for that creamy touch!
Leftovers: If you’re lucky enough to have leftovers, don’t worry! Simply store them in an airtight container in the fridge. They should keep for up to three days. To reheat, just pop them in the oven at 350°F for about 15–20 minutes or until heated through. The cheese may get a little melty again, and it’ll taste just as wonderful!
Emotional Engagement: I can’t stress enough how much joy this dish brings me. When I first served it to my family, their faces lit up, and they couldn’t stop talking about how good it was! You’re going to love this recipe, and I can’t wait for you to experience the warmth and smiles it creates around your dinner table.
FAQ Section: Can I use turkey instead of beef? Absolutely! Ground turkey is a wonderful alternative and makes the dish a bit lighter. I’ve made it this way, and it’s just as delicious.
What if I don’t have jumbo shells? If you can’t find jumbo shells, don’t fret! You can use regular pasta, like penne or rigatoni. Just adjust the cooking time accordingly.
Can I make this dish ahead of time? Yes, you can prepare the shells and the filling ahead of time. Just store them separately in the fridge, and when you’re ready, stuff and bake them!
Is there a vegetarian option? Of course! You can easily replace the meat with a mix of black beans, corn, and diced vegetables for a delightful vegetarian version. Just be sure to season it well!
Conclusion: Making Taco-Stuffed Shells is not just about following a recipe; it’s about creating memories and sharing love through food. This dish has become a cherished favorite in my household, and I’m so excited for you to try it. I know you’ll love the flavors, the warmth, and the way it brings everyone together at the table. Let me know how it turns out when you make it, and if your family starts asking for seconds just like mine does every time, you’ll know you’ve created something special! Happy cooking!
Taco-Stuffed Shells
Ingredients
Pasta and Filling Ingredients
- 20 pieces Jumbo pasta shells These are the stars of the show!
- 1 pound Ground beef Provides hearty, savory flavor.
- 1 medium Onion, chopped Enhances the taste and adds depth.
- 1 cup Salsa Use your favorite for zesty kick.
- 1 cup Cheddar cheese, shredded Adds sharpness to the filling.
- 1 cup Monterey Jack cheese, shredded Melts beautifully for creamy texture.
- 1/2 cup Additional cheese for topping More cheese on top makes a difference!
Instructions
Preparation
- Preheat your oven to 350°F (175°C).
- Bring a large pot of salted water to a boil. Add the jumbo pasta shells and cook until al dente. Drain and set aside.
- In a skillet, heat oil over medium heat. Brown the ground beef, breaking it apart. Drain any excess fat.
- Add the chopped onion to the skillet and cook for about 5 minutes until softened.
- Stir in the salsa and allow it to simmer for a few minutes.
- Stuff each pasta shell with the ground beef mixture and place them upright in a baking dish.
- Sprinkle the shredded cheddar and Monterey Jack cheese on top.
- Cover with foil and bake for 20 minutes. Remove the foil and bake for an additional 10 minutes until the cheese is bubbly and golden.
Serving
- Allow the dish to cool for a few minutes before serving.
- Pair with a fresh garden salad or tortilla chips.