
Every time I make Toasted Ravioli, it takes me back to the kitchen table of my childhood, where my mother would tell stories while she cooked—her laughter intertwining with the fragrance of melting cheese and crunchy breadcrumbs. The smell alone brings warmth to my heart, and I can almost hear the clinking of forks against plates as family members gather around, excited to share a meal together. There’s something so comforting about sinking your teeth into a perfectly fried ravioli, with that gooey cheese filling and a hint of Italian seasoning. It’s not just food; it’s a gateway to memories and good times shared. I know once you try this dish, you’ll feel that same warmth and comfort!
Now, let’s dive into how to create these delightful bites of goodness in your own kitchen. I promise, it’s easier than you might think.
Ingredients:
- Ravioli: You can choose fresh or frozen, but I prefer frozen for convenience. They’re typically filled with ricotta cheese or meat, adding a rich taste.
- Bread crumbs: I always use Italian-style breadcrumbs because they add that extra flavor. You could also make your own from leftover bread if you have some lying around!
- Italian seasoning: This is key for giving your ravioli that authentic kick. It’s a blend of dried herbs, like oregano and basil, that just brings everything together beautifully.
- Parmesan cheese: A sprinkle of this creates that wonderful creamy finish that compliments the crispy exterior.
- Marinara sauce: This is perfect for dipping or drizzling on top. You can use store-bought or make your own if you’re feeling adventurous.
- Oil for frying: A neutral oil, like vegetable oil, works best here. It has a high smoke point, ensuring perfect frying without any off flavors.
Cooking Steps:
-
Prep Your Oil: First, fill a large pot with oil. You want to heat that oil to 350°F (175°C). This step is vital because it creates that perfect crispy texture. Use a thermometer if you have one; it makes a difference!
-
Mix the Bread Crumbs and Seasoning: While the oil is heating, take a moment to mix the breadcrumbs with the Italian seasoning in a bowl. This way, they’ll be well combined for an even flavor on your ravioli.
-
Coat Your Ravioli: Get a plate ready, and take your chilled ravioli from the freezer. Dip each one into the breadcrumb mixture. Press gently so they’re well-coated. You’ll love how the sound of the crunch can already be imagined!
-
Fry to Perfection: When the oil is hot, carefully drop the ravioli into the pot one by one. Let them fry for about 3-4 minutes, turning them occasionally until they’re golden brown. Trust me, the smell will make your mouth water!
-
Drain and Cool: Once golden, remove them with a slotted spoon and place them on paper towels to drain any excess oil. This is when the anticipation builds as you wait.
-
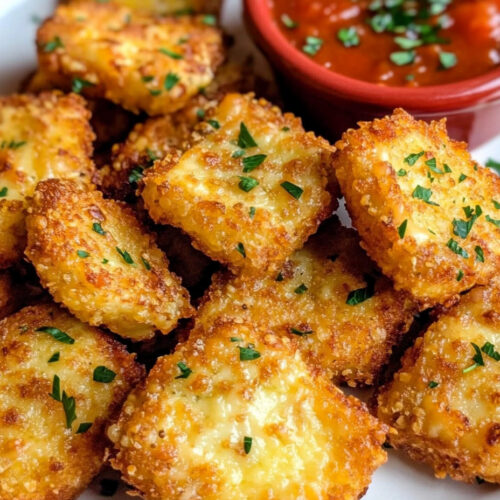
Serve with Marinara: Lastly, serve them hot! I love to arrange them on a platter with a small bowl of warm marinara sauce for dipping. A sprinkle of Parmesan cheese on top is just the cherry on the cake, or should I say, the cheese on the ravioli!
Why I Love Making Toasted Ravioli:
Toasted Ravioli holds a special place in my heart. It’s not just about the food; it’s about the memories created in the kitchen. I remember attempting to make these during a rainy afternoon with my granddaughter. We laughed and got flour all over the kitchen, but the joy was contagious. Each bite reminds me of that special time spent together. The dish has become a go-to for family gatherings because everyone loves it. It’s so versatile—you can serve them as an appetizer or enjoy them as the main dish, paired with a light salad on the side.
What You’ll Need:
- A deep pot for frying (I use an old Dutch oven that has seen many meals!)
- A slotted spoon for removing the ravioli
- Paper towels for draining
- A thermometer to monitor the oil temperature if you have one (it’s not mandatory but very helpful)
Step-by-Step Guide:
- Start by heating your oil—this is key for that crispy skin!
- Mix your bread crumbs with seasoning while waiting for the oil to heat.
- Coat each ravioli properly; you want that crunch!
- Fry them carefully, don’t overcrowd!
- Drain them once golden brown.
- Serve with a smile and enjoy the joy on your loved ones’ faces!
Tips for Perfect Results:
- Make sure your oil is hot enough; this is a must! A thermometer is your best friend here.
- Don’t overcrowd the pot when frying. You want them to fry evenly without steaming, which could happen if they’re too close together.
- If you can, let the breaded ravioli sit in the fridge for about 30 minutes before frying. It helps the coating stick better!
Serving Suggestions and Sides:
Toasted Ravioli can stand proudly on its own, but I love to pair it with a fresh arugula salad drizzled with a lemon vinaigrette for a bit of brightness. Grilled vegetables also complement the dish beautifully. Of course, garlic bread is always a winner in my house.
Leftovers:
If you happen to have any leftovers (which is rare in my house), store them in an airtight container in the fridge for up to 3 days. To reheat, pop them in the oven at 350°F (175°C) for about 10 minutes, and they’ll crisp up nicely again—no soggy ravioli here!
FAQ Section:
Can I use any kind of ravioli? You certainly can! I recommend sticking with cheese or meat-filled ravioli for the best flavor.
What if I don’t have Italian seasoning? No worries! You can use any mix of dried herbs you have on hand, like basil, oregano, and thyme.
Can I bake these instead of frying? Yes, you can bake them for a healthier option. Just preheat your oven to 400°F (200°C), place them on a baking sheet, and bake until golden brown.
This dish has become a favorite in my house, and I’m so excited for you to try it. I know you’ll love it as much as I do! Let me know how it turns out, and if your family asks for seconds, just like mine does every time. Enjoy this labor of love, and don’t forget to share the smiles that come with every delicious bite.
Toasted Ravioli
Ingredients
Main Ingredients
- 16 oz frozen ravioli Preferably cheese or meat-filled.
- 1 cup Italian-style breadcrumbs Homemade breadcrumbs are an option if you have leftover bread.
- 2 tsp Italian seasoning Key for authentic flavor.
- 1/2 cup Parmesan cheese For sprinkling on top before serving.
- 1 cup marinara sauce For dipping or drizzling.
- 4 cups oil for frying Use neutral oil like vegetable oil.
Instructions
Preparation
- Fill a large pot with oil and heat it to 350°F (175°C).
- In a bowl, mix the breadcrumbs with the Italian seasoning.
- Take the frozen ravioli and dip each piece into the breadcrumb mixture, ensuring they are well-coated.
Frying
- Carefully drop the coated ravioli into the hot oil, frying them one by one for about 3-4 minutes until golden brown.
- Use a slotted spoon to remove the fried ravioli and drain them on paper towels.
Serving
- Serve the toasted ravioli hot, arranged on a platter with a small bowl of warm marinara sauce for dipping.
- Sprinkle with Parmesan cheese before serving.